Meat a Meat: The Ultimate Guide to Cuts & Cooking
Ingredients
Scale
From ribeye to round, here's the no-nonsense meat a meat guide every home cook needs, plus a foolproof pan-seared steak that nails restaurant results.
meat a meat is really about confidence: knowing which cut to buy, how to cook it, and when to pull it from the heat so dinner lands juicy, tender, and deeply flavorful. Whether you are standing at the butcher counter eyeing a marbled ribeye or wondering if that chuck roast can become Sunday supper, the secret is matching the meat to the method.
This guide walks through the big picture first—cuts, texture, marbling, heat, internal temperature—then brings it home with a simple pan-seared steak you can make tonight. Think of it as your friendly kitchen roadmap, with enough detail to help you troubleshoot without turning dinner into a science project.
By the end, you will understand the best cuts of beef for quick searing, which tougher cuts need time, and how to use a thermometer like a pro. You will also find plain-English cues for doneness, so you can stop guessing and start serving the steak, roast, chop, or chicken piece you actually wanted.
At its simplest, this phrase is shorthand for choosing and cooking meat with intention. A tenderloin, a brisket, a pork shoulder, and a chicken thigh are not interchangeable, even if they all look like “protein” on a grocery list. Each cut has its own ratio of muscle fibers, connective tissue, fat, and bone, which determines whether it wants a fast sear, a gentle braise, or a long roast.
Cut selection changes everything because tenderness is not just about price; it is about how much work that muscle did on the animal. Rib and loin cuts tend to be tender because they do less heavy lifting, while shoulder, chuck, round, and brisket work harder and develop more connective tissue. That connective tissue can feel tough if rushed, but when cooked low and slow, it melts into gelatin and creates that spoon-tender, savory richness we crave in pot roast or pulled pork.
Flavor follows a similar logic. Marbling—the thin white streaks of intramuscular fat—bastes meat from the inside as it cooks, giving steaks like ribeye their lush, buttery character. Leaner cuts can still be delicious, but they need careful timing, added fat, marinades, or slicing against the grain to stay pleasant on the plate.
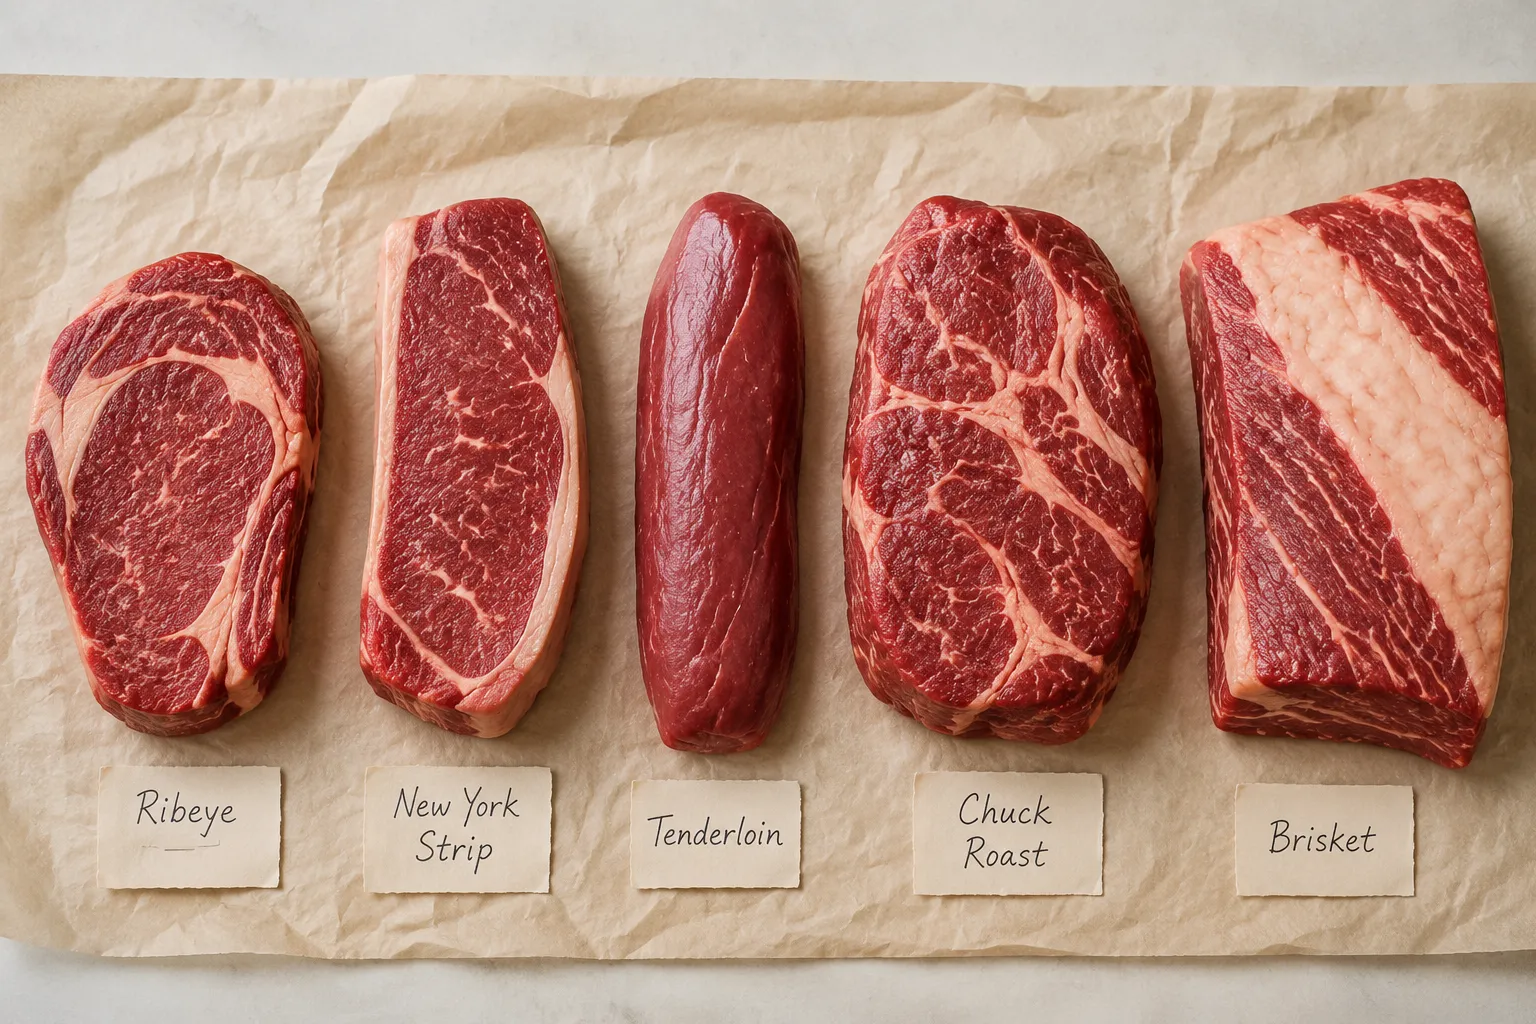
Beef is where many cooks first feel overwhelmed, so start with the major families. Chuck comes from the shoulder and is ideal for braises, stews, and roasts; rib gives us ribeye and prime rib; loin includes strip steak, T-bone, porterhouse, and tenderloin; round is lean and comes from the rear leg; brisket is the breast; short plate includes skirt steak; and flank is a lean, grainy cut from the abdominal area. If you have ever searched for a guide to cuts of beef, this is the practical version: tender cuts cook quickly, working cuts need time.
Pork has its own rhythm. Shoulder is rich, forgiving, and perfect for slow roasting or braising; loin is leaner and best treated gently; belly gives us bacon and luscious roasted slabs; and ribs love smoke, spice, and patient heat. Pork chops can be wonderful, but because modern pork is often lean, they benefit from brining, accurate temperature checks, and a short rest before slicing.
Chicken and turkey are simpler, but the same rules still apply. Breast meat is lean and cooks fast, while thighs, wings, and drumsticks contain more connective tissue and fat, making them more forgiving and flavorful. Dark meat can handle roasting, grilling, and braising beautifully, while breast meat usually shines when cooked just to temperature and not a minute longer.
Quick high-heat cooking belongs to naturally tender cuts: ribeye, strip steak, filet mignon, pork chops, lamb chops, chicken cutlets, and tenderloin. These cuts do well with searing, grilling, broiling, or roasting because they do not need hours to become tender. The goal is a deeply browned outside and a juicy center, which means preheating the pan or grill properly and avoiding constant flipping or poking.
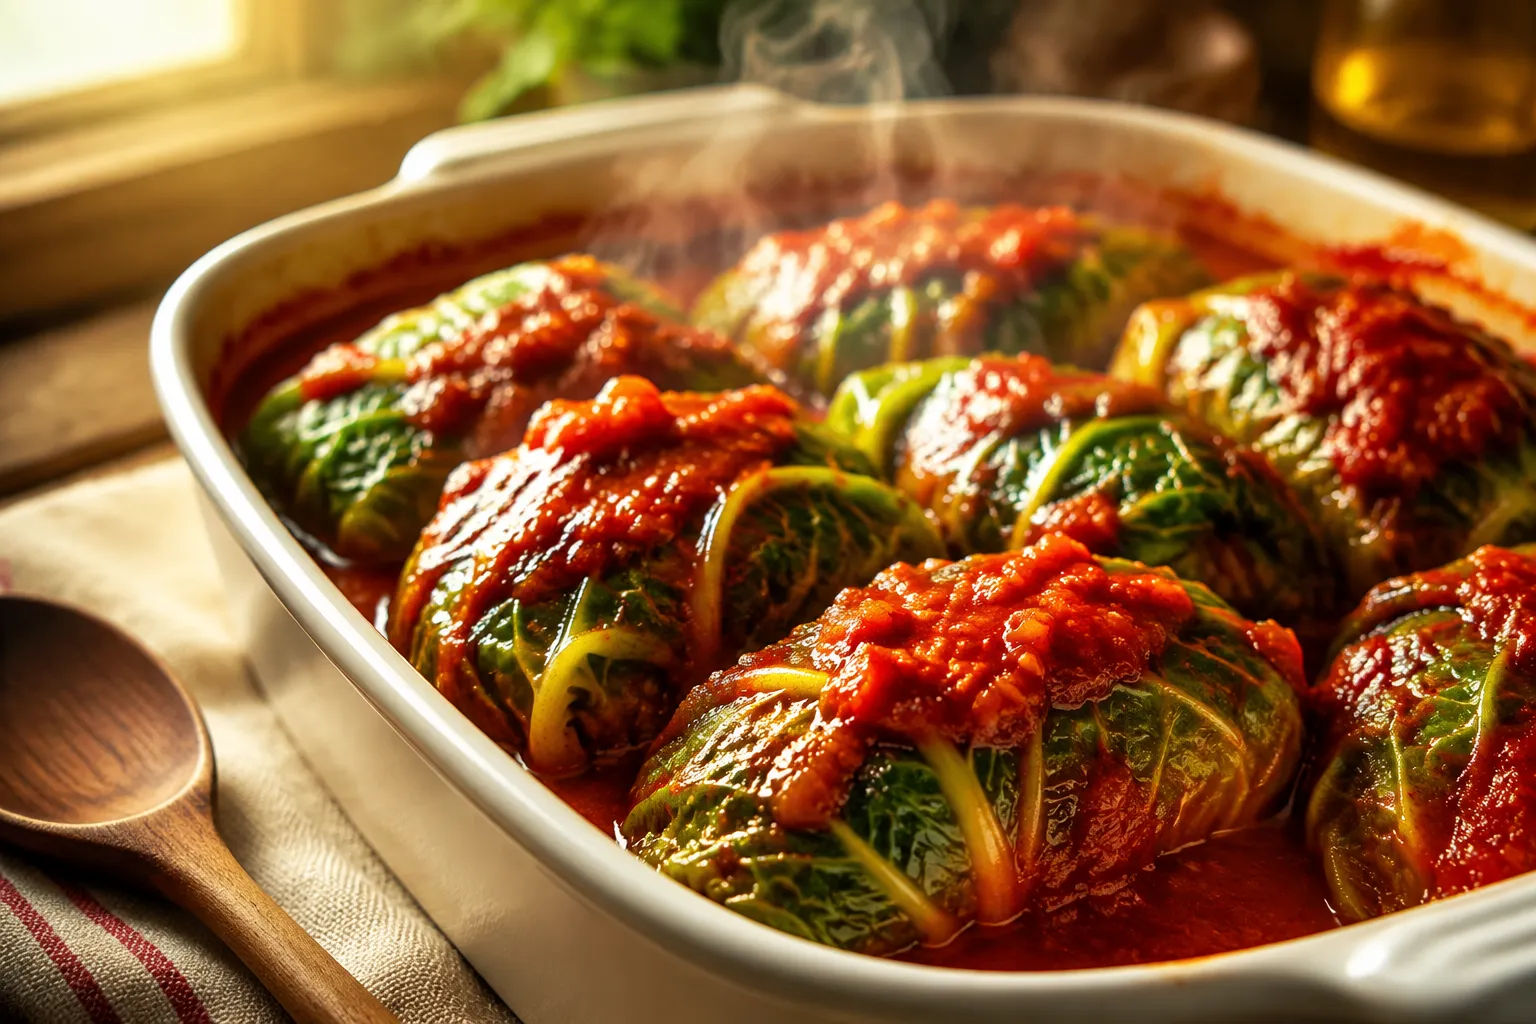
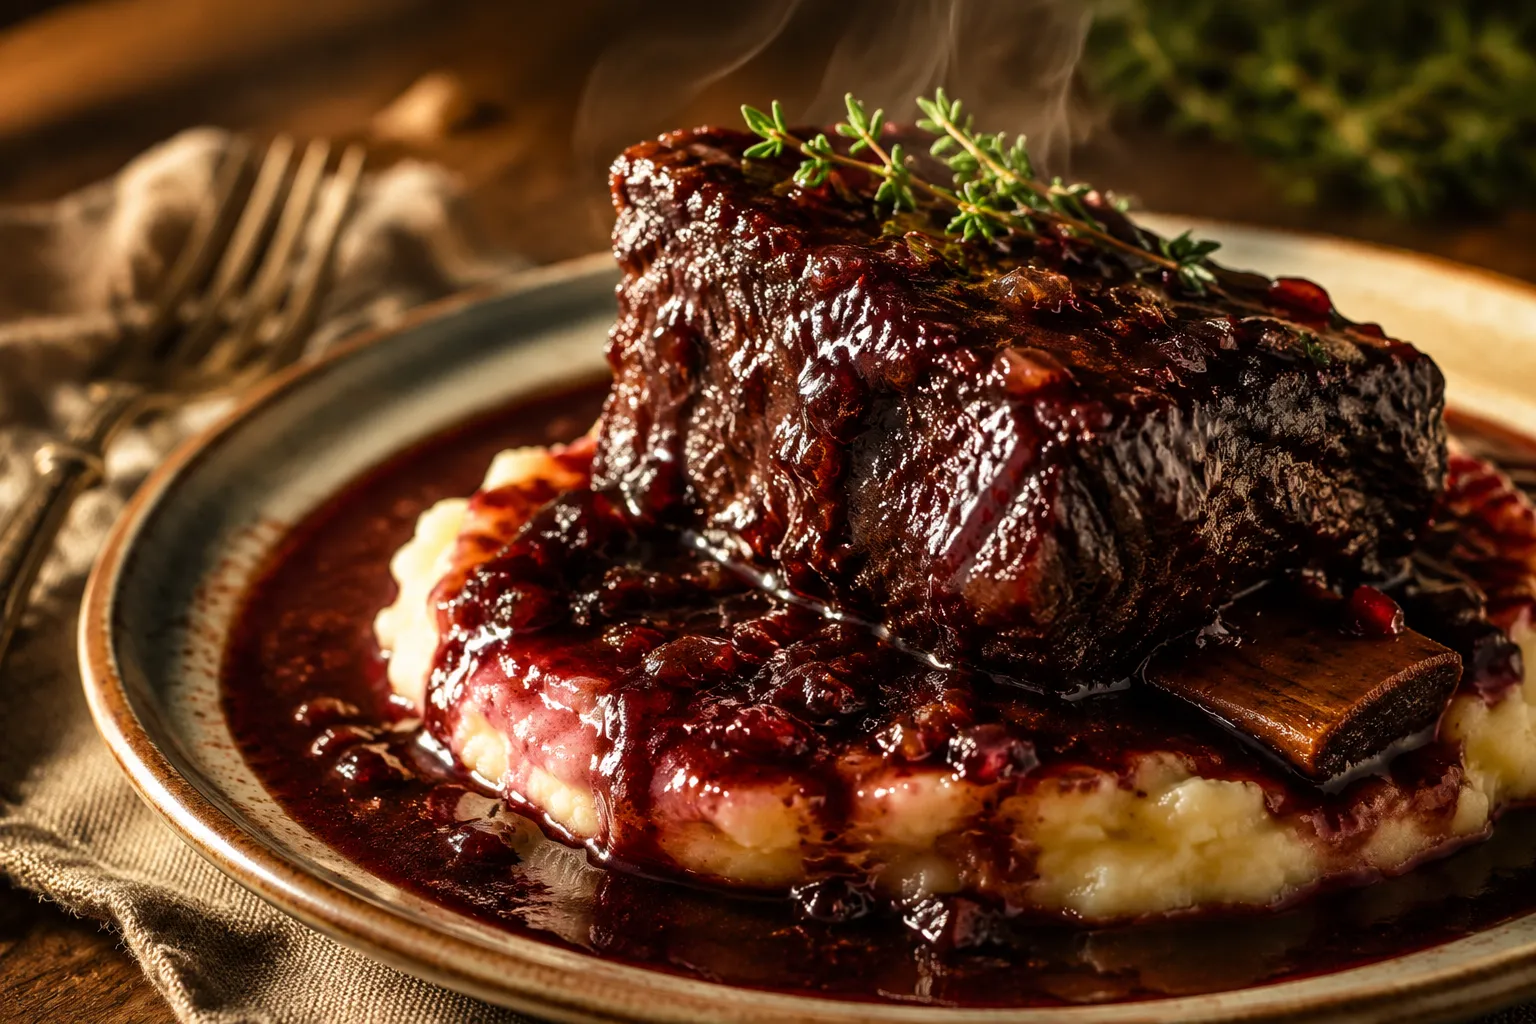
Low-and-slow cooking is the magic path for brisket, chuck roast, short ribs, pork shoulder, lamb shanks, and turkey legs. These cuts contain collagen that needs time, moisture, and steady heat to transform. Braising in broth, wine, tomatoes, or aromatics turns firmness into silkiness, while smoking or slow roasting builds bark, tenderness, and big savory flavor.
Budget cuts can punch far above their weight when you respect their structure. Skirt steak, flank steak, flat iron, chuck eye, chicken thighs, pork shoulder steaks, and beef shanks are all excellent values when prepared well. If you love the reverse sear method, try it with thicker steaks or roasts where you want even doneness from edge to center before finishing with a ripping-hot crust.
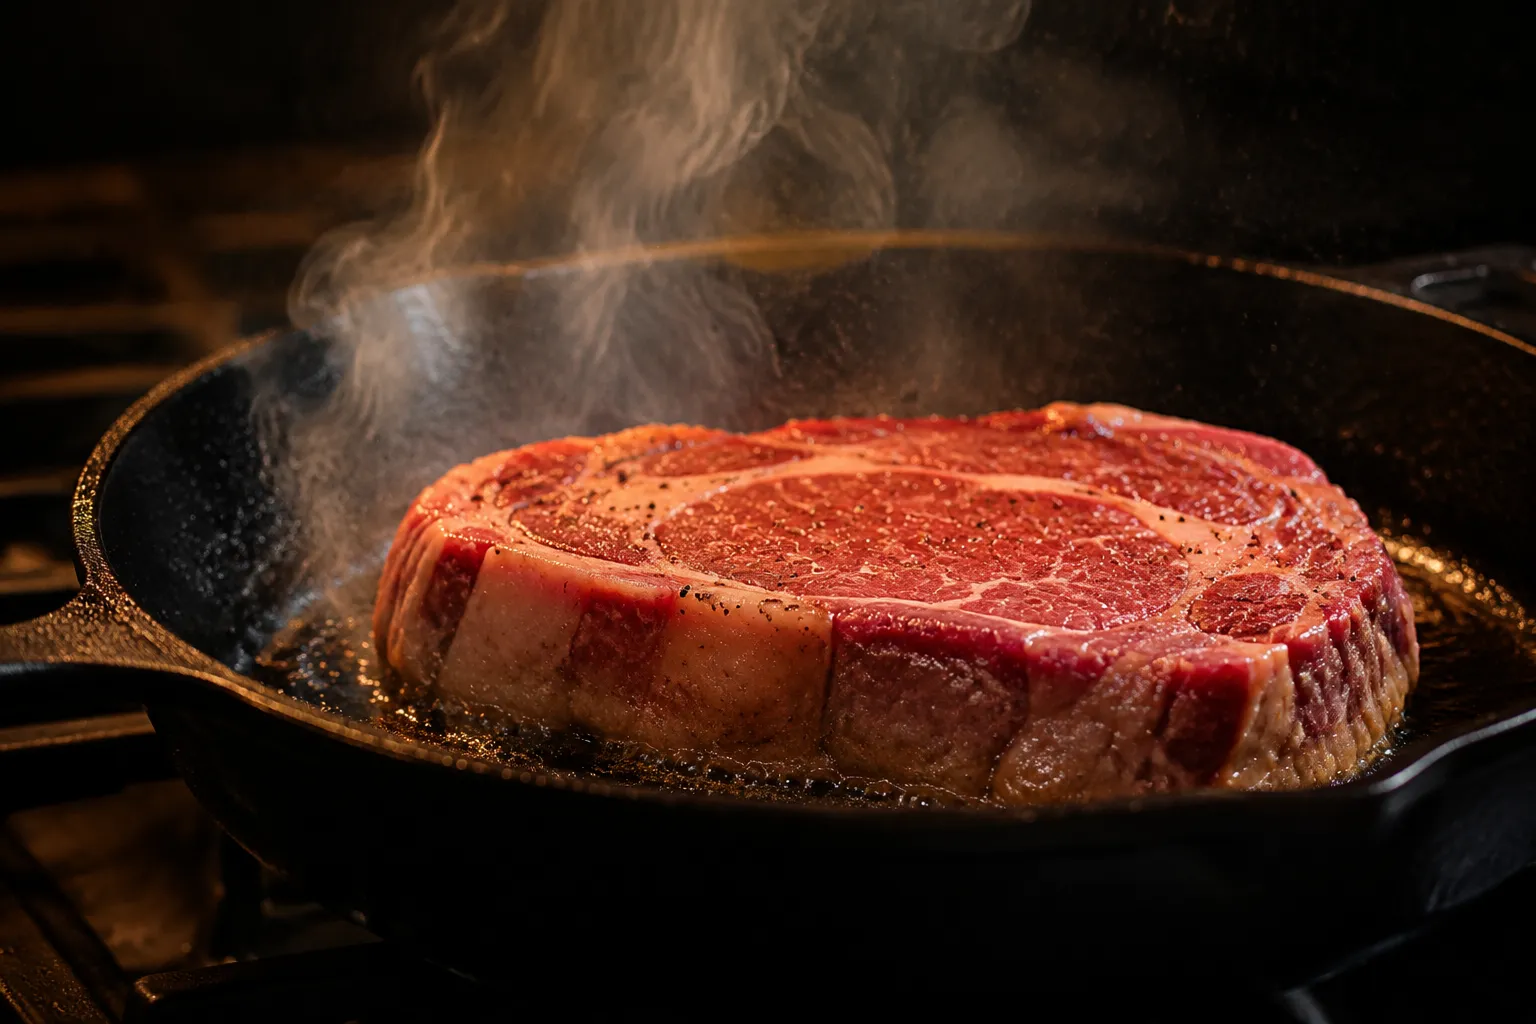
Dry-heat methods include searing, roasting, grilling, and broiling. They rely on direct or surrounding heat to create browning through the Maillard reaction—that delicious crusty, savory surface that makes a steakhouse steak so irresistible. For the best crust, pat meat very dry, season confidently, and give it space in the pan so moisture can evaporate instead of steaming.
Moist-heat methods include braising, stewing, and sous vide. Braising and stewing are ideal for tougher cuts because liquid, gentle heat, and time work together to soften connective tissue. Sous vide offers precision, holding meat at a target temperature before a final sear, which is especially helpful for thick steaks, pork chops, chicken breasts, or anyone nervous about overcooking.
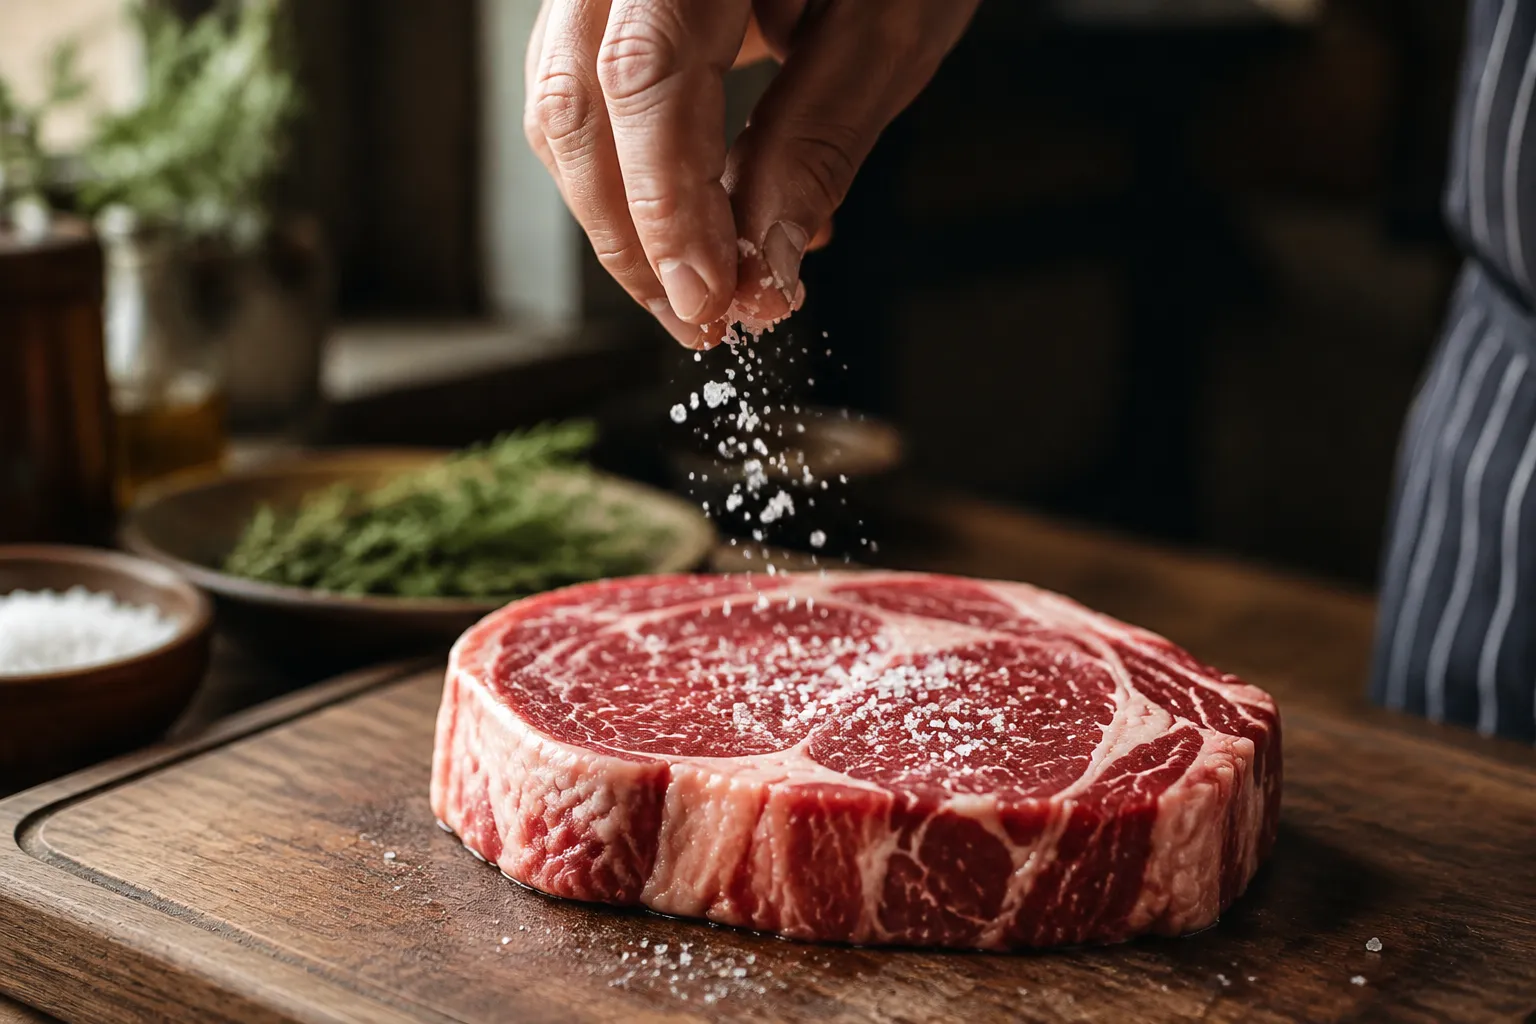
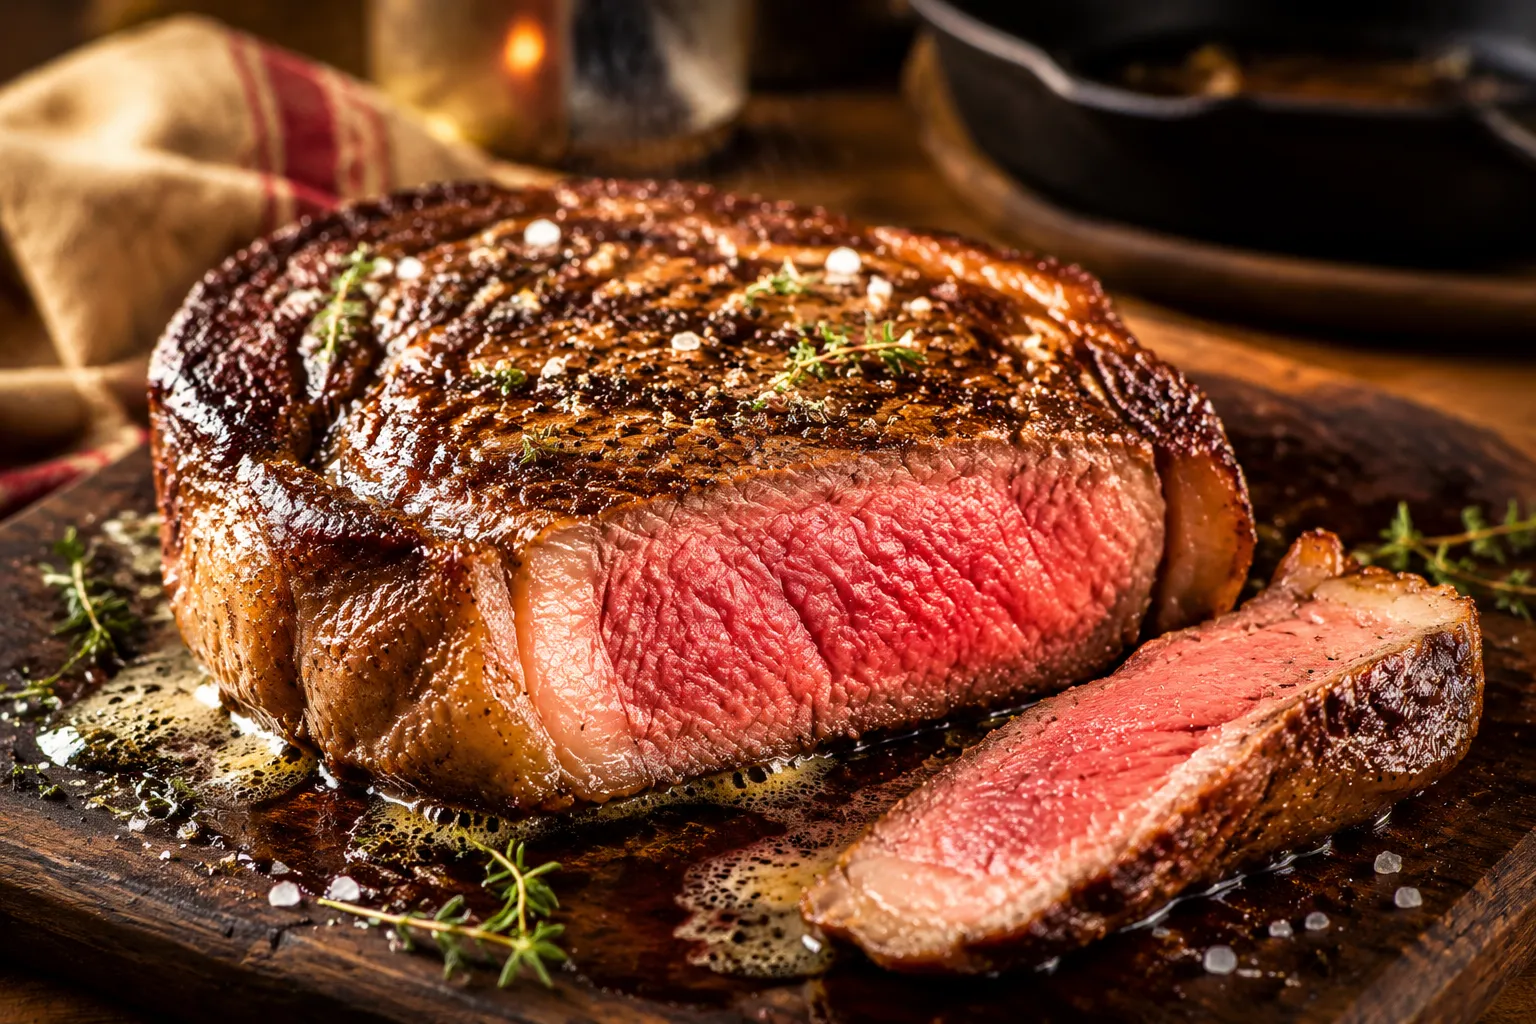
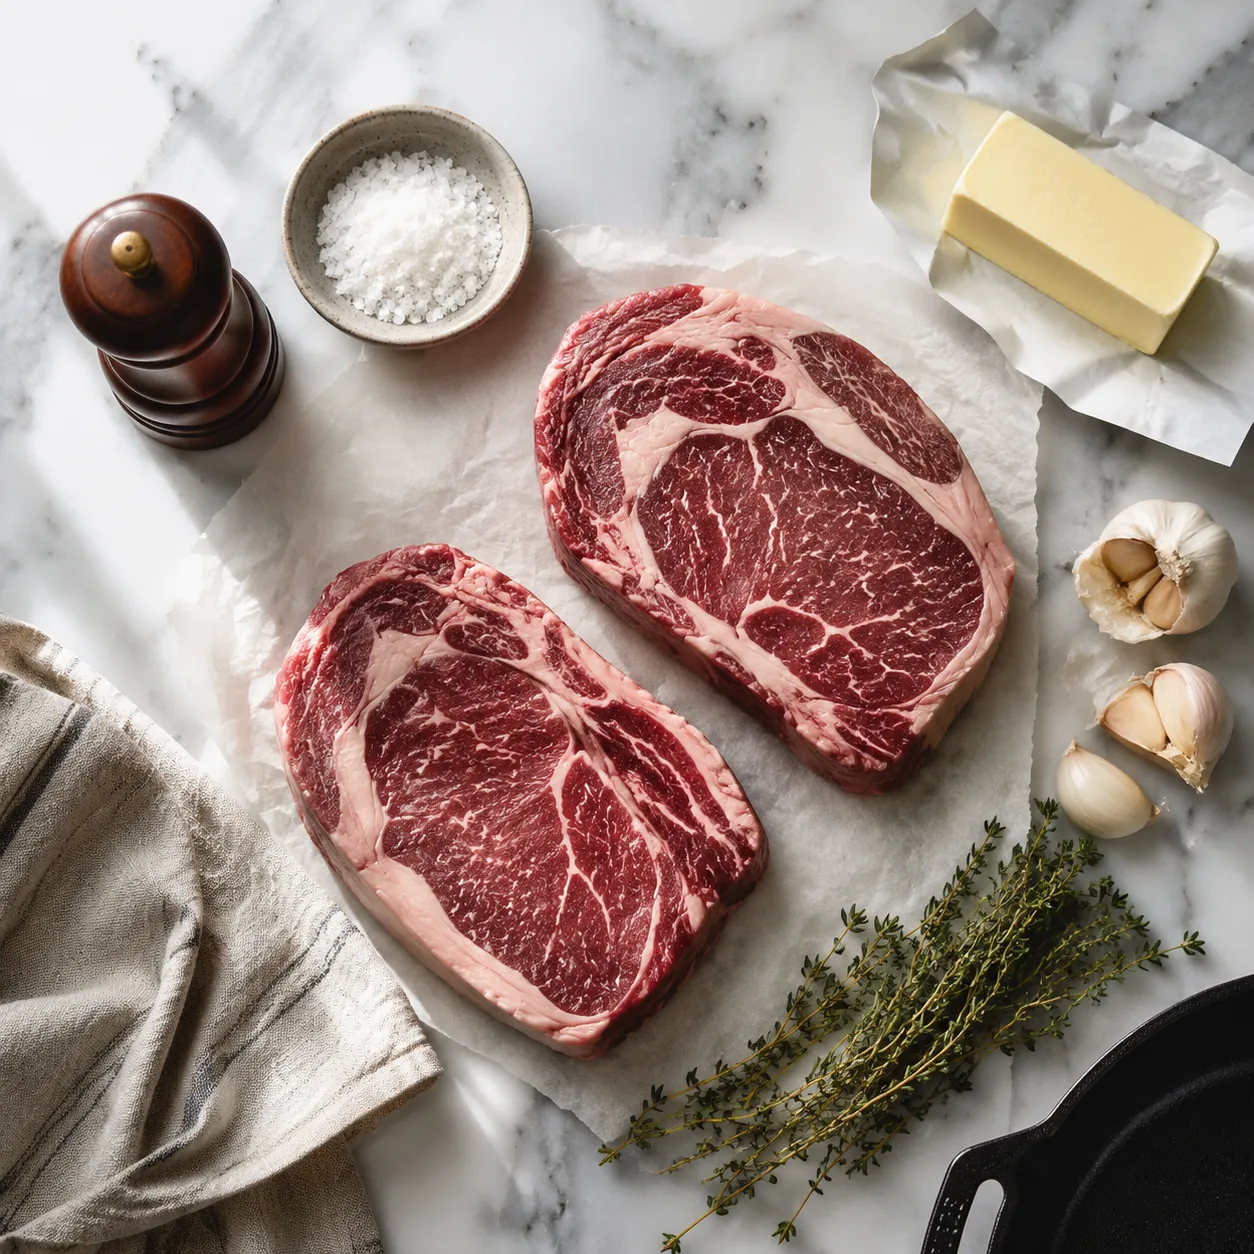
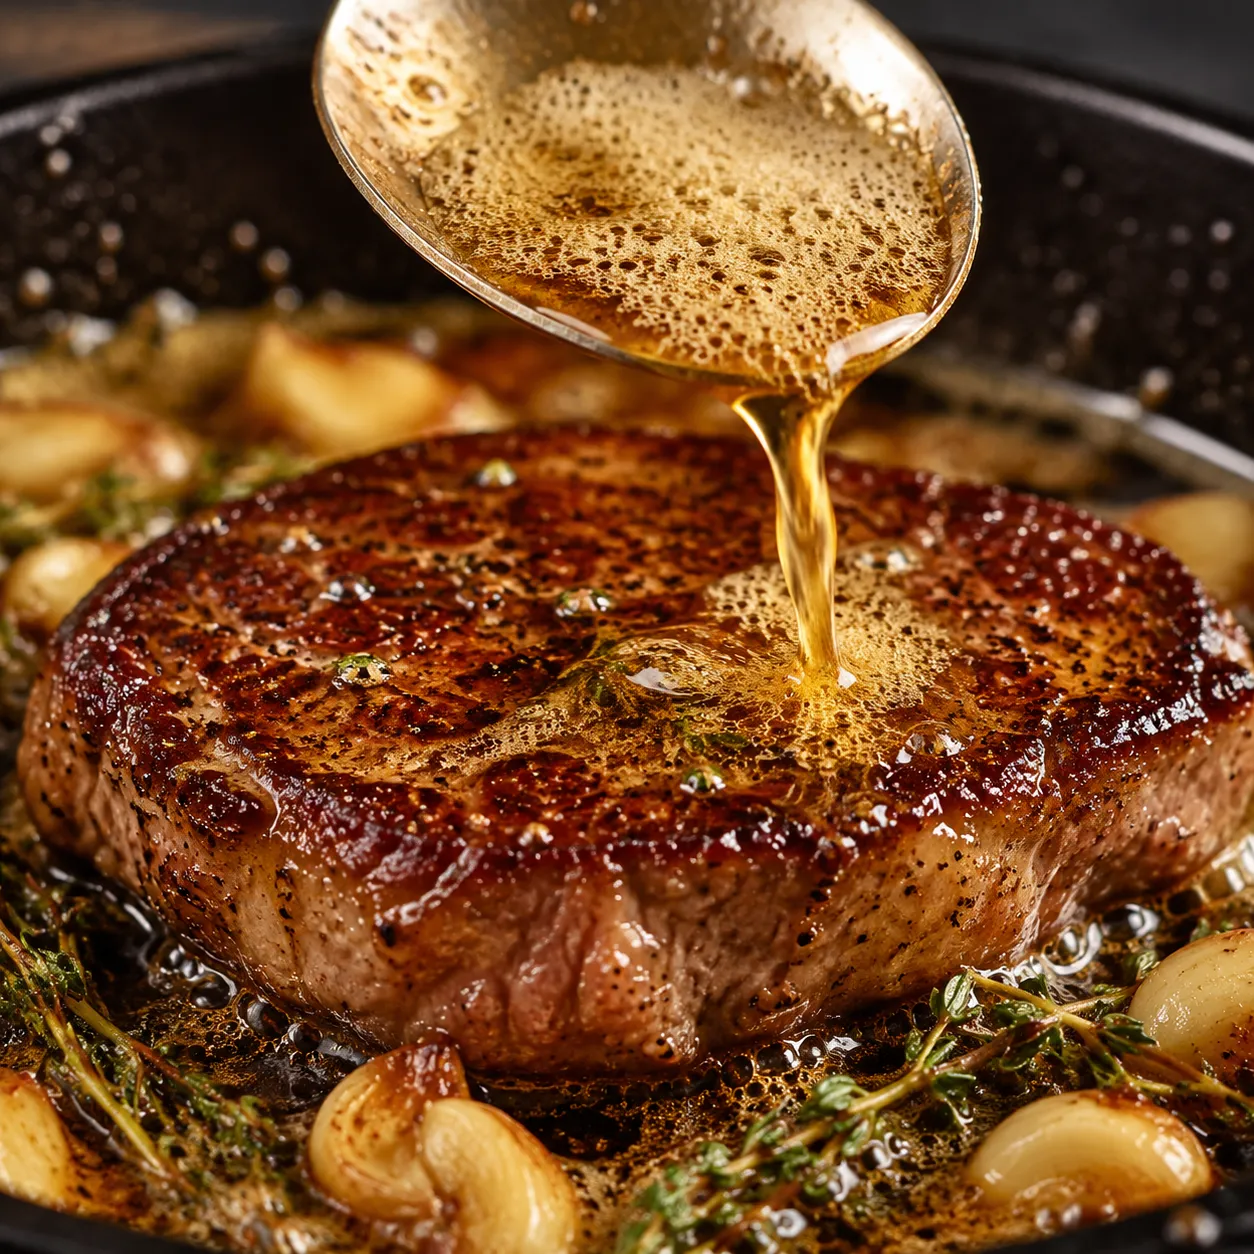
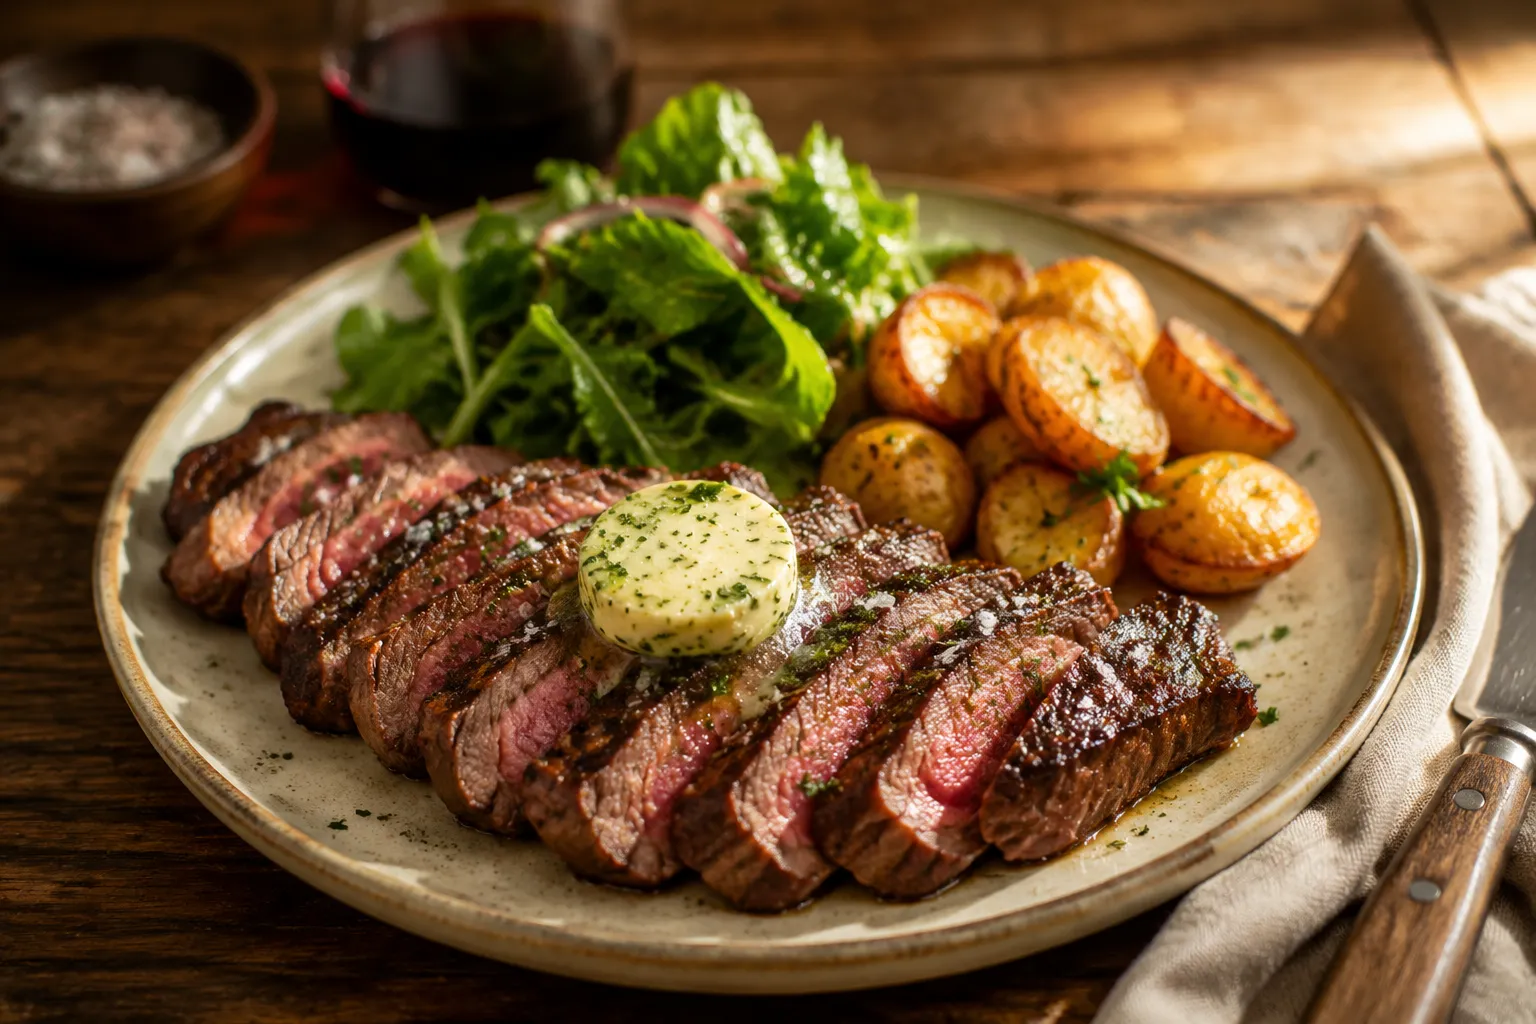
For the featured pan-seared steak, ribeye is the sweet spot: well-marbled, widely available, and rich enough to stay juicy even under high heat. Salt the steaks in advance if you can, then sear them in a hot cast iron skillet with neutral oil until the crust is dark and fragrant. Butter, garlic, and thyme go in near the end, turning the pan into a bubbling bath of flavor that gets spooned over the meat.
This is also where the meat a meat mindset pays off. You are not just following a pan-seared steak recipe; you are watching for surface dryness, heat level, crust formation, and internal temperature. Once those cues click, you can apply the same logic to strip steak, pork chops, lamb chops, or even thick chicken breasts with small timing adjustments.
Butter basting is not just restaurant theater. The foaming butter carries the aroma of garlic and thyme over the steak while helping the crust brown evenly in the final minutes. Tilt the skillet slightly, spoon the butter over the top repeatedly, and keep checking the thickest part with an instant-read thermometer so you pull the steak before it overshoots.
A thermometer is the single most reliable way to cook meat well. Color can be useful, but lighting, cut thickness, marinades, and carryover cooking can all fool your eyes. For whole cuts of beef, pork, lamb, and veal, the USDA safe temperature is 145°F followed by a 3-minute rest; ground meats should reach 160°F, and poultry should reach 165°F throughout.
For steakhouse-style doneness, many cooks pull steak below the USDA whole-cut minimum for rare or medium-rare preferences, then rest it and serve immediately. A common steak doneness chart reads roughly as rare at 120°F to 125°F, medium-rare at 130°F to 135°F, medium at 140°F to 145°F, medium-well at 150°F to 155°F, and well-done at 160°F and above. Use these ranges as culinary guidance, while keeping USDA recommendations in mind for food safety, especially for guests who are pregnant, elderly, immunocompromised, or very young.

Resting meat matters because juices are in motion when the protein comes off the heat. If you slice immediately, more of those juices run onto the board instead of staying in each bite. For steaks and chops, 5 to 10 minutes is usually enough; for larger roasts, 15 to 30 minutes is more appropriate. If you want a deeper dive, learning how to rest meat is one of the simplest upgrades you can make to weeknight cooking.
Carryover cooking is the temperature rise that happens after meat leaves the pan, oven, or grill. A thick steak may climb 5°F or more while resting, and a roast can climb even higher. That is why the best move is to pull meat just shy of your final target, tent it loosely with foil, and let time finish the job.
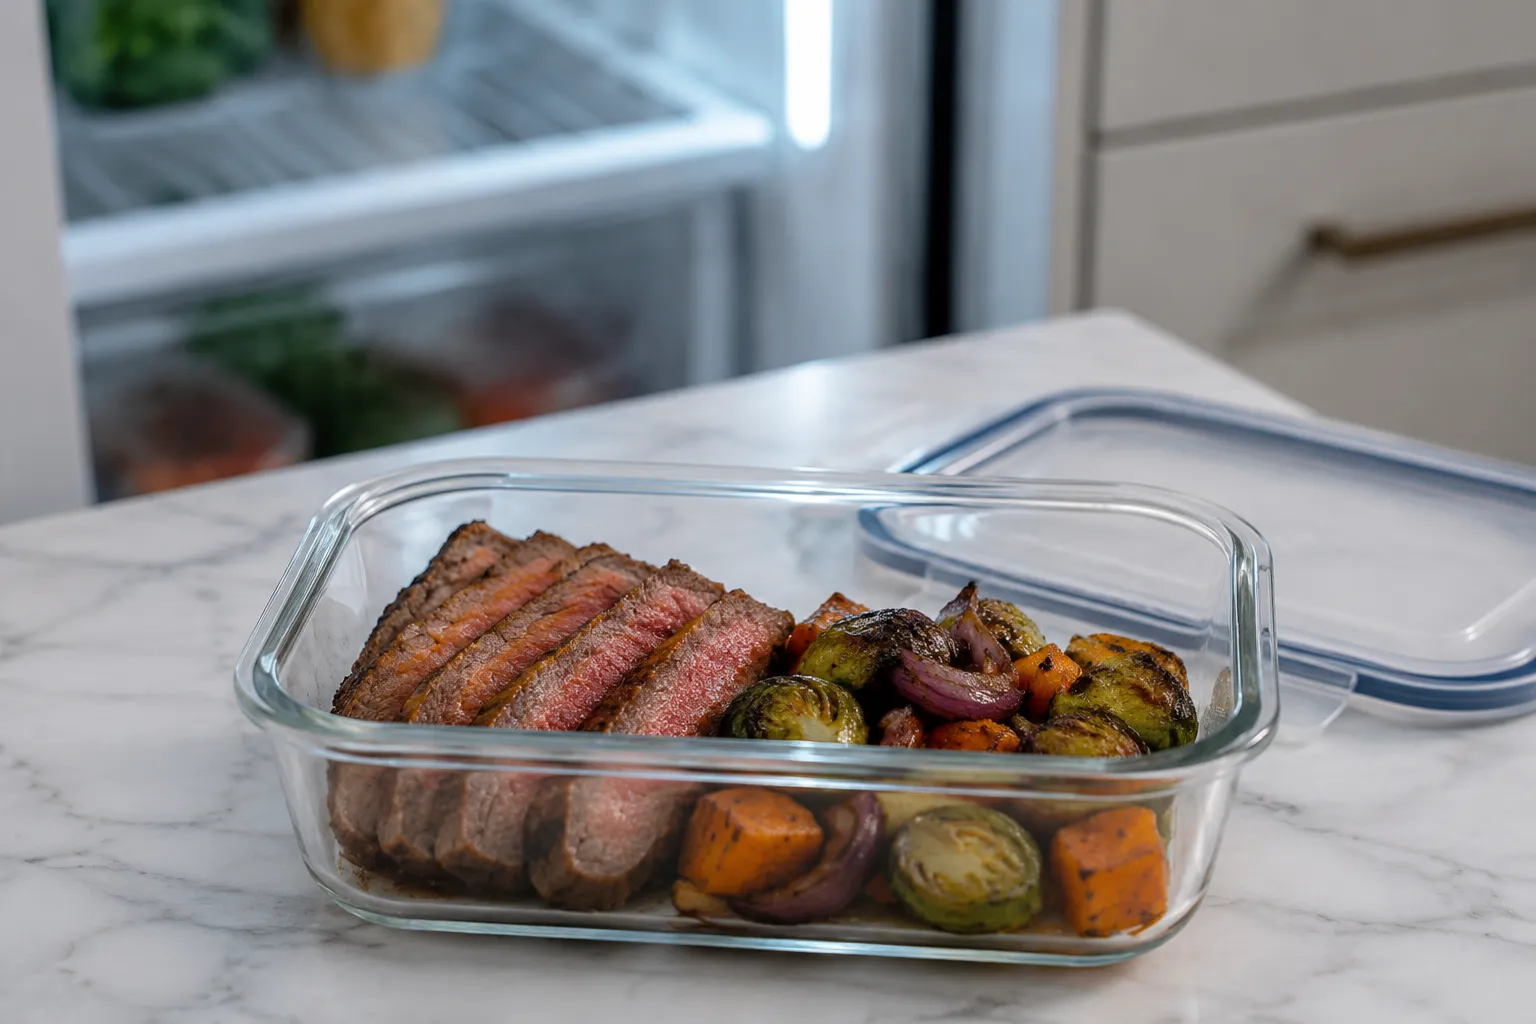
Good cooking starts before the pan ever heats. Raw steaks, chops, and roasts generally keep in the refrigerator for 3 to 5 days, while ground meat and poultry are best cooked within 1 to 2 days. If your plans change, freeze sooner rather than later; freezing meat at peak freshness gives you a much better thawed result.
To freeze without freezer burn, wrap meat tightly in plastic wrap or butcher paper, then seal it in a freezer bag with as much air pressed out as possible. Label the package with the cut and date, because future-you will not remember what that frosty parcel is. For minced meat, ground beef storage tips are especially useful: flatten packages before freezing so they thaw quickly and evenly.
Reheating is where many leftovers lose their charm, but gentle heat helps. Warm sliced steak or roast beef in a low oven with a splash of broth, or briefly reheat in a skillet over low heat with butter. Avoid blasting lean cuts in the microwave unless you use short intervals and cover them to trap a little steam.
One of the most common mistakes is cooking ice-cold meat straight from the refrigerator. While you do not need to leave steak out for hours, giving thick cuts 20 to 30 minutes at room temperature helps them cook more evenly. More importantly, pat the surface dry right before cooking so the exterior browns instead of steams.
Skipping the rest is another classic misstep. It is tempting to slice into a gorgeous steak the second it leaves the skillet, but patience protects the texture you worked for. A short rest gives carryover cooking time to settle and helps the meat feel juicier in each bite.
Overcrowding the pan can quietly ruin browning. When too much meat goes into a skillet at once, the temperature drops, moisture builds, and the pieces steam in their own juices. Cook in batches if needed, and listen for a lively sizzle rather than a wet simmer.
A rich ribeye loves bright, crisp, and starchy sides. Try a green salad with lemony vinaigrette, roasted potatoes, garlicky green beans, creamed spinach, or a simple tomato salad in summer. A spoonful of herb butter or chimichurri can make the plate feel special without requiring a second complicated recipe.
If you are serving a bigger dinner, build contrast around the meat. Pair braised short ribs with polenta, pork shoulder with slaw, roast chicken thighs with rice, or grilled flank steak with charred vegetables and tortillas. The goal is balance: something fresh, something comforting, and enough sauce or pan juices to make every bite feel complete.
Once you understand the logic, meat a meat becomes less of a mystery and more of a kitchen instinct. You will know when to buy the marbled steak, when to choose the hardworking roast, and when to let time do the tenderizing for you. Start with the ribeye below, keep your thermometer close, and let this guide be the nudge that turns a good dinner into a great one.