Classic Meringue Recipe: Crispy Outside, Chewy Inside
Ingredients
Scale
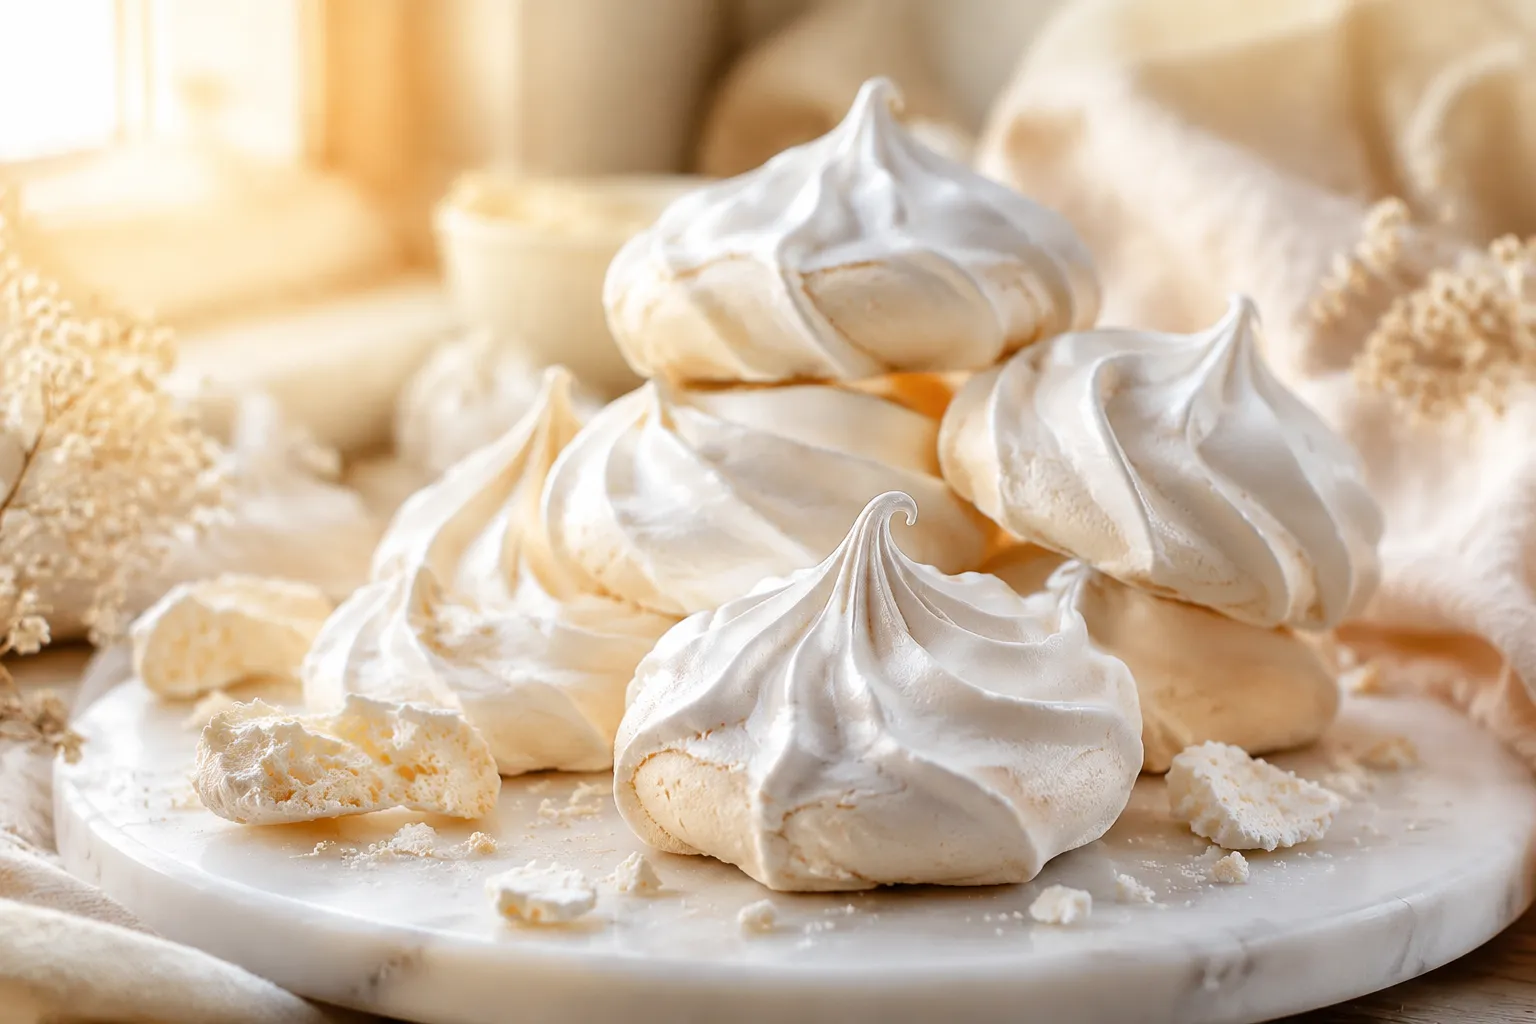
This easy meringue recipe delivers crisp shells with marshmallow-soft centers — just 4 pantry ingredients and one bowl.
This classic meringue recipe has earned a permanent spot in my baking rotation, and after one bite I think it will earn one in yours too. We're talking shatter-crisp shells that give way to a soft, marshmallow-like center — the kind of texture contrast that makes you slow down on the second cookie just to figure out how something so simple tastes this good. Four pantry ingredients, one bowl, and a low oven do all the heavy lifting.
If meringue has ever intimidated you, I get it. Sticky shells, weeping syrup, peaks that refuse to peak — it can feel like the eggs are personally testing you. But the truth is meringue is mostly chemistry, and once you understand the few rules that actually matter (acid, fat, patience), it becomes one of the most forgiving cookies you can bake. This is a true French meringue: raw egg whites whipped with sugar, piped, and dried out in a low oven until they hold their shape and snap clean when you bite in.
I'll walk you through the technique step by step, plus the troubleshooting notes I wish someone had handed me the first time I tried these. Whether you're stocking a holiday cookie tin, topping off a pavlova, or just craving something light and a little nostalgic, this is the version I keep coming back to.
Five things, and you almost certainly have most of them already. The magic of egg white desserts is how dramatically simple ingredients transform — there's no butter, no flour, no leavening doing the work. It's just protein, sugar, and air, behaving in surprisingly predictable ways once you know what to look for.
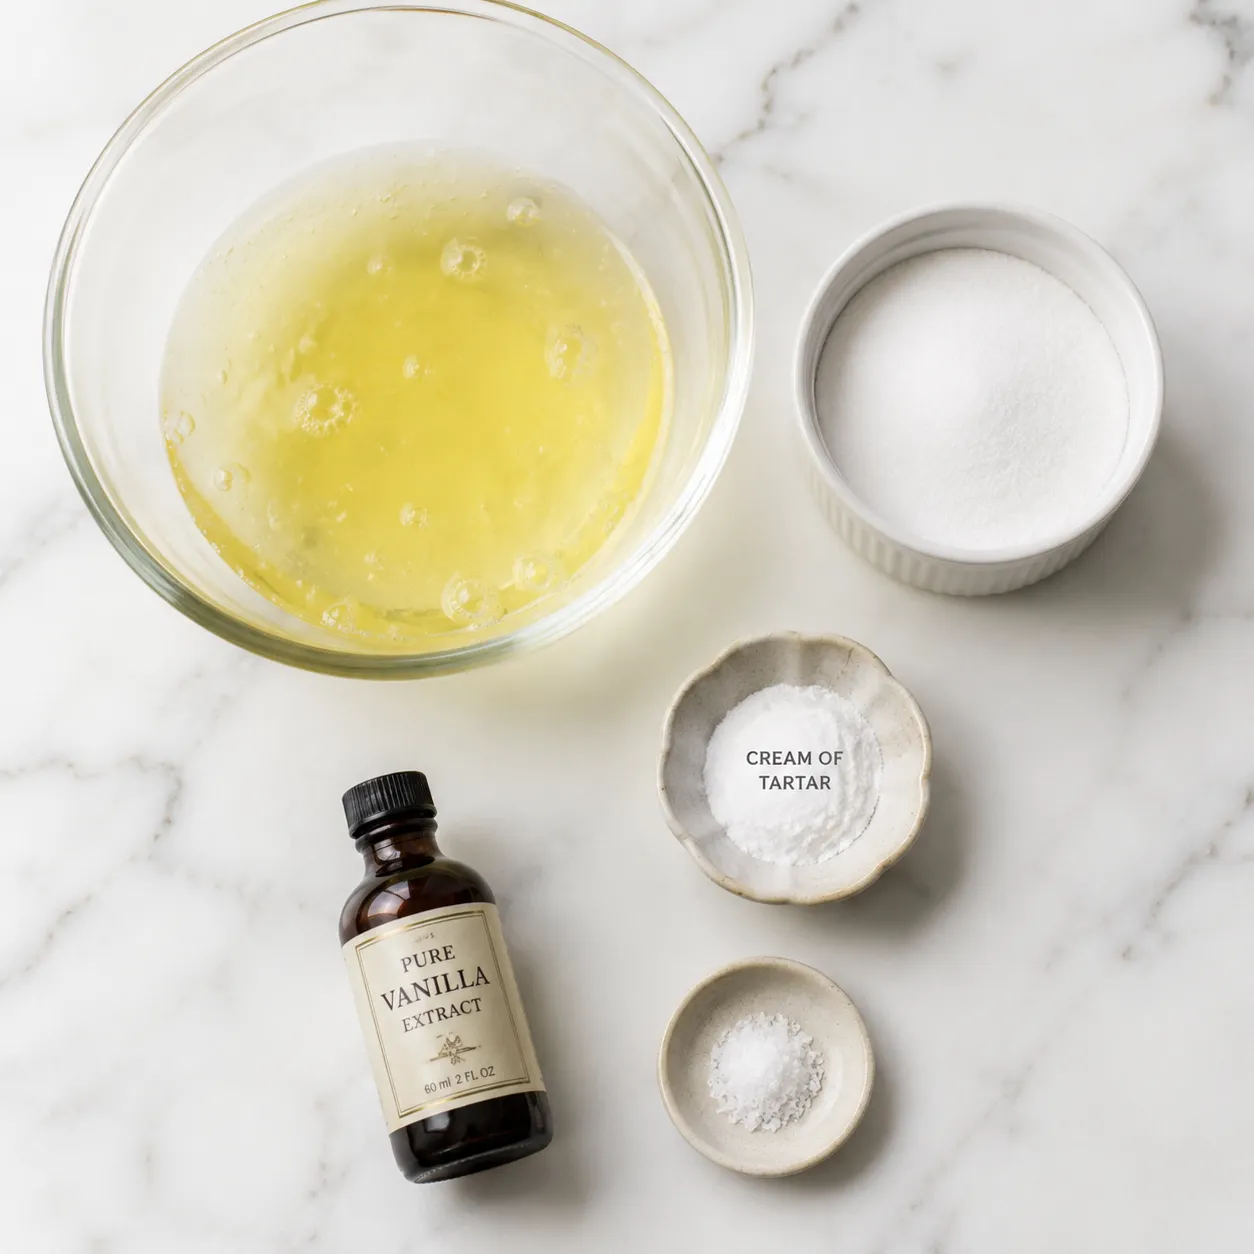
Cold egg whites whip slower and never quite reach the volume of room-temp ones. Pull your eggs out 30 minutes before you start, or warm the already-separated whites in their bowl over a pan of barely-warm water for a few minutes. Always separate eggs one at a time into a small dish before transferring to your mixing bowl — that way one stray yolk doesn't tank the whole batch. Even a single drop of fat shuts down the operation.
Superfine sugar (sometimes labeled caster sugar) dissolves faster into the egg whites, which means a glossier finish and zero gritty texture. If all you have is regular granulated, pulse it in a food processor for 30 seconds and it will behave the same way. Powdered sugar isn't a great substitute here because the added cornstarch mutes the gloss and chew. The cleaner the sugar, the cleaner the snap.
Cream of tartar is a mild acid that stabilizes the egg foam, helping it hold volume even after the sugar goes in. It is the secret to meringues that don't deflate or weep. Vanilla extract adds warmth, and a pinch of salt sharpens the sweetness. If you don't have cream of tartar in the cupboard, half a teaspoon of lemon juice or white vinegar does the same stabilizing job.
The full timing and amounts live in the recipe card below, but here's what's actually happening at each stage so you know what to look for. There's a moment in this meringue recipe where everything changes — the foam shifts from cloudy and soft to satin and structured — and recognizing that visual cue matters more than any timer or stopwatch.
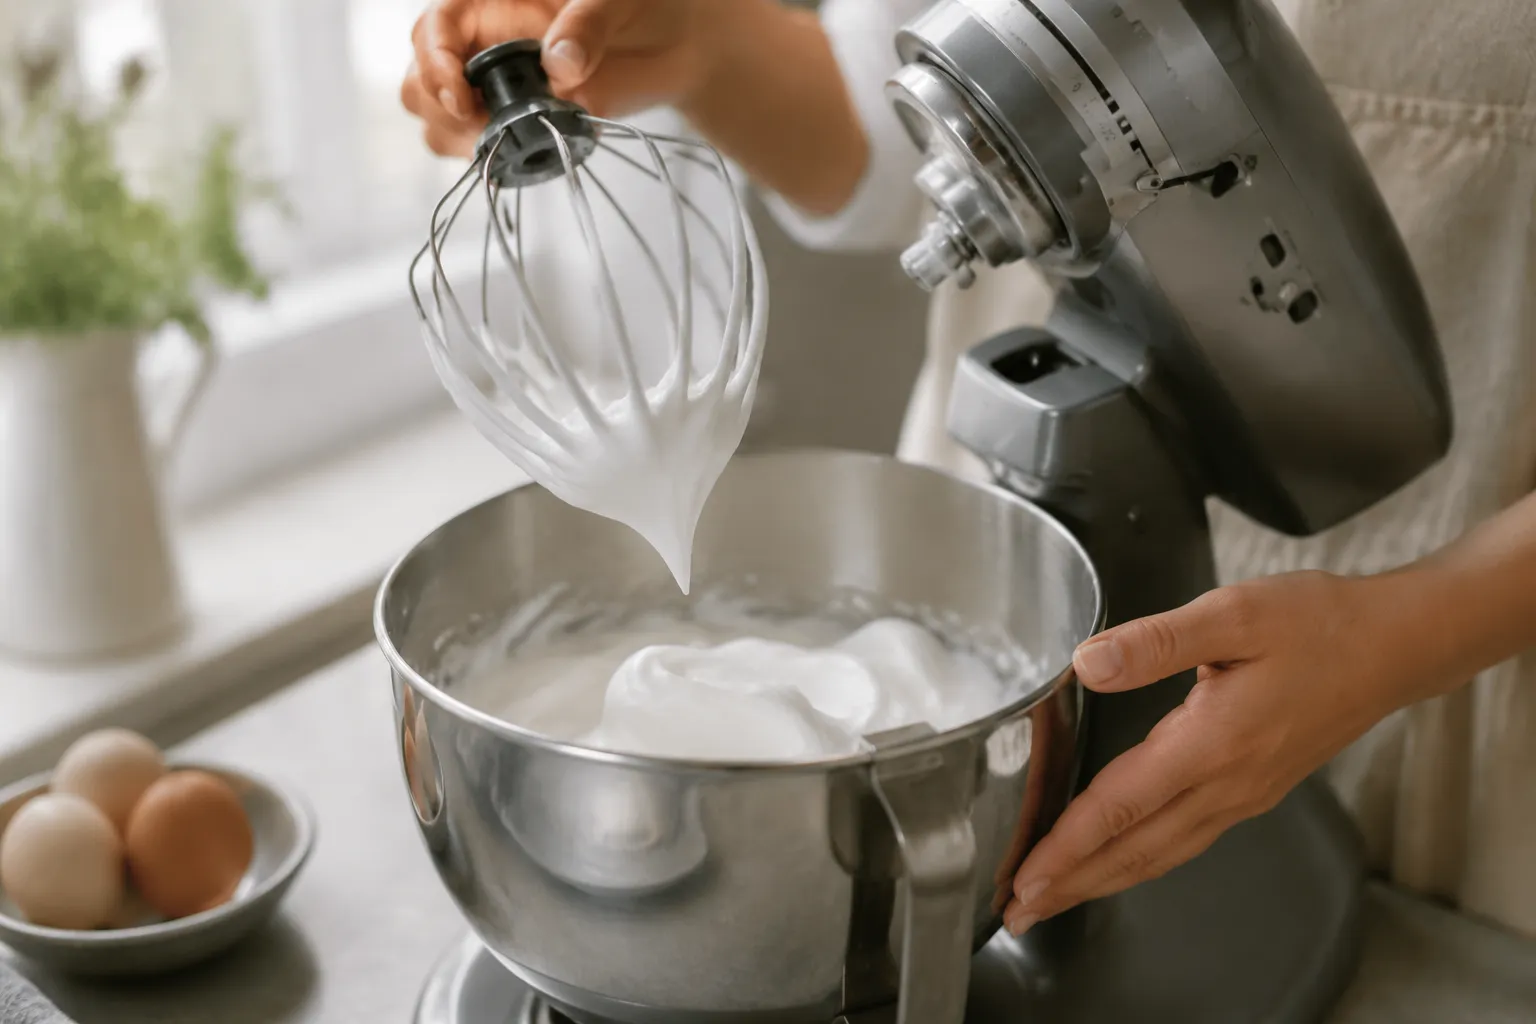
Start the mixer on medium with just the whites, salt, and cream of tartar. You want to build the foam slowly so the protein structure stays strong. After about two minutes you'll see the whipped egg whites turn opaque and start to climb the whisk. Stop when the peaks droop softly when the whisk is lifted — this is the soft-peak stage, and it's the right window to start adding sugar.
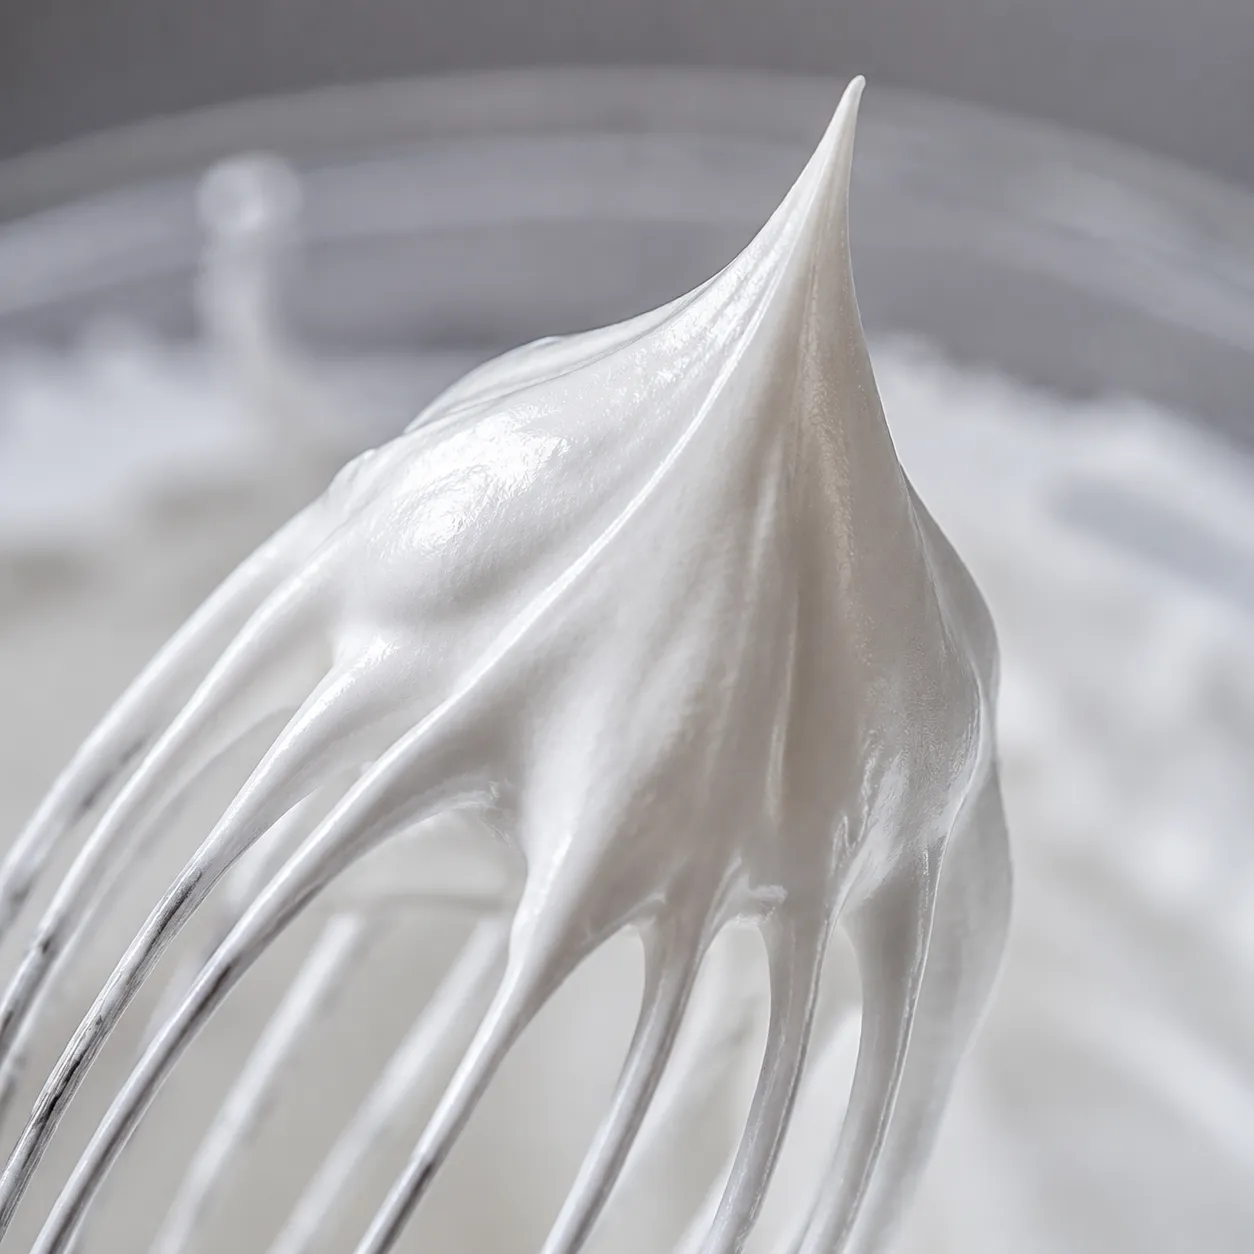
Increase the speed to medium-high and rain in the superfine sugar one tablespoon at a time. Going slowly here is the difference between glossy and grainy — each addition needs a few seconds to dissolve before the next goes in. After all the sugar is incorporated, keep whipping until the meringue turns thick, glossy, and holds stiff peaks that point straight up. Rub a bit between your fingers; if you feel sugar grains, keep whipping for another minute.
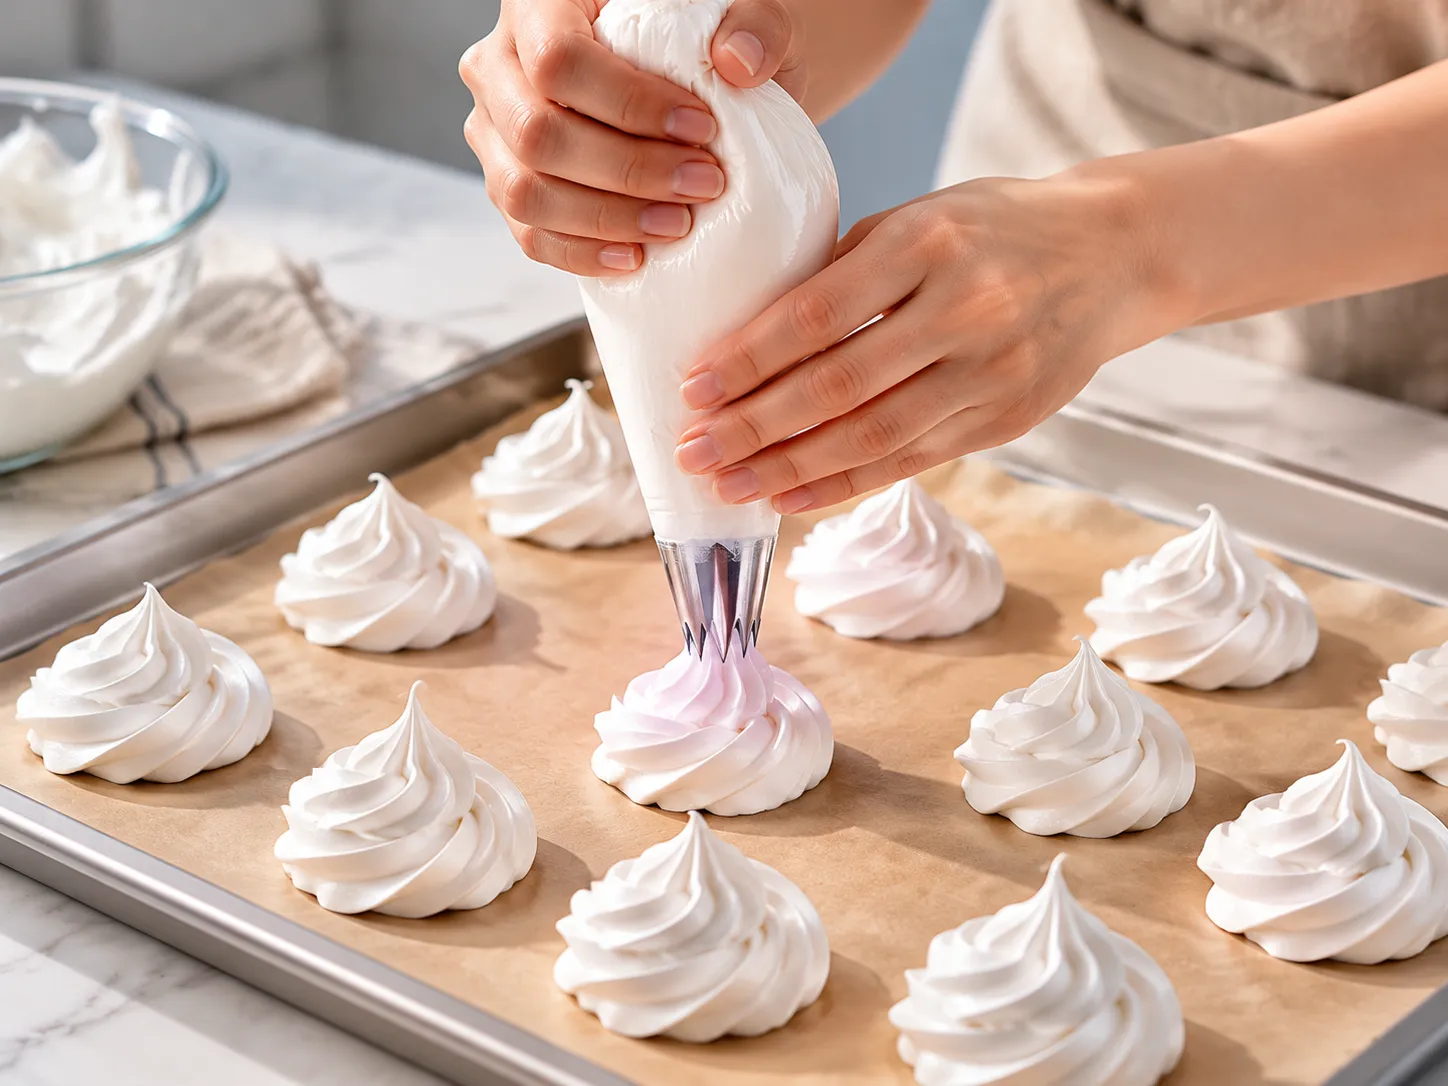
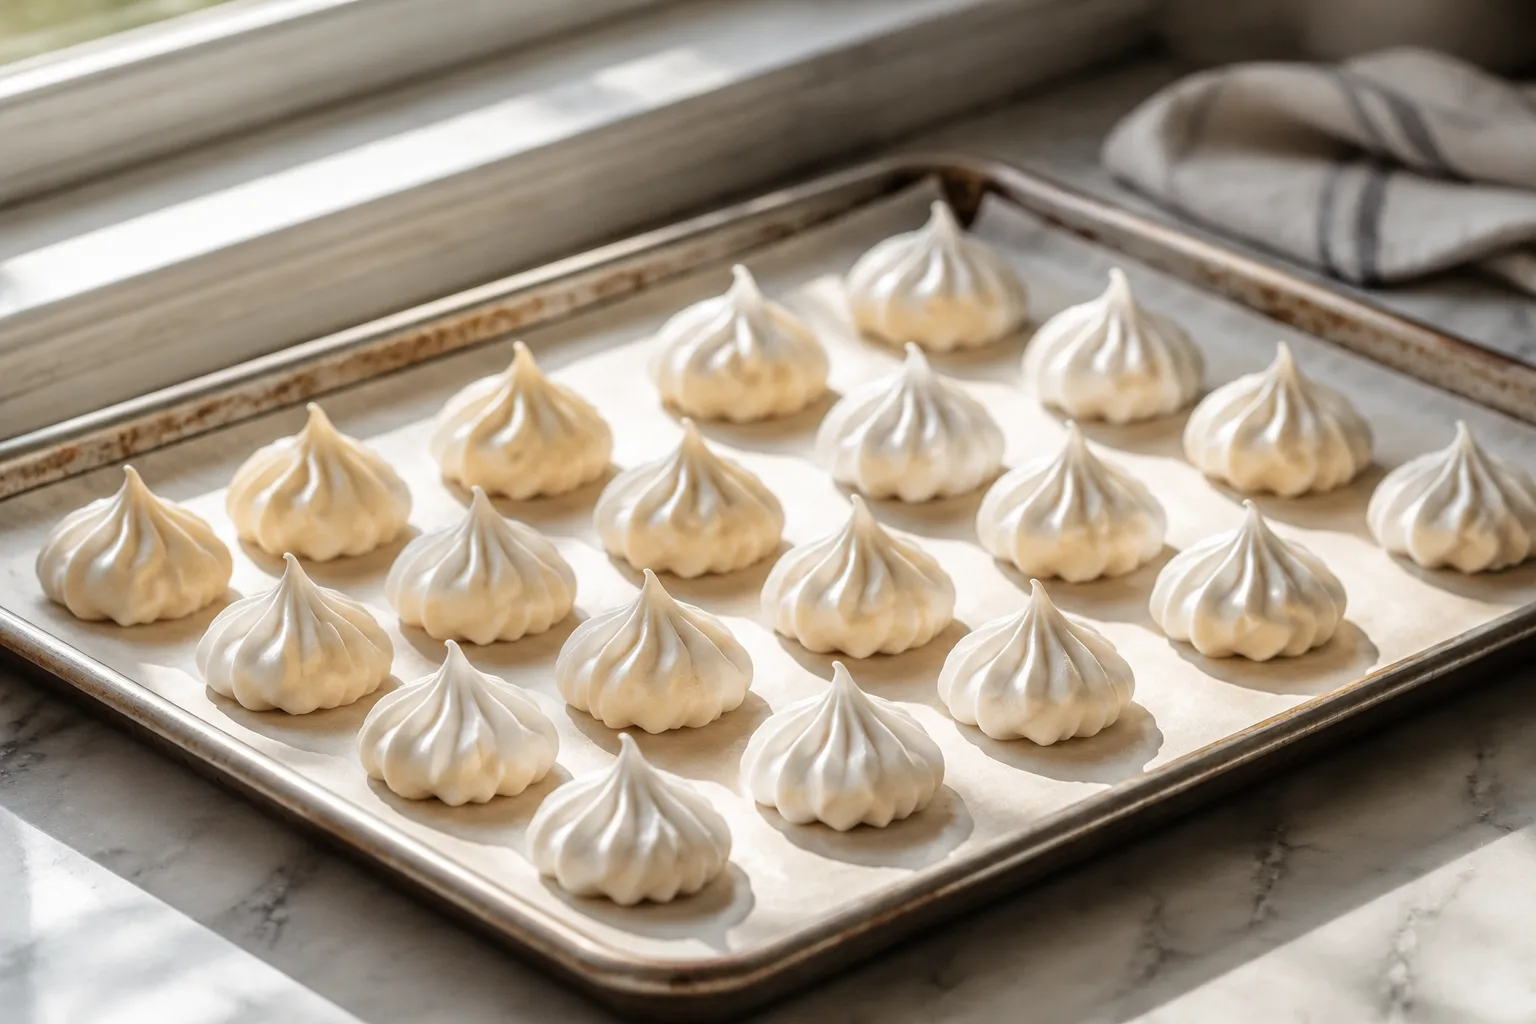
Transfer the meringue to a piping bag fitted with a star tip and pipe 1.5-inch swirls onto a parchment-lined sheet, spacing them an inch apart. They barely spread, so you can fit a lot of them. Bake at 225°F for 90 minutes, then turn off the oven and leave them inside, door closed, for at least another hour to fully dry. This long, gentle drying is what gives you that crackly shell with a chewy heart.
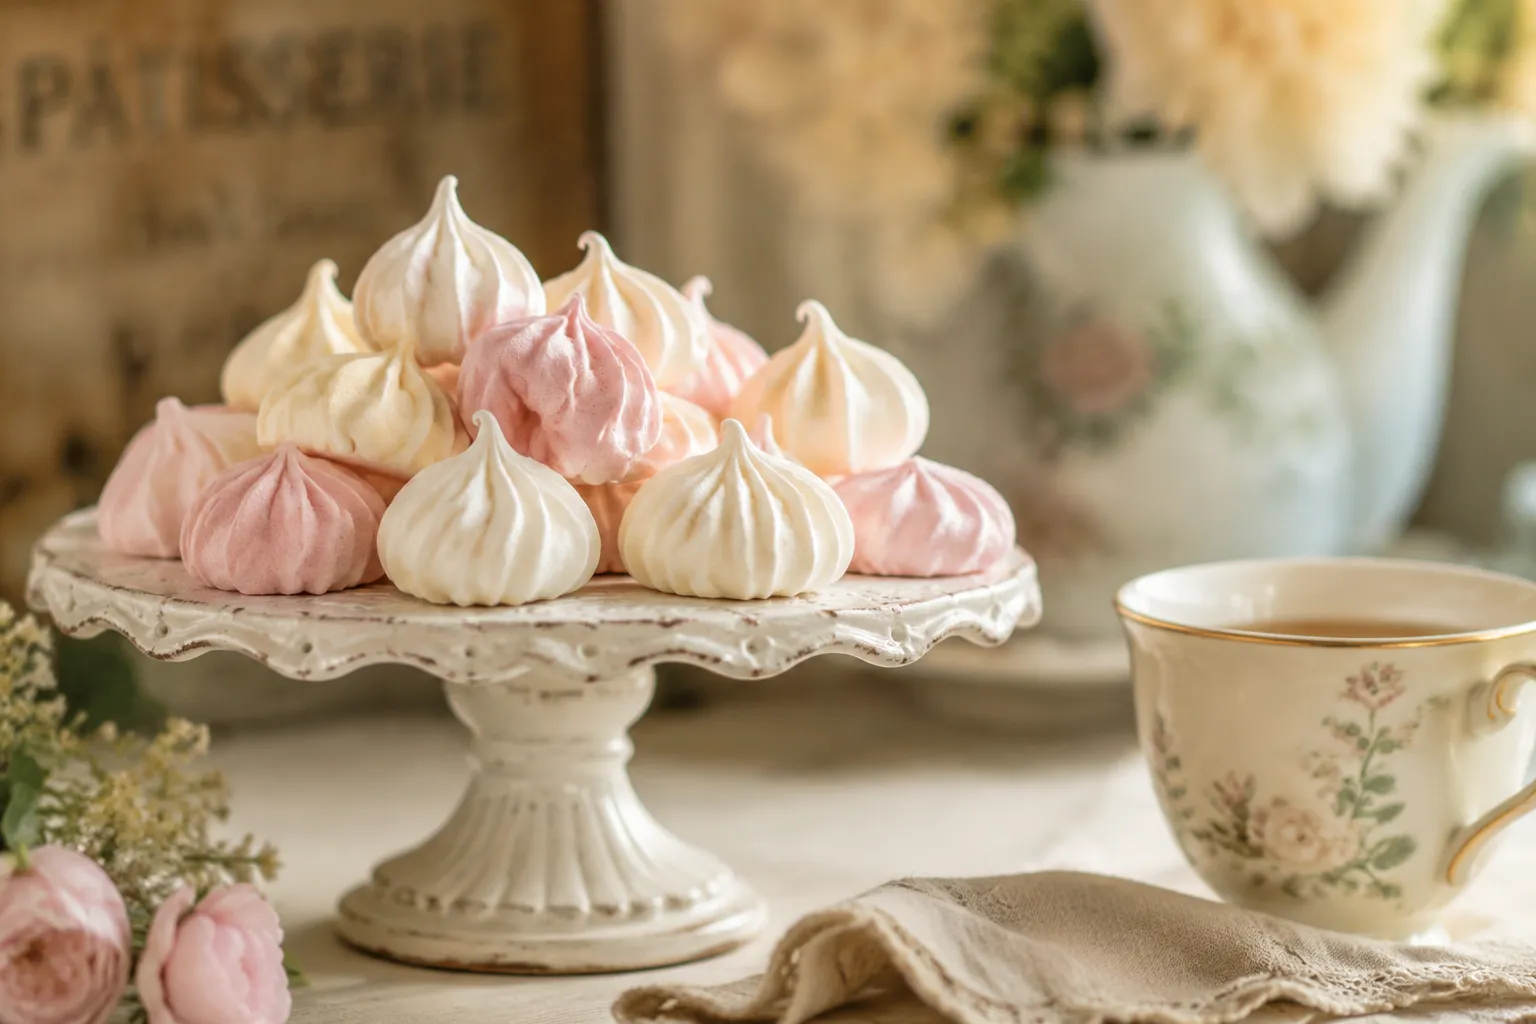
Meringue cookies are gorgeous on their own with coffee or tea, but they also play really well with other desserts and fresh fruit. I love crumbling them over softly whipped cream and macerated berries for an instant Eton mess, or sandwiching two with a thin layer of dark chocolate ganache for a cookie that punches well above its weight.
If you're entertaining, these are also the perfect base for a pavlova-style platter — pile them on a board with mascarpone, fresh figs, lemon curd, and chocolate shavings and let people build their own bites. They're naturally gluten-free and dairy-free, so they slide easily into mixed dietary crowds without anyone feeling like they got the consolation dessert.
For an afternoon spread, I usually pair meringues with something a little richer to balance their sweetness — a slice of dark chocolate tart, a cup of espresso, or even a small glass of dessert wine. Their lightness is a feature, not a flaw, and they keep the rest of the table from feeling heavy.
Even with a solid meringue recipe, the eggs sometimes have opinions. Almost every issue traces back to one of three culprits: fat, moisture, or speed. Here's how to read what your meringue is telling you and fix it on the next batch.
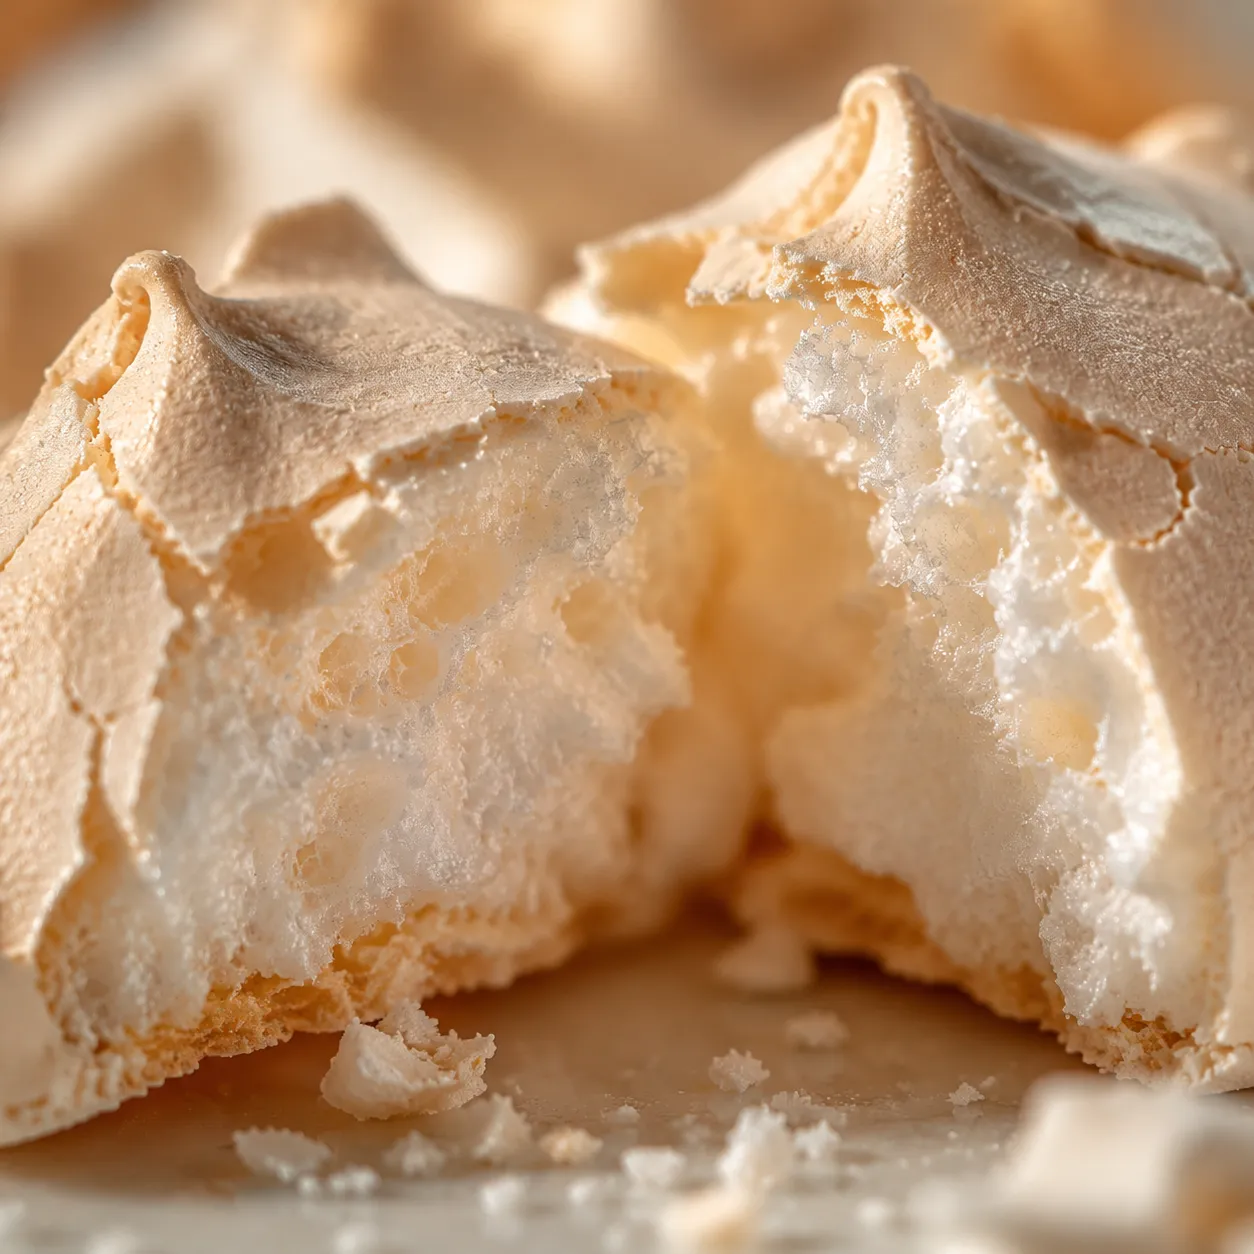
Those clear syrupy beads forming under the meringue mean the sugar didn't fully dissolve, or the cookies were undercooked. Whip longer next time so the sugar disappears completely (the rub-between-fingers test is your friend), and don't pull the tray from the oven early. Properly baked meringues should feel dry to the touch and lift cleanly off the parchment without sticking.
Cracks usually mean the oven was too hot or you opened the door during baking. Stick to 225°F, no peeking, and let them cool slowly in the closed oven. Hollow centers can also come from over-whipping past stiff peaks — when the foam goes from glossy to clumpy and dry, the structure is already breaking down and won't hold air evenly during the bake.
Tiny amber droplets forming on the outside of baked meringues come from undissolved sugar weeping out during baking. The fix: superfine sugar, slower addition, and longer whipping after the last spoonful goes in. High humidity makes this much worse, so if it's a damp day, run the kitchen fan or simply save the project for drier weather.
This meringue recipe is one of those pantry-friendly bakes that feels far more impressive than it has any right to be. Once you nail the technique, you'll find yourself reaching for it whenever you need a quick, elegant dessert that uses up the leftover whites from custards or curd. Bonus: kids love them, they ship surprisingly well, and they keep for weeks if you can resist eating them straight from the jar.
If you make these, I'd love to hear how they turn out. Tag your photos so I can see — and don't forget to grab a glass of milk before you grab the second cookie. Trust me on that one.
The base recipe is a blank canvas, and a few small additions take it in completely different directions without changing the technique. Fold extras in gently after the meringue has reached stiff, glossy peaks so you don't deflate the foam.
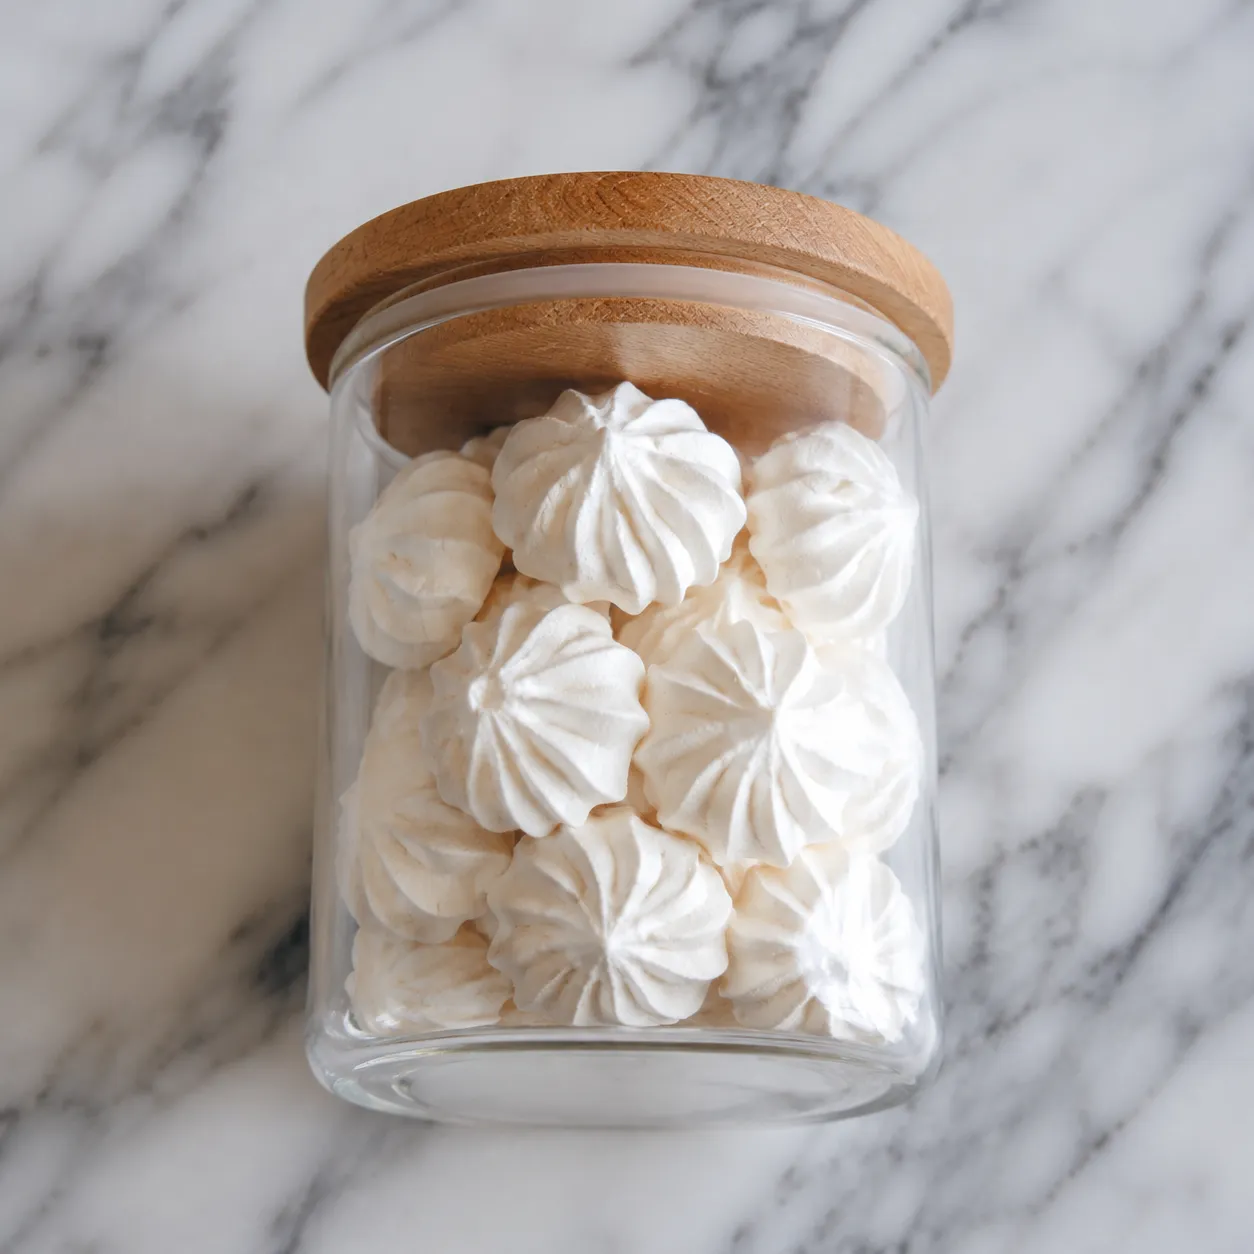
Stored properly, meringues stay crisp for up to 2 weeks at room temperature. The key is keeping them away from any source of moisture — that means an airtight glass or rigid plastic container with a tight lid, kept somewhere cool and dry, never in the refrigerator. Refrigeration is the fastest way to ruin them; the humid fridge environment will turn the shells sticky within hours.
If your meringues do soften (this happens fast in humid climates), you can revive them in a 200°F oven for 15-20 minutes. Let them cool completely before resealing or they'll trap steam in the container and undo all your work. For longer storage, meringues freeze beautifully — layer them between sheets of parchment in a rigid container and freeze for up to 2 months. Thaw at room temperature with the lid on so condensation lands on the lid, not the cookies.