Angel Food Cake Recipe: Light, Fluffy & Foolproof
Ingredients
Scale
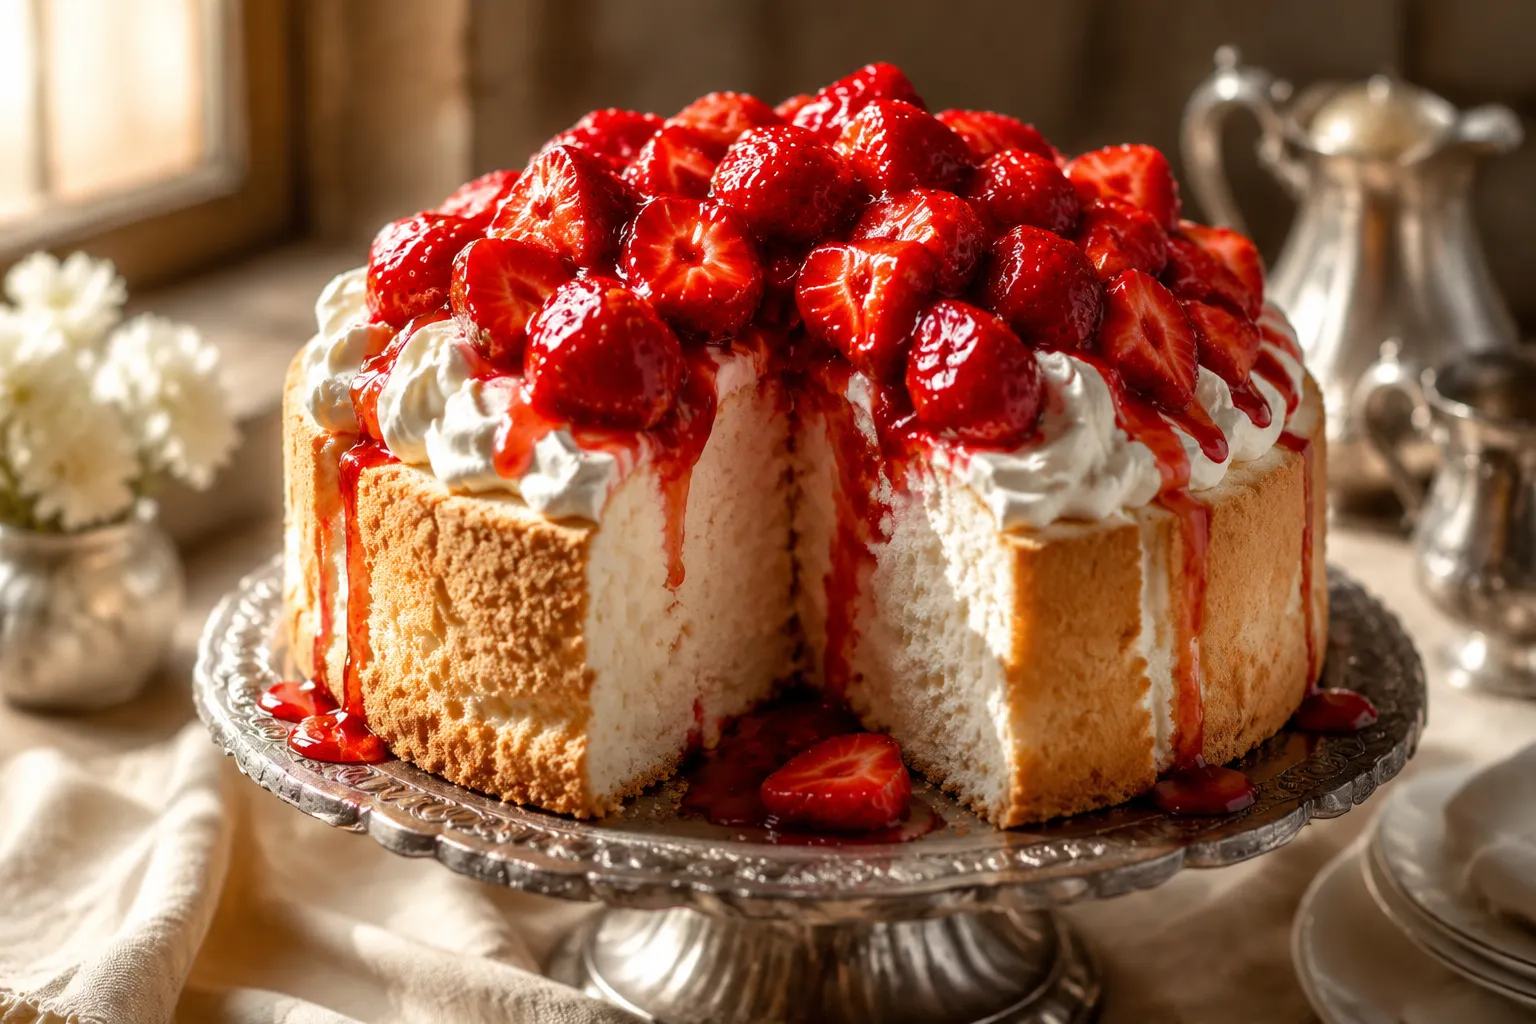
A pillowy, snow-white angel food cake with a delicate vanilla crumb — made from whipped egg whites, cake flour, and sugar in one tall tube pan.
This angel food cake recipe is the kind of classic dessert that feels like a little kitchen magic: a few humble ingredients whisked into a tall, snow-white cake with a golden, crackly top and the softest cloud-like crumb.
There is no butter, no oil, and no baking powder here. The lift comes almost entirely from air beaten into egg whites, which makes the method feel wonderfully old-fashioned and just a little dramatic in the best way. When it works, it is impossibly light, delicately sweet, and made for berries, cream, lemon, chocolate, or honestly just a cup of coffee and a fork.
If you have ever been nervous about meringue-based cakes, this guide is written for you. We will talk through the ingredients, the pan, the texture cues, and the gentle folding that helps the batter stay lofty instead of sinking before it reaches the oven. Think of this as your friendly, flour-dusted roadmap to a bakery-worthy angel cake at home.
The beauty of angel food cake is that it gets its volume from structure and steam rather than fat. Beaten egg whites trap tiny bubbles, then the heat of the oven expands those bubbles while the flour and sugar set everything into a tender sponge. That is why the batter looks so billowy going into the pan and why the finished cake has that signature feather-light bite.
Unlike a butter cake, which relies on creamed butter and sugar for richness, this cake is all about balance. Too much flour can make it tough, too little sugar can make it dry, and under-whipped whites will not provide enough lift. The texture should be springy but not rubbery, sweet but not cloying, and sturdy enough to slice while still feeling almost weightless on the plate.
One of the quiet secrets is patience. You want to build the foam gradually, sift the dry ingredients well, and fold with a light hand. None of the steps are difficult, but each one protects the air you worked so hard to create.
The ingredient list is beautifully short, so each item has a clear job. You will need egg whites, superfine sugar, cake flour, cream of tartar, vanilla extract, and fine sea salt. Because there are so few components, this is the moment to use a fragrant vanilla, fresh eggs, and flour that has not been sitting open in the pantry since last winter.

Cake flour is the classic choice because it has a lower protein content than all-purpose flour, which helps keep the crumb delicate and soft. It also blends more easily into the foam when sifted with a portion of the sugar. If you have ever compared a sponge made with all-purpose flour to one made with cake flour, the difference is subtle but real: the cake flour version is finer, softer, and less chewy.
Superfine sugar is another small detail that makes a big difference. Its tiny crystals dissolve more readily into the whites, creating a glossy, stable meringue without grittiness. If you only have regular granulated sugar, you can pulse it briefly in a food processor until it is finer, taking care not to turn it into powdered sugar.
Cream of tartar is the stabilizer that gives the foam strength and resilience. It helps the whites whip higher and hold their shape, which is especially important in a cake that depends on air for its rise. A splash of vanilla extract gives the cake that clean, bakery-style aroma; homemade vanilla extract is lovely here because the flavor is front and center.
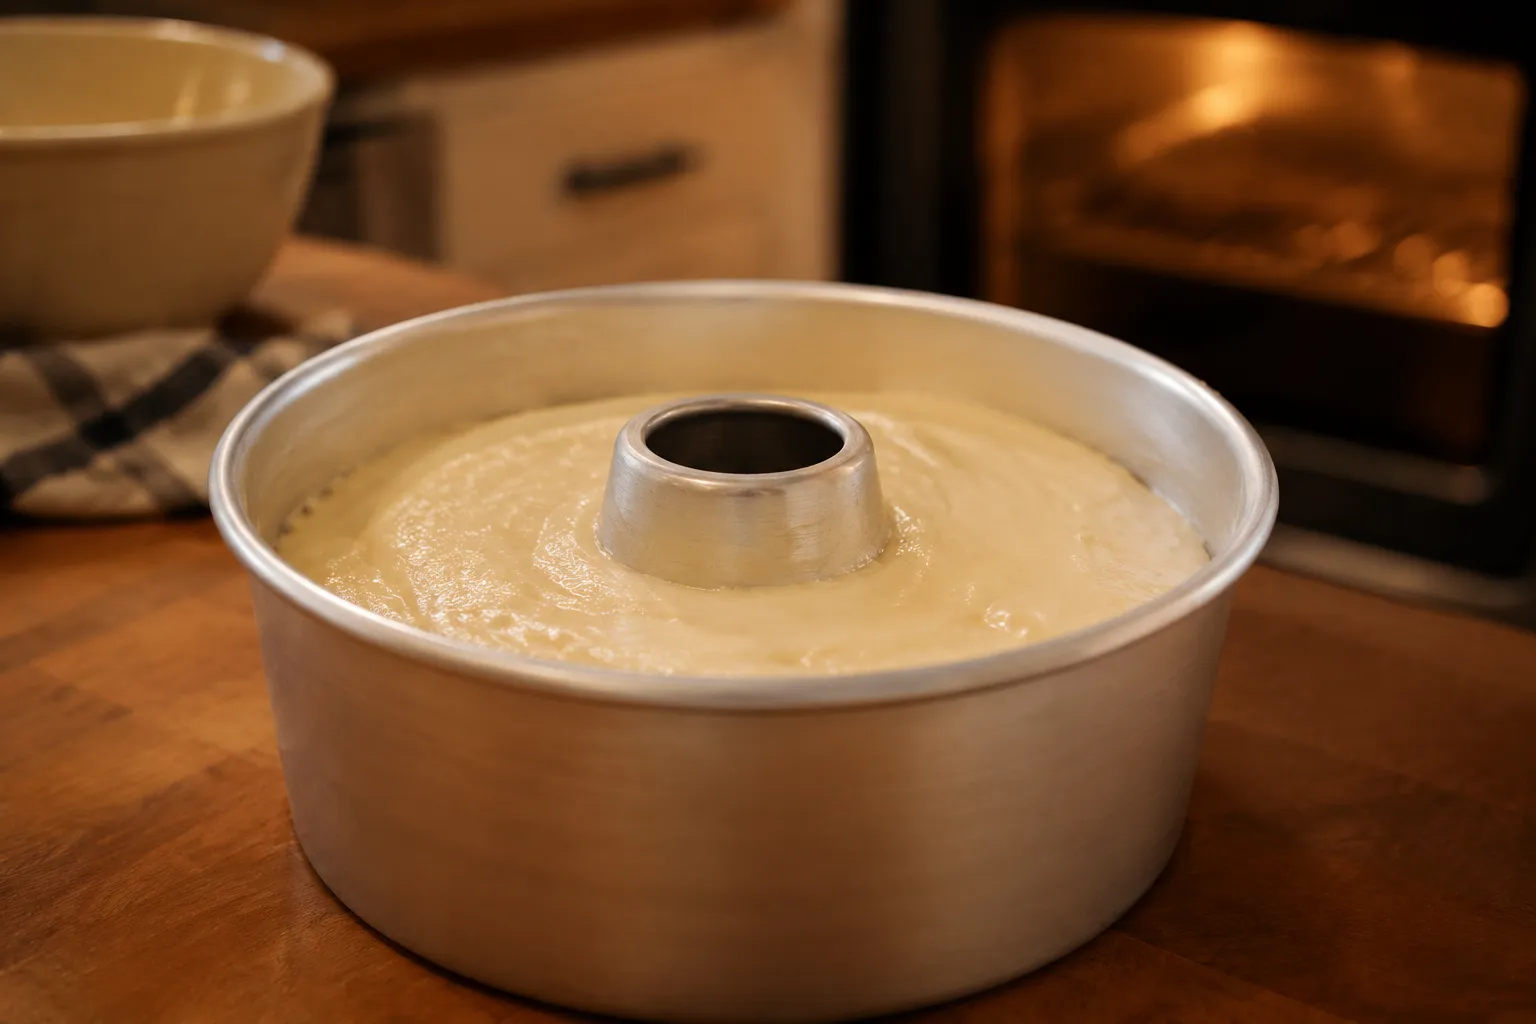
A proper tube pan is more than just a pretty shape; it is part of the engineering of the cake. The center tube allows heat to reach the middle of the batter quickly, so the cake bakes evenly from the outside and inside at the same time. This matters because angel food batter is so light that it needs steady support as it climbs.
The pan should be ungreased. That may feel wrong if you are used to buttering every cake pan in sight, but the batter needs to cling to the sides as it rises. Grease creates a slippery surface, and a slippery surface can cause the cake to slump instead of climbing tall and proud.
A two-piece aluminum pan is ideal because it conducts heat well and makes removing the cake easier once it has cooled. Nonstick pans are not the best choice for this style of cake because, again, the batter needs traction. If your pan has little feet around the rim, those are designed to help the cake cool upside down; if not, you can invert the center tube over the neck of a sturdy bottle.
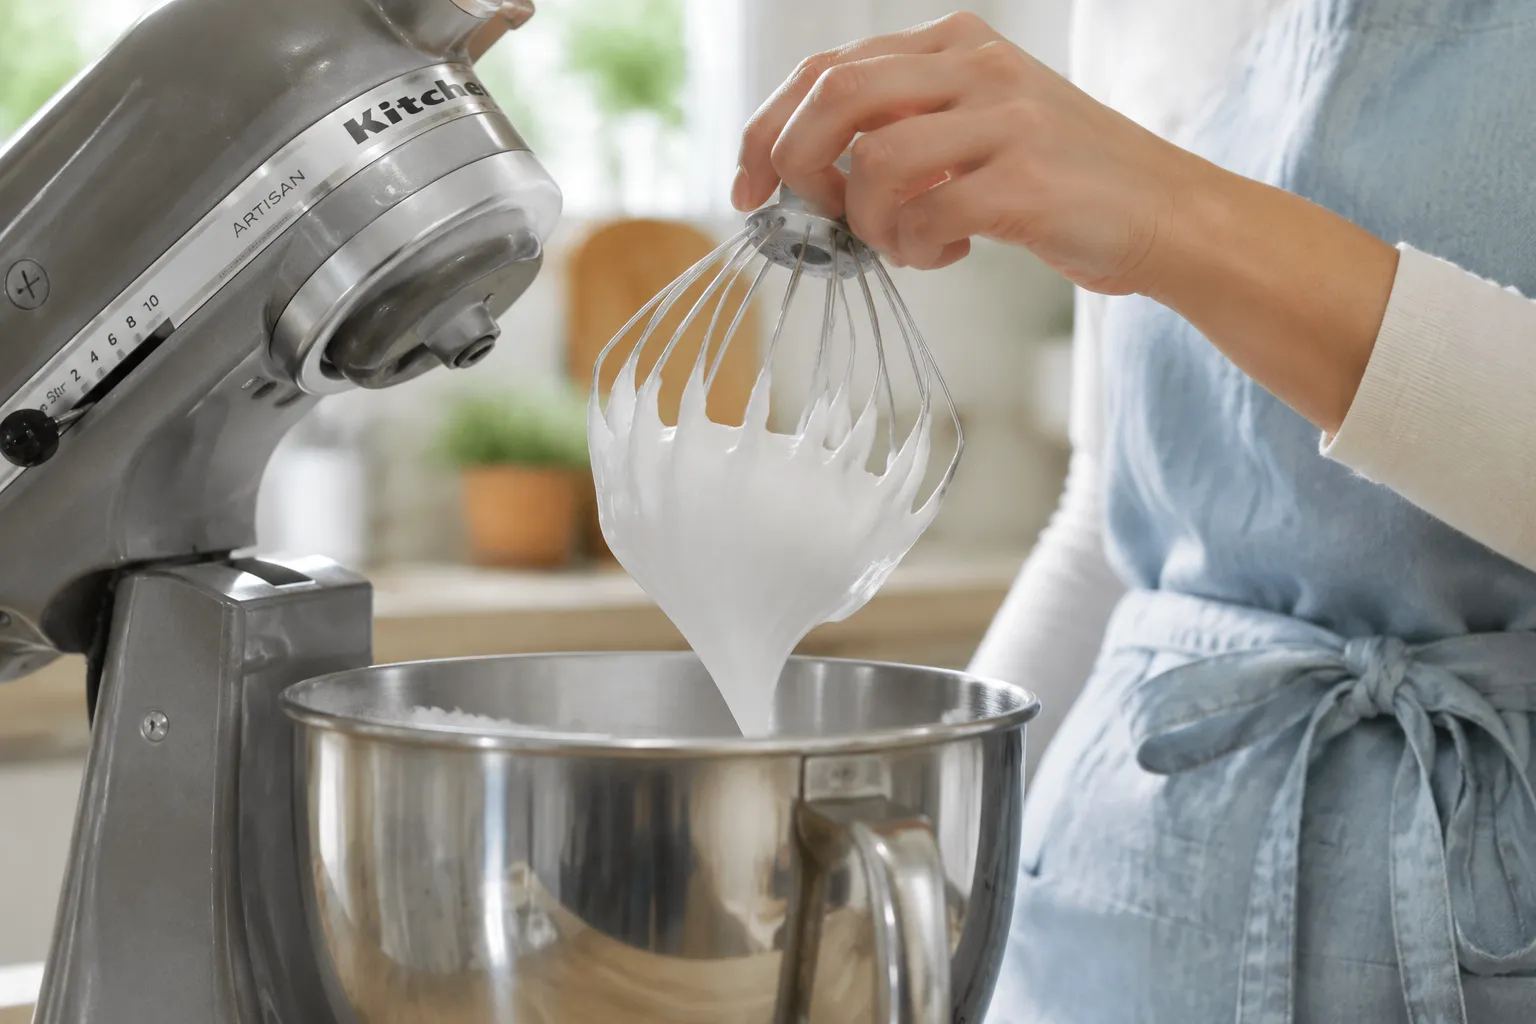
The most important technique in this cake is creating a stable foam. Start with a perfectly clean mixing bowl and whisk attachment, because even a trace of fat can interfere with the whites. Room-temperature egg whites whip more easily and usually gain volume faster, which is exactly what you want for a tall cake.
At first, the whites will look loose and foamy, like sea foam. As the mixer runs, they will turn opaque and begin to thicken; once the cream of tartar and salt are added, the structure becomes more reliable. The sugar should go in gradually, a spoonful or slow stream at a time, so it dissolves instead of weighing the foam down all at once.
Look for a glossy finish and peaks that stand up when you lift the whisk, with just a slight bend at the tip. This is the sweet spot: strong enough to hold the flour, but not so dry and clumpy that the batter becomes hard to fold. Properly whipped egg whites should look smooth, satiny, and a little luxurious.
Once the foam is ready, the next goal is to incorporate the dry ingredients without crushing all that air. Sifting is not optional here; it lightens the flour mixture and helps it fall over the foam in a fine, even layer. Add it in several additions rather than all at once, then use a wide spatula to sweep down the side of the bowl, across the bottom, and up through the center.
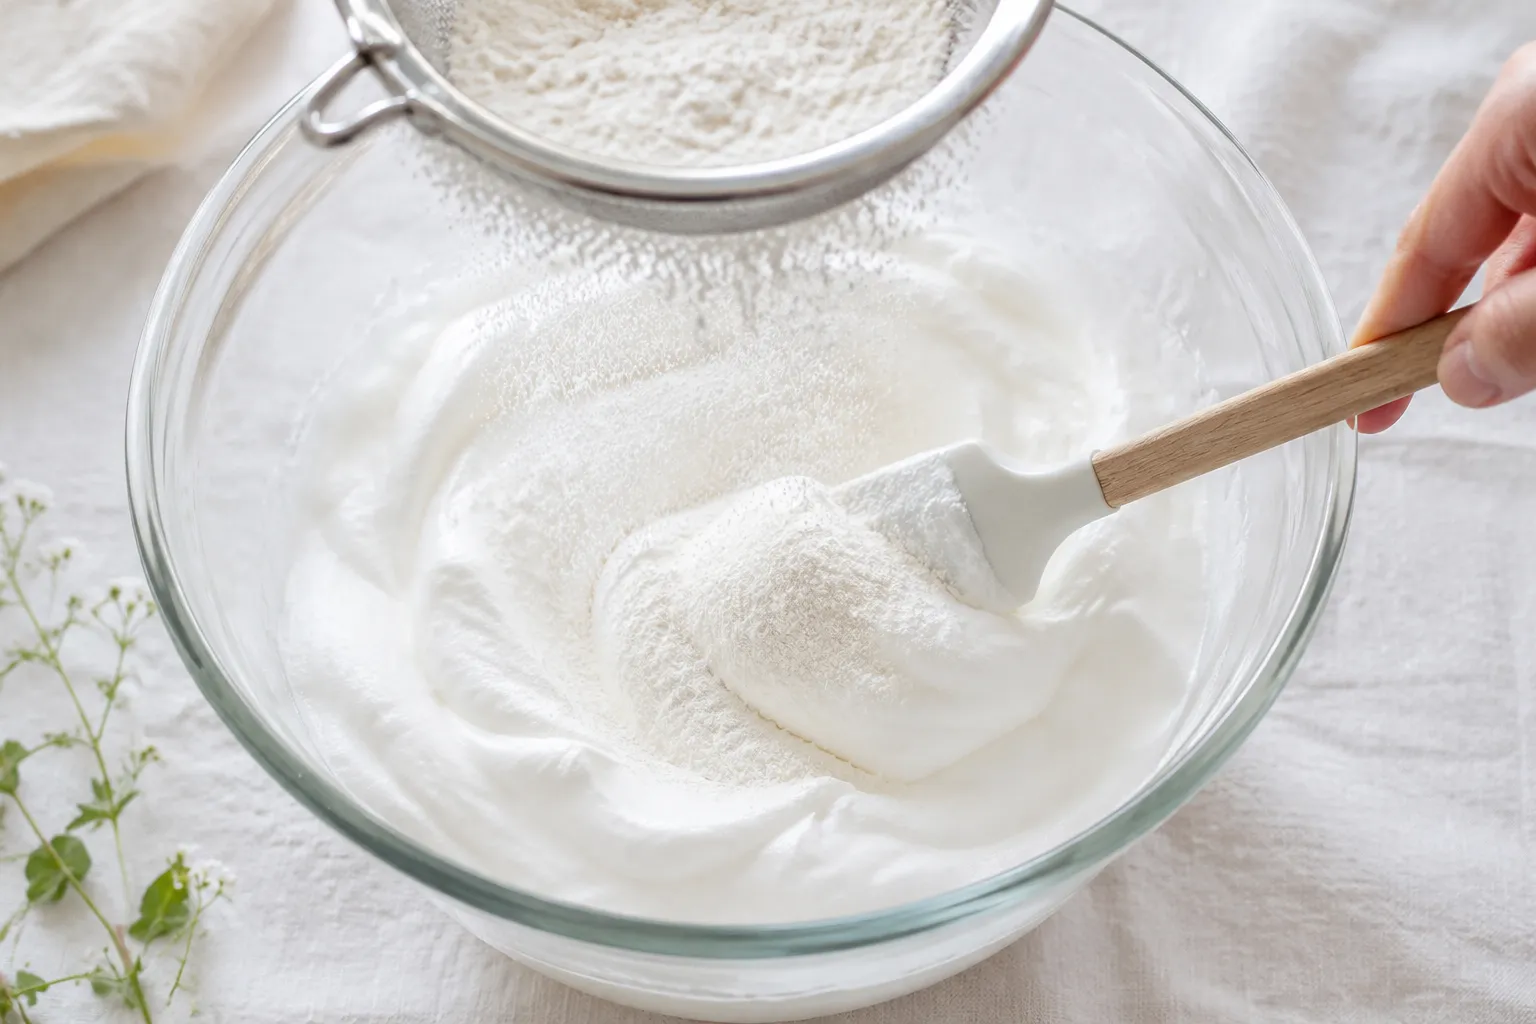
This motion sounds simple, but it is one of the defining steps in the recipe. You are not stirring, beating, or smoothing aggressively. You are gently turning the foam over itself until the flour disappears, stopping as soon as there are no dry streaks.
The finished batter should still look airy and slightly mounded, not thin or pourable. If it suddenly becomes soupy, it has likely deflated from overmixing. A few tiny flour specks are less damaging than a batter that has been folded into submission, so err on the side of gentleness.
Transfer the batter to the ungreased pan and smooth the top lightly. Some bakers like to run a butter knife through the batter once or twice to release large hidden air pockets; keep the motion slow and minimal so you do not knock out the smaller bubbles that give the cake its lift. The pan should go into a fully preheated oven so the structure begins setting right away.
As it bakes, the top will rise, turn golden, and develop those charming little cracks that signal a classic angel cake. The cake is done when it springs back lightly when touched and a skewer inserted near the center comes out clean. Avoid opening the oven too early, because a sudden temperature drop can interrupt the rise.
Cooling is just as important as baking. The cake must be inverted immediately so gravity helps stretch and hold the delicate structure while it sets. Let it cool completely in the pan before loosening the edges with a thin knife; if you unmold too soon, the warm crumb can compress under its own weight.
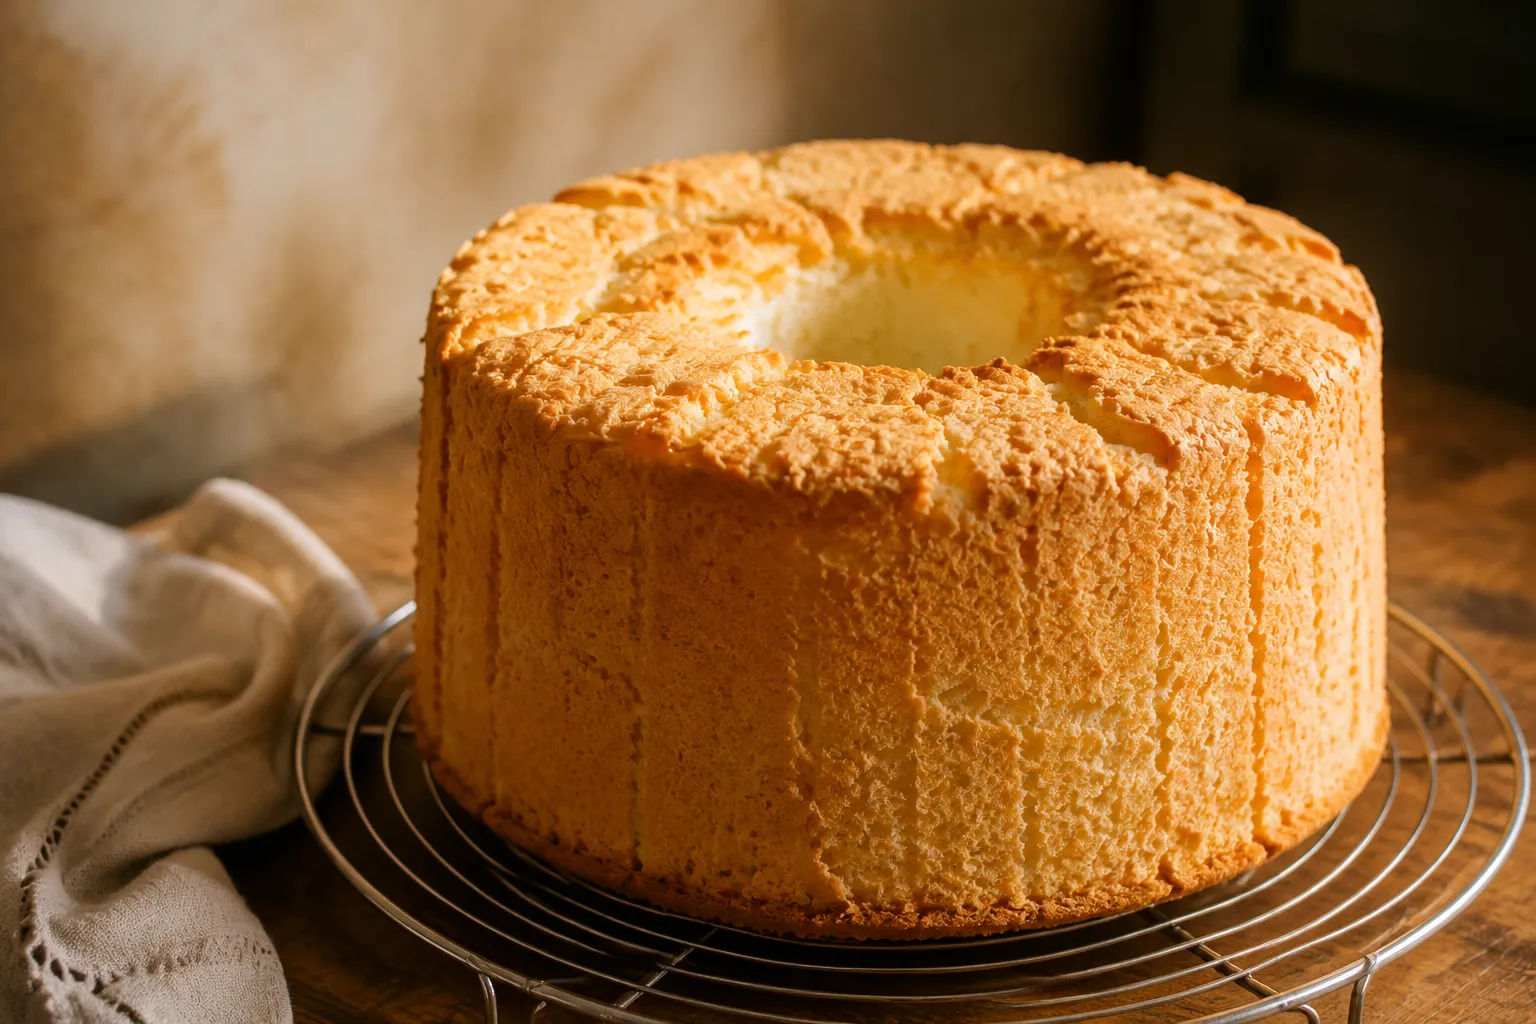
A well-made angel food cake has a pale, snowy interior with many tiny air pockets rather than a few giant holes. The crumb should spring back when gently pressed and tear into soft, slightly stretchy pieces. It should not feel wet, dense, or gummy in the center.
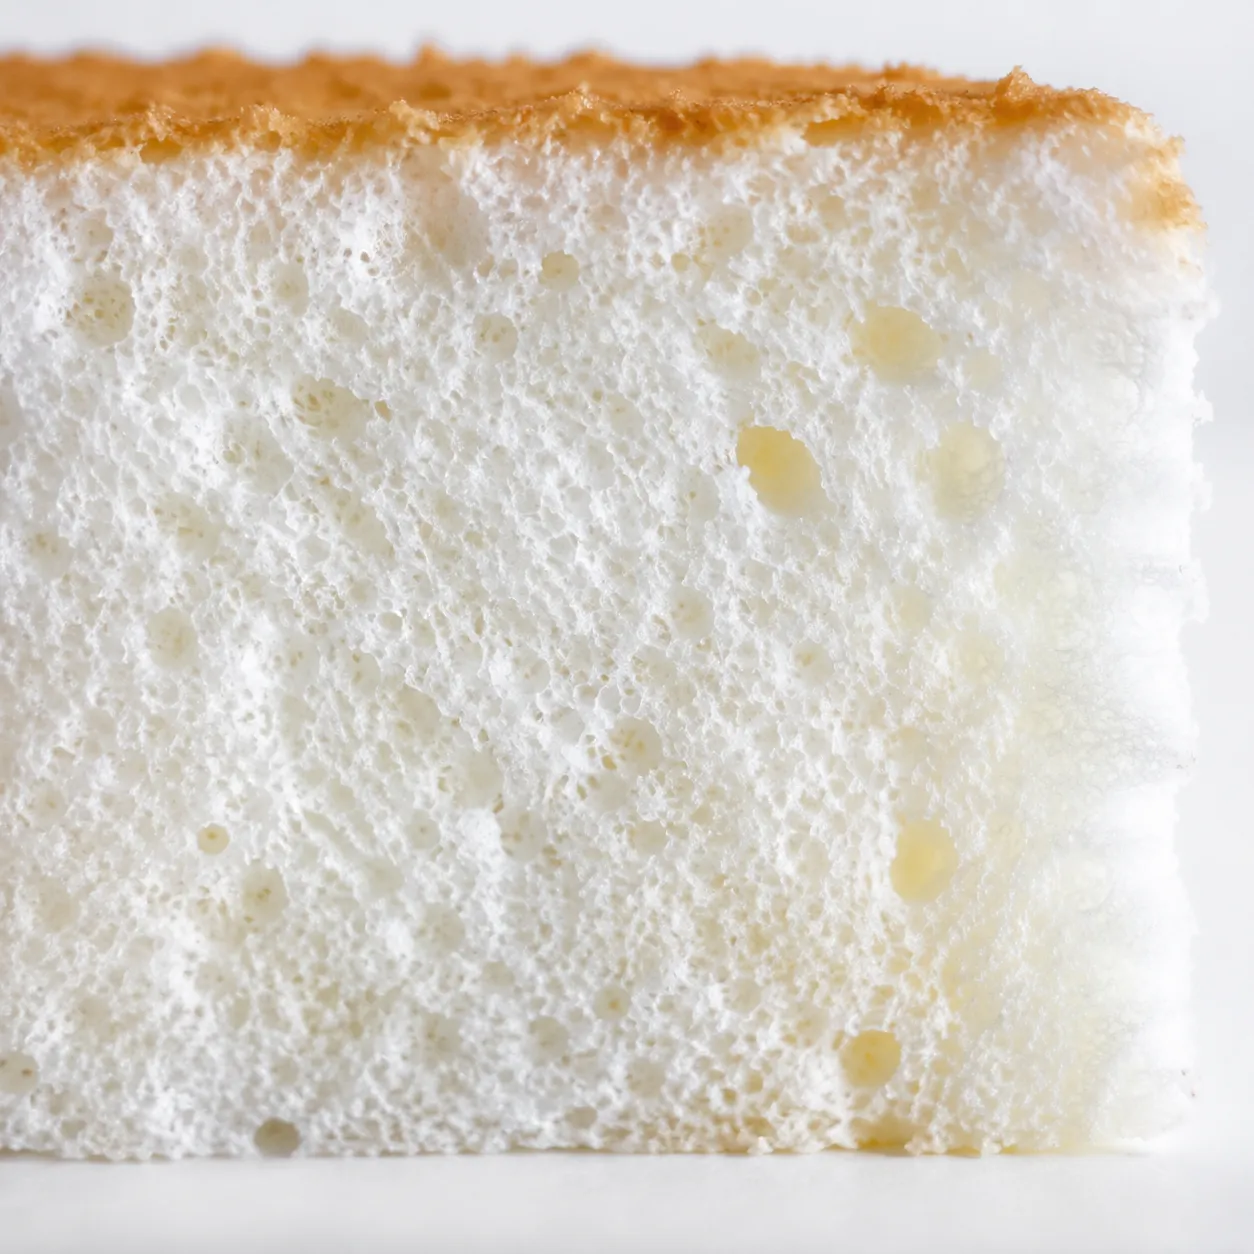
If the cake looks compact near the bottom, the foam may have deflated during folding or the cake may have been removed from the pan before it was fully cool. Large tunnels can mean the batter had big air pockets that were not released before baking. A slightly uneven crumb is still delicious, but learning to read the slice helps you refine your next bake.
For clean slices, use a serrated knife and a gentle sawing motion rather than pressing straight down. You can also use an angel food cake cutter if you have one, but a sharp bread knife works beautifully. The goal is to glide through the sponge without squashing its delicate structure.
This is the part where the cake becomes a celebration. The simplest topping is a spoonful of macerated strawberries, which bring juicy sweetness and a ruby-red syrup that soaks lightly into the cake. Add stabilized whipped cream if you are serving guests and want the cream to hold its shape on a dessert table.
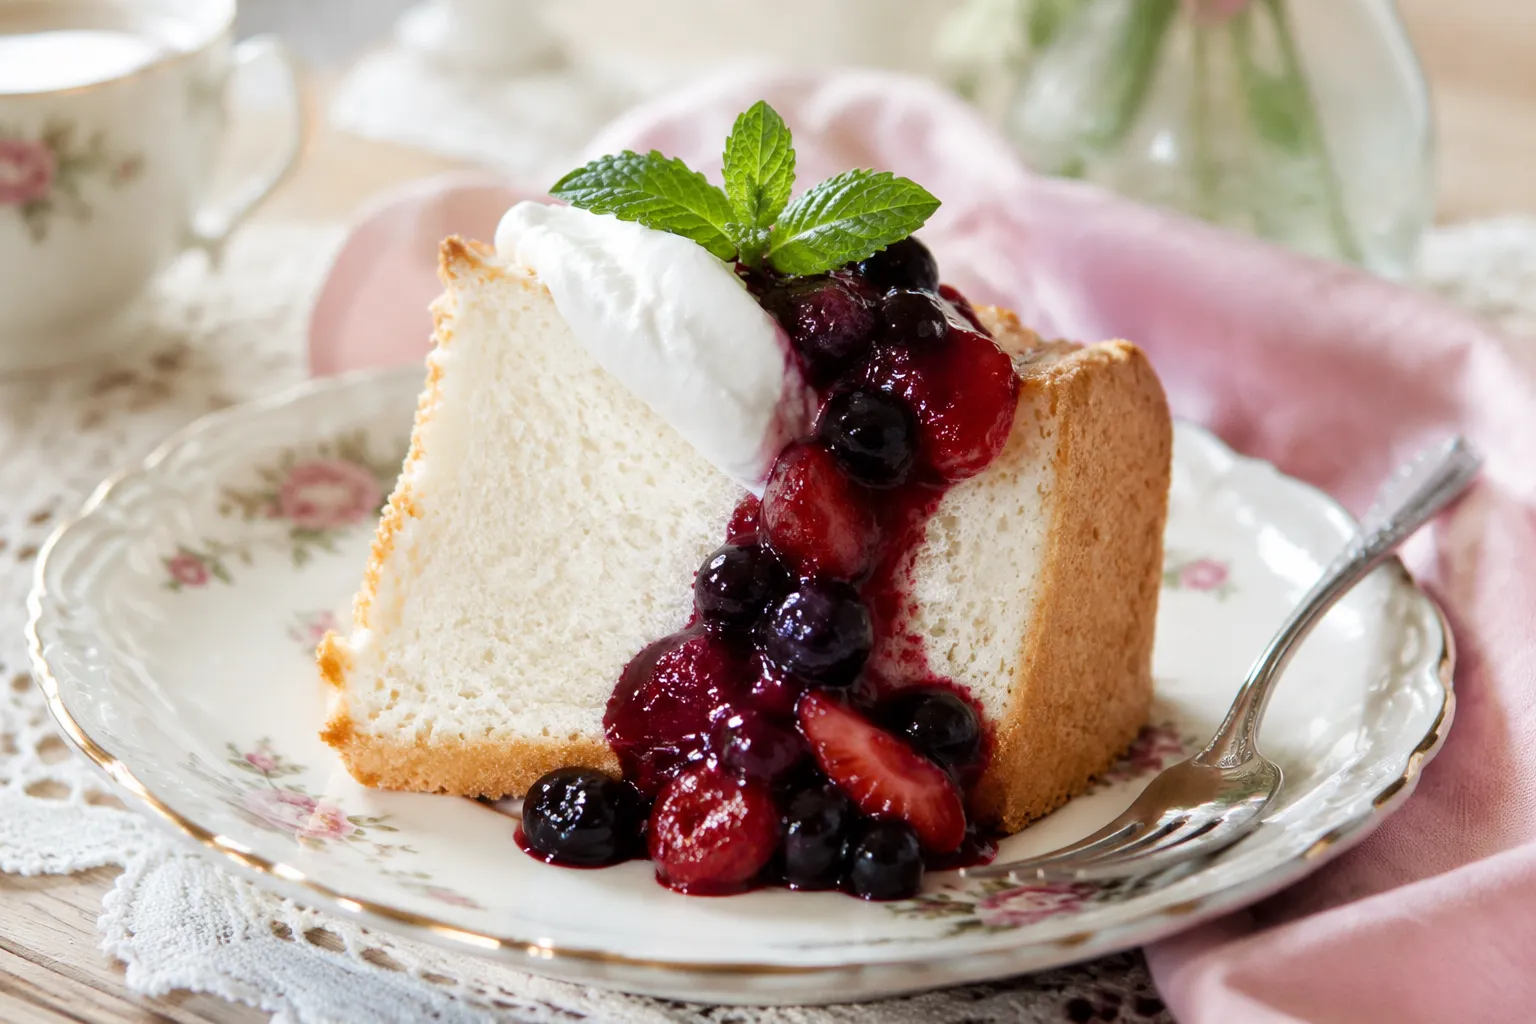
For a brighter finish, drizzle slices with a thin lemon glaze made from powdered sugar and fresh lemon juice. The tangy glaze plays beautifully against the sweet vanilla crumb and gives the dessert a sunny, springlike feel. A little lemon zest over the top is especially pretty.
If you are leaning cozy and dramatic, try a warm chocolate drizzle or a spoonful of chocolate ganache. The cake itself is light enough that richer toppings never feel too heavy. You can also toast slices lightly and serve them with peaches, raspberries, or a scoop of vanilla ice cream for a summery plated dessert.
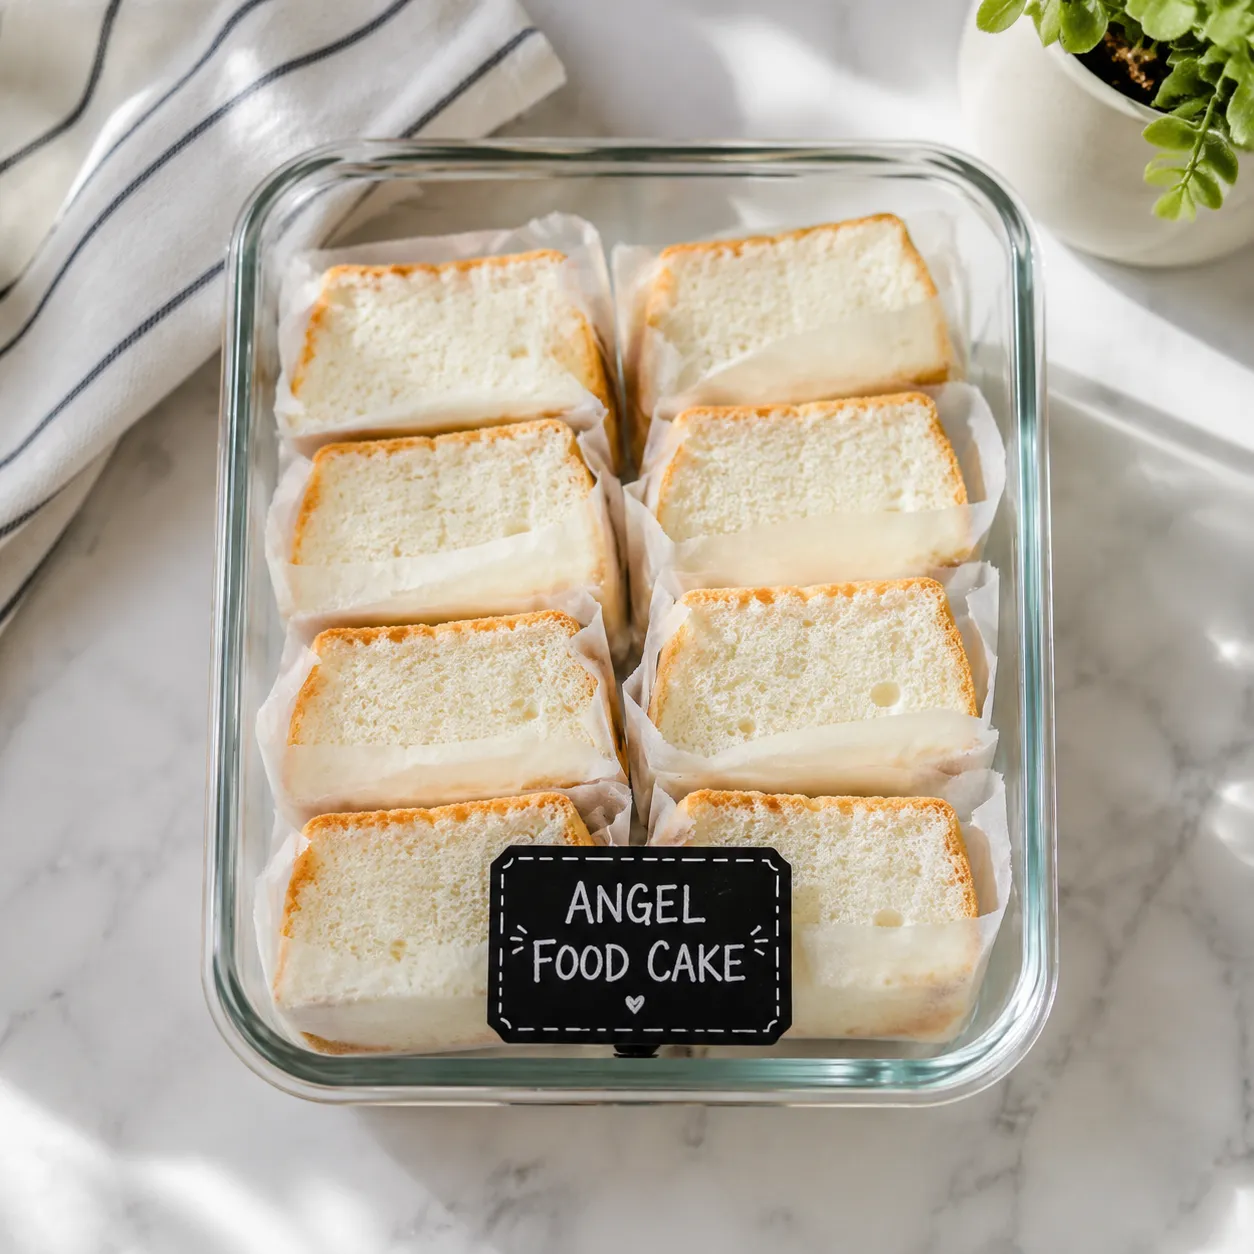
Angel food cake is a wonderful make-ahead dessert because the flavor and texture hold well when the cake is protected from drying out. Bake it earlier in the day, let it cool completely, and keep it covered until serving. Wait to add berries, cream, glaze, or chocolate until close to serving so the exterior stays light and the toppings look fresh.
If you are bringing the cake to a gathering, transport the plain cake separately from any juicy topping. Berry sauces and cream are best spooned over slices just before everyone digs in. This keeps the crumb from becoming soggy and makes the finished plates look as lovely as they taste.
Once you understand the foam, the pan, and the upside-down cooling step, this angel food cake recipe becomes much less intimidating. It is really a study in restraint: whip the whites until glossy, fold just enough, bake until set, and let the pan do its quiet structural work. The reward is a tall, tender cake that looks impressive but comes from everyday pantry staples.
Serve it with berries in June, citrus in winter, chocolate for birthdays, or simply powdered sugar when you want something soft and nostalgic. However you dress it up, the heart of the dessert stays the same: a delicate vanilla sponge with a golden top, a cloud-white center, and that unmistakable homemade charm.
Store plain angel food cake tightly covered at room temperature for up to 2 days. Because the crumb is low in fat, it can dry out if left exposed, so wrap it well or keep it under a cake dome.
For longer storage, wrap individual slices in plastic wrap, place them in an airtight container or freezer bag, and freeze for up to 3 months. Thaw at room temperature, then add whipped cream, berries, glaze, or sauce just before serving.