7 Layer Bars: The Classic Magic Cookie Bar Recipe
Ingredients
Scale
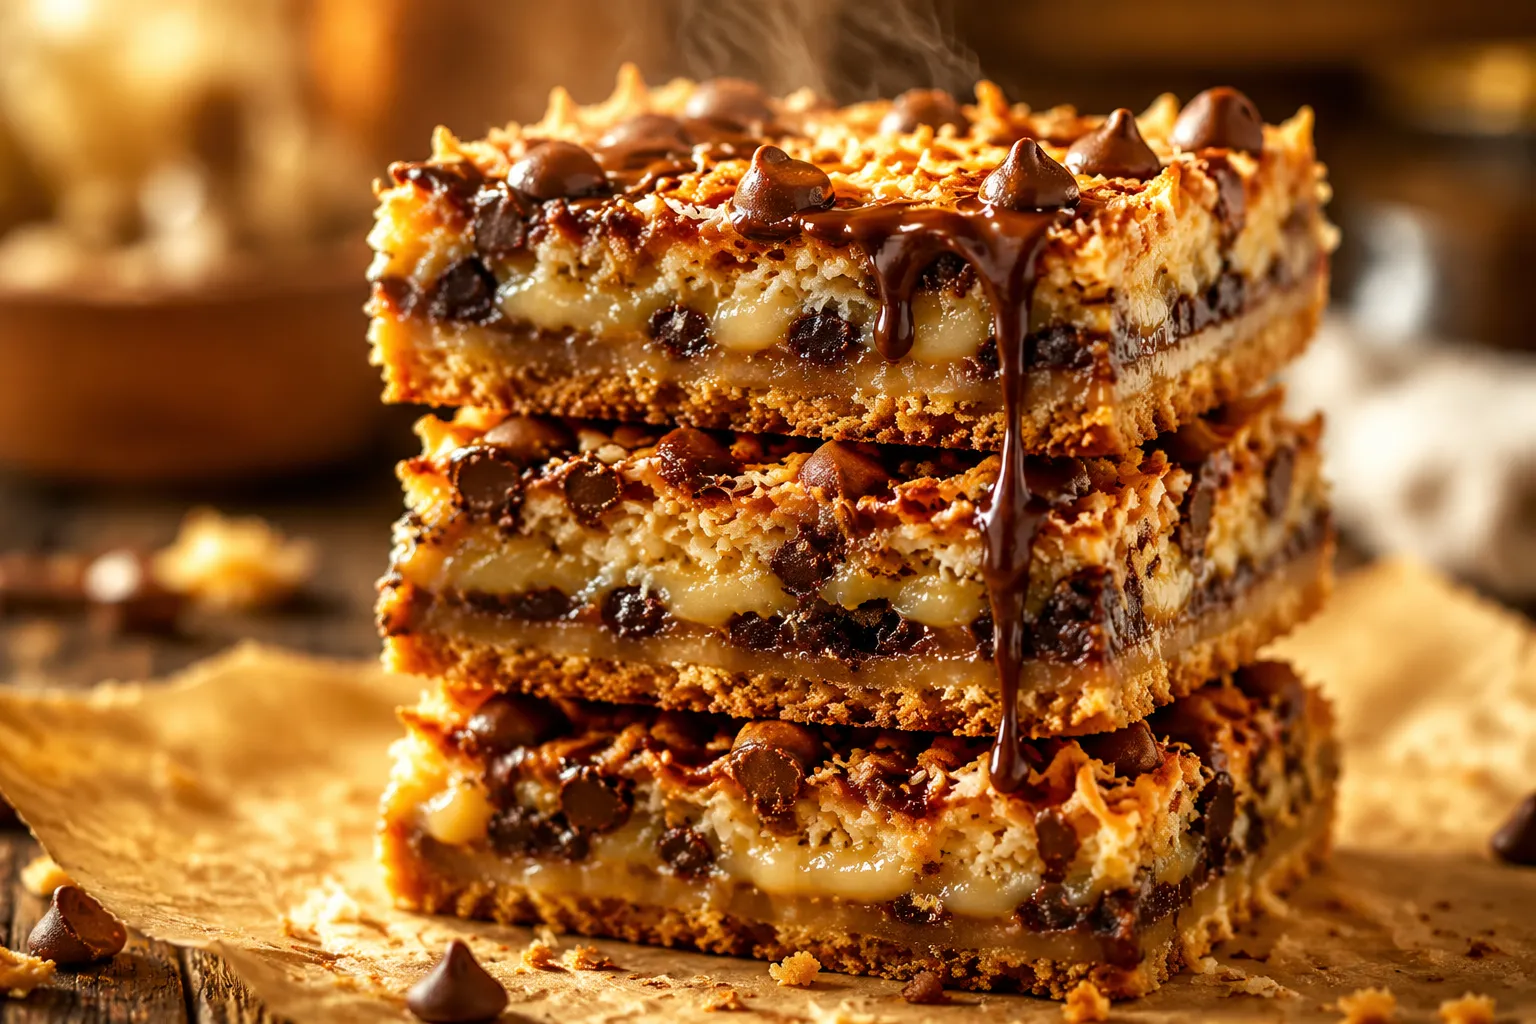
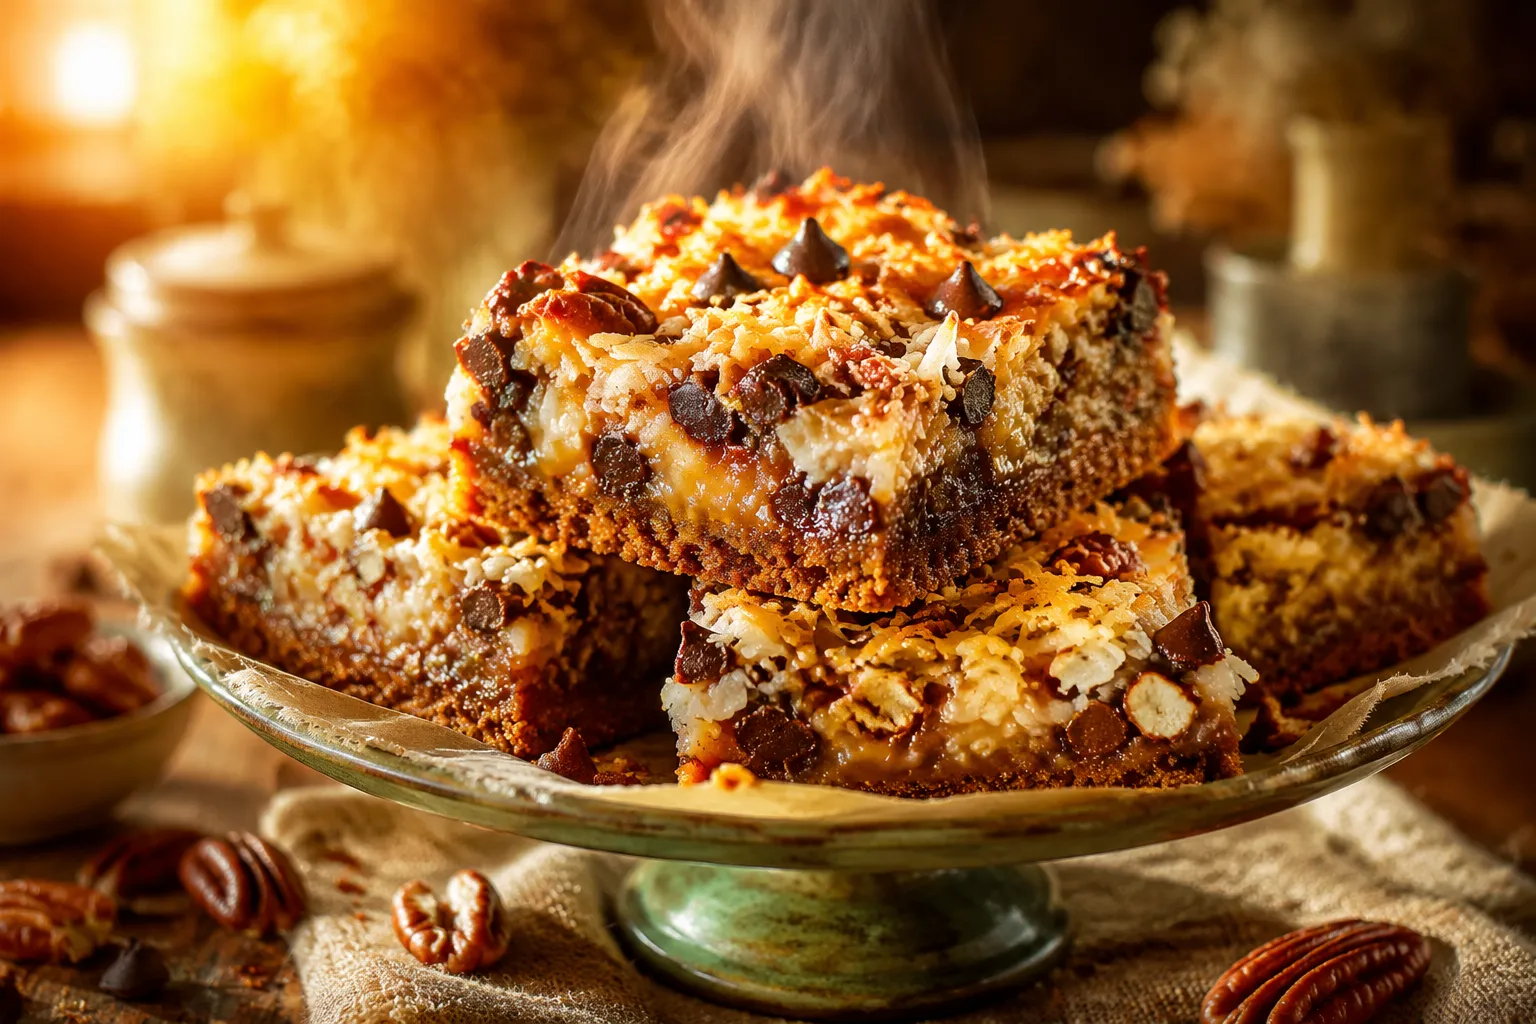
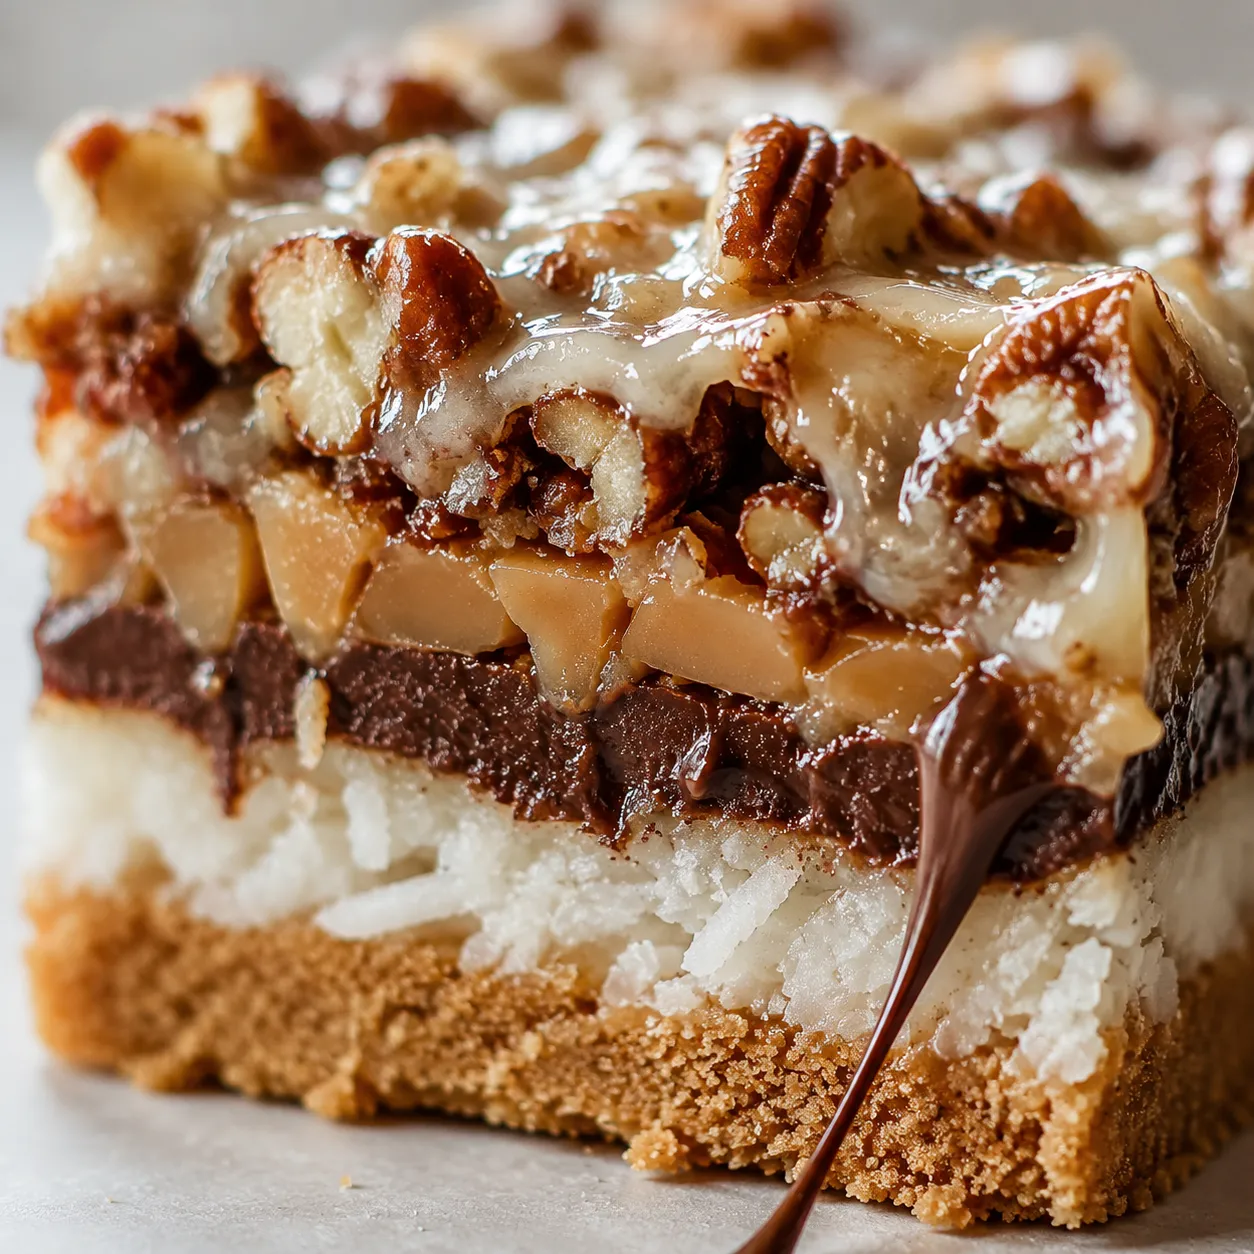
7 layer bars are the ultimate one-pan dessert: a buttery graham crust layered with chocolate, butterscotch, coconut, and pecans, all bound by sweetened condensed milk.
There is something undeniably magical about a fresh pan of 7 layer bars. If you grew up attending church picnics, neighborhood block parties, or festive family gatherings, you likely have a vivid memory of these gooey, textured squares. They are the quintessential one-pan wonder, requiring no fancy equipment, no stand mixer, and absolutely zero fuss. You simply layer a handful of pantry staples into a baking dish, pour over a can of liquid gold, and let the oven do the heavy lifting.
In the pantheon of easy holiday cookie bars, this recipe reigns supreme. The beauty of these bars lies in their perfectly balanced contrast: the crisp, buttery base against the chewy, caramelized top; the slight bitterness of semi-sweet chocolate mingling with the rich, nostalgic sweetness of butterscotch; the earthy crunch of toasted pecans cutting through the dense, milky binder. It is a symphony of textures and flavors that has stood the test of time for very good reason.
Whether you know them as magic cookie bars, Hello Dollys, or by their numerical moniker, these treats are the ultimate bake-and-take dessert. They are sturdy enough to stack in a tin, rich enough to feed a crowd, and universally beloved by kids and adults alike. If you have been searching for foolproof potluck dessert bars that guarantee empty platters and requests for the recipe, you have found exactly what you need.
Before we start stacking, it is worth taking a brief walk down memory lane to understand the origins of this iconic treat. The history of the classic seven layer bars recipe is deeply intertwined with the mid-century boom of convenience baking in the United States. During the 1960s, home bakers were looking for ways to produce spectacular desserts without spending hours measuring, sifting, and creaming.
The original recipe is widely credited to the Gail Borden company, specifically their Eagle Brand product line. To boost sales, the company began printing recipes on the labels of their cans. The concept was revolutionary in its simplicity: use the thick, syrupy milk as an all-in-one binder and sweetener for a pan of layered dry ingredients. Because the milk caramelizes as it bakes, it creates a chewy, fudgy texture that holds everything together without the need for eggs, flour, or additional sugar in the filling. This brilliant marketing strategy cemented the dessert's place in the American culinary canon and made it one of the most famous sweetened condensed milk desserts in history.
Depending on where you grew up, you might know this exact same dessert by a completely different name. In many parts of the country, they are simply called magic cookie bars—a nod to the "magic" of how the loose ingredients fuse into a solid, sliceable bar during baking. In the South, you will frequently hear them referred to as Hello Dolly bars, allegedly named after the hit 1964 Broadway musical starring Carol Channing. Regardless of what your grandmother called them, the fundamental architecture remains the same: a crushed cookie base, a medley of chips and nuts, and a glossy pour of condensed milk.
The success of this dessert relies entirely on the quality and ratio of its components. Because there is no batter to mix, each individual ingredient plays a starring role. Let's break down the layers that make up this legendary treat.
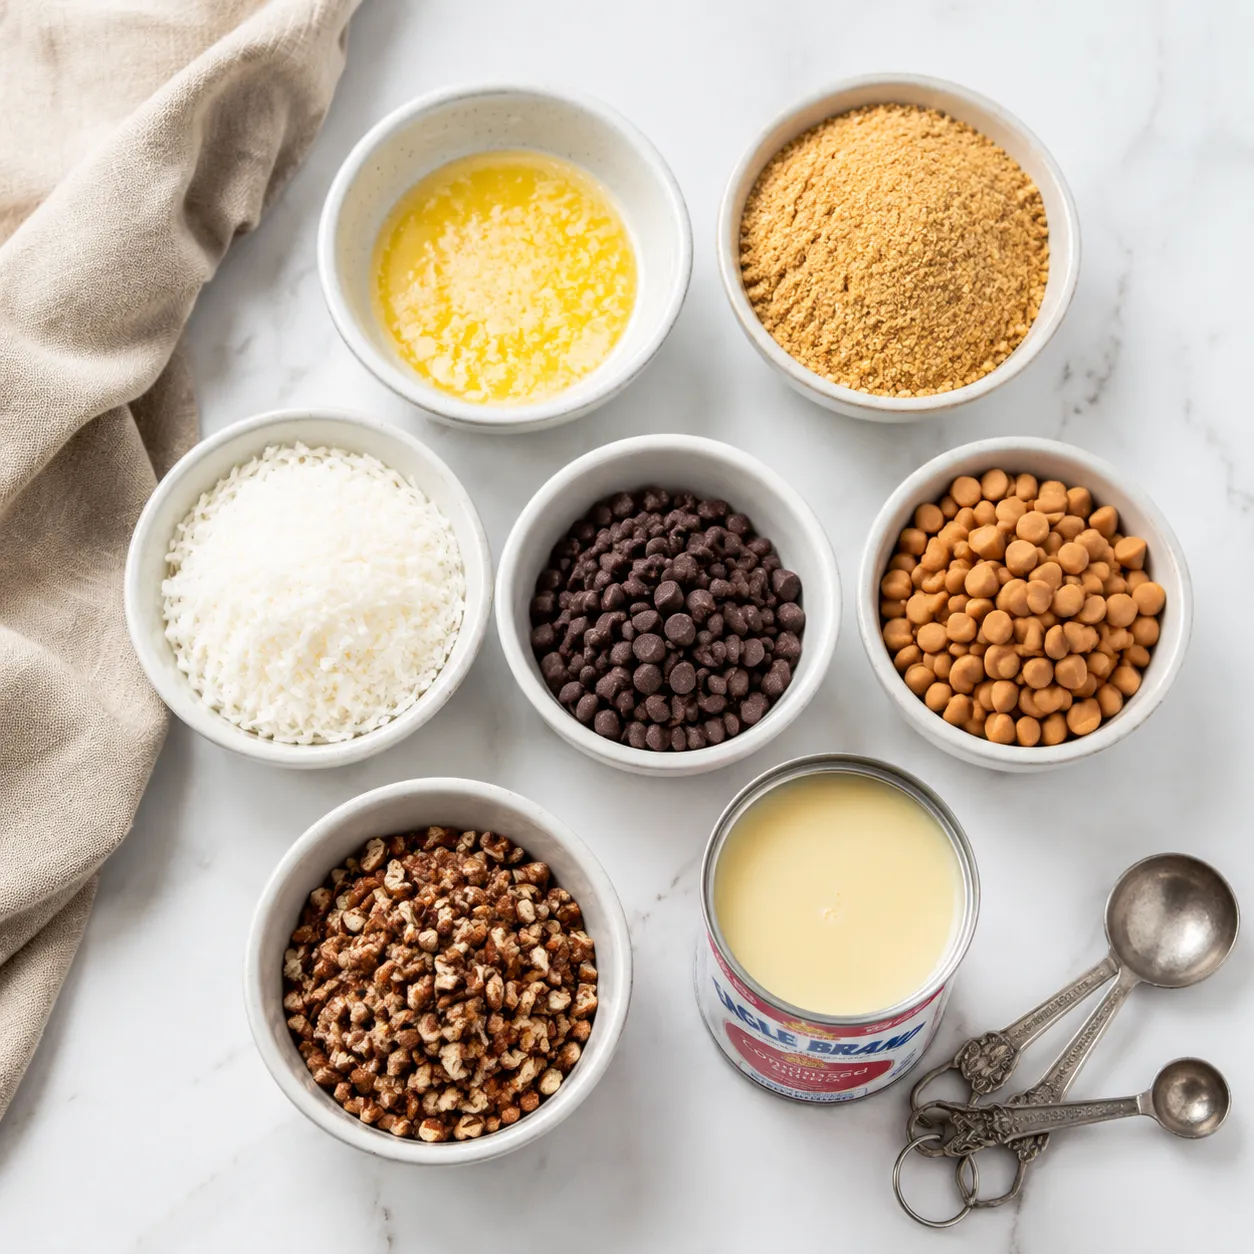
Every great bar dessert begins with a solid foundation, and here, that foundation is built on butter. We use unsalted butter to control the sodium level, melting it down until completely liquid. The butter acts as the primary moisture source for the crust, binding the dry crumbs together and providing a rich, savory undertone that balances the intense sweetness of the layers above.
The second component is the classic graham cracker crust. You can buy pre-crushed crumbs in a box for convenience, or you can pulse whole graham cracker sheets in a food processor until finely ground. The honeyed, slightly nutty flavor of the graham crackers is essential. When mixed with the melted butter and pressed firmly into the pan, it forms a sturdy, slightly crisp base that prevents the gooey toppings from turning into a sticky puddle.
Next comes the shredded coconut. For the best texture and flavor, we recommend using sweetened shredded coconut rather than the desiccated, unsweetened variety. The moisture in the sweetened coconut helps it meld beautifully with the condensed milk, while the strands on the very top of the bars will toast in the oven, providing a delightful chewiness and a gorgeous golden-brown finish.
No pan of decadent bars would be complete without chocolate. While some chocolate chip bar recipes call for milk chocolate, semi-sweet chocolate chips are absolutely crucial here. The slight bitterness of the semi-sweet cocoa cuts through the sugary profile of the other ingredients, preventing the bars from becoming cloying. As they bake, the chips soften and melt into luscious puddles of dark, rich chocolate.
This is arguably the most defining flavor in the entire recipe. Butterscotch chips bring a deeply caramelized, slightly salty, brown-sugar flavor that elevates the bars from simple chocolate treats to complex, nostalgic masterpieces. The way the butterscotch melts and swirls into the semi-sweet chocolate creates a marbled flavor profile that is instantly recognizable to anyone who has ever enjoyed these bars.
To break up the dense, chewy sweetness, we need crunch. Chopped pecans are the traditional choice, offering a buttery, earthy snap that pairs beautifully with the butterscotch and graham flavors. If you prefer, walnuts are an excellent substitute, providing a slightly more astringent, tannic note that also works wonderfully to balance the sugar. Whichever nut you choose, ensure they are roughly chopped so you get a bit of crunch in every single bite.
Finally, the magic ingredient. Sweetened condensed milk is cow's milk from which water has been removed and sugar has been added, resulting in a thick, sticky, intensely sweet syrup. When poured over the dry ingredients and baked, it undergoes a transformation, bubbling and caramelizing into a chewy, toffee-like binder that holds the entire matrix together. Do not confuse this with evaporated milk, which is unsweetened and much thinner—using evaporated milk will result in a watery disaster.

While the process is incredibly straightforward, paying attention to a few key details during assembly will ensure your bars turn out perfectly sliceable and beautifully layered every single time.
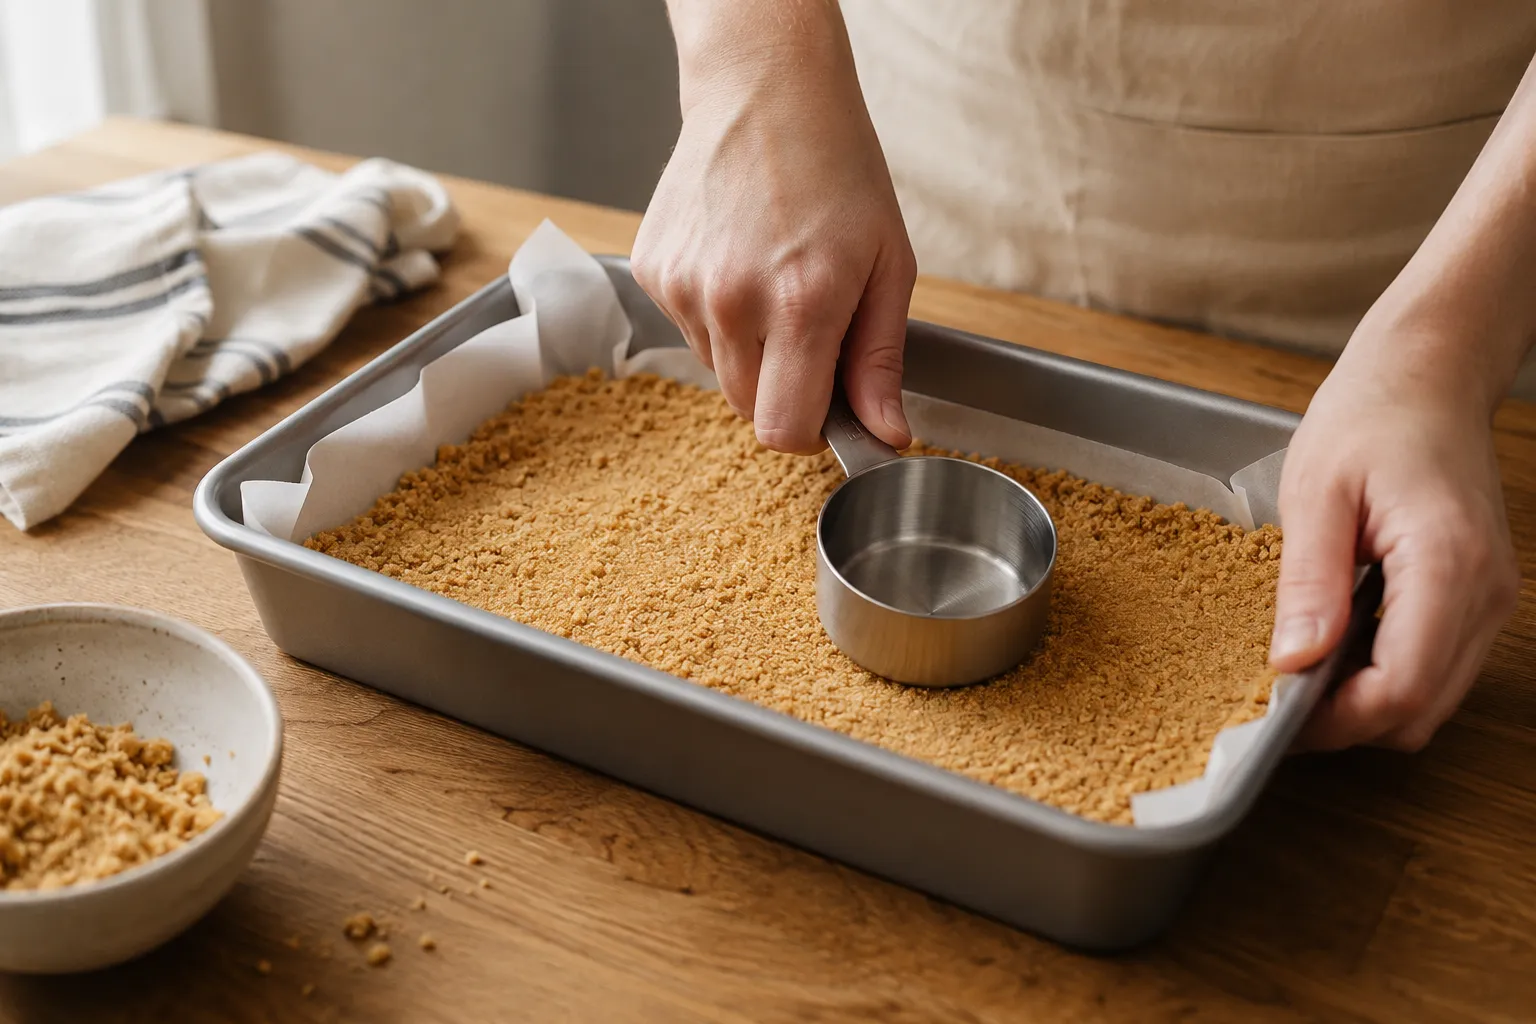
Before you begin, preheat your oven to 350°F (or 325°F if you are using a dark metal or glass pan, which conduct heat more aggressively). The most critical prep step is lining your 9x13-inch baking pan with parchment paper. Leave an overhang on the longer sides to create a "sling." This sling will allow you to lift the entire slab of cooled bars out of the pan in one piece, making slicing infinitely easier and preserving your non-stick bakeware.
Start by tossing your graham cracker crumbs and melted butter in a bowl until the mixture resembles wet sand. Pour this sandy mixture into your prepared pan. Using the flat bottom of a measuring cup or a sturdy glass, press the crumbs firmly and evenly across the bottom of the pan. Take your time here; a well-pressed crust is the secret to bars that hold their shape rather than crumbling when you pick them up.
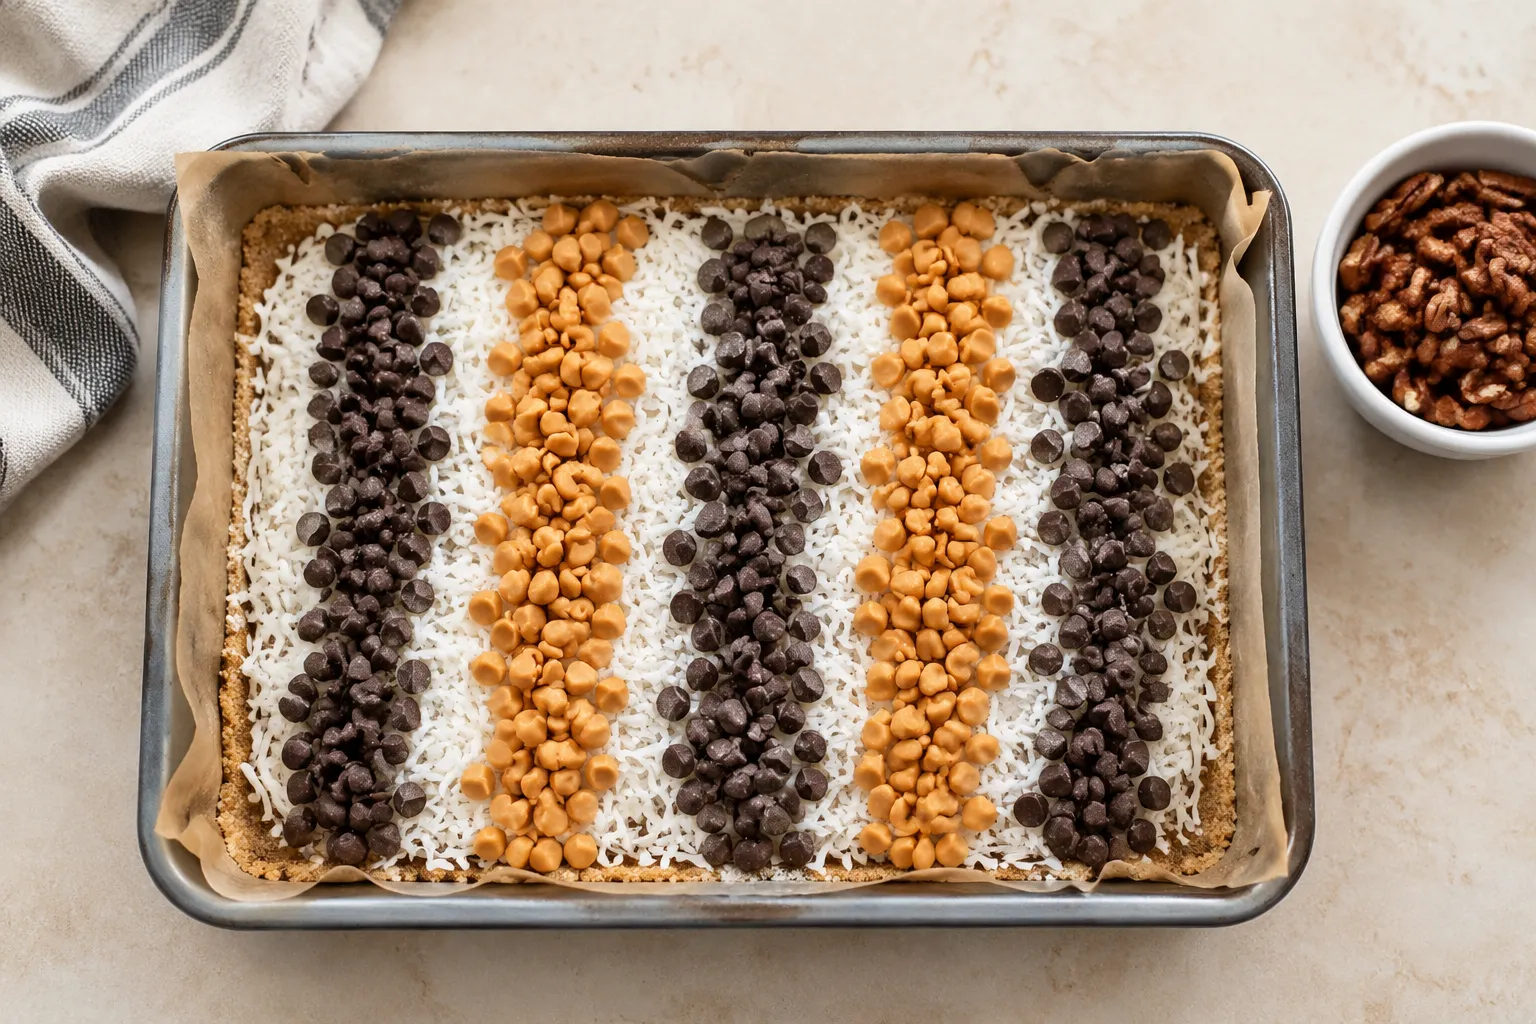
When building your 7 layer bars, the order of operations matters. Start by sprinkling an even layer of shredded coconut over the crust. Next, scatter the semi-sweet chocolate chips, followed by the butterscotch chips. Finally, distribute the chopped pecans evenly over the top. Layering the dry ingredients first creates a porous structure for the liquid to seep into, ensuring every bite is perfectly bound.
Open your can of sweetened condensed milk and slowly drizzle it over the entire pan. Try to cover as much surface area as possible, paying special attention to the edges. Do not stir or mix the pan! Transfer the dish to the oven and bake for 25 to 30 minutes. You are looking for the edges to pull away slightly and turn a deep, bubbling golden brown, while the coconut on top should look beautifully toasted.
Now comes the hardest part: waiting. Baking 7 layer bars requires a watchful eye, but cooling them requires monumental patience. You must let the pan cool completely at room temperature. If you attempt to slice them while they are still warm, the melted chips and hot condensed milk will collapse into a gooey mess. For the cleanest cuts, you can even chill the cooled pan in the refrigerator for an hour before slicing.
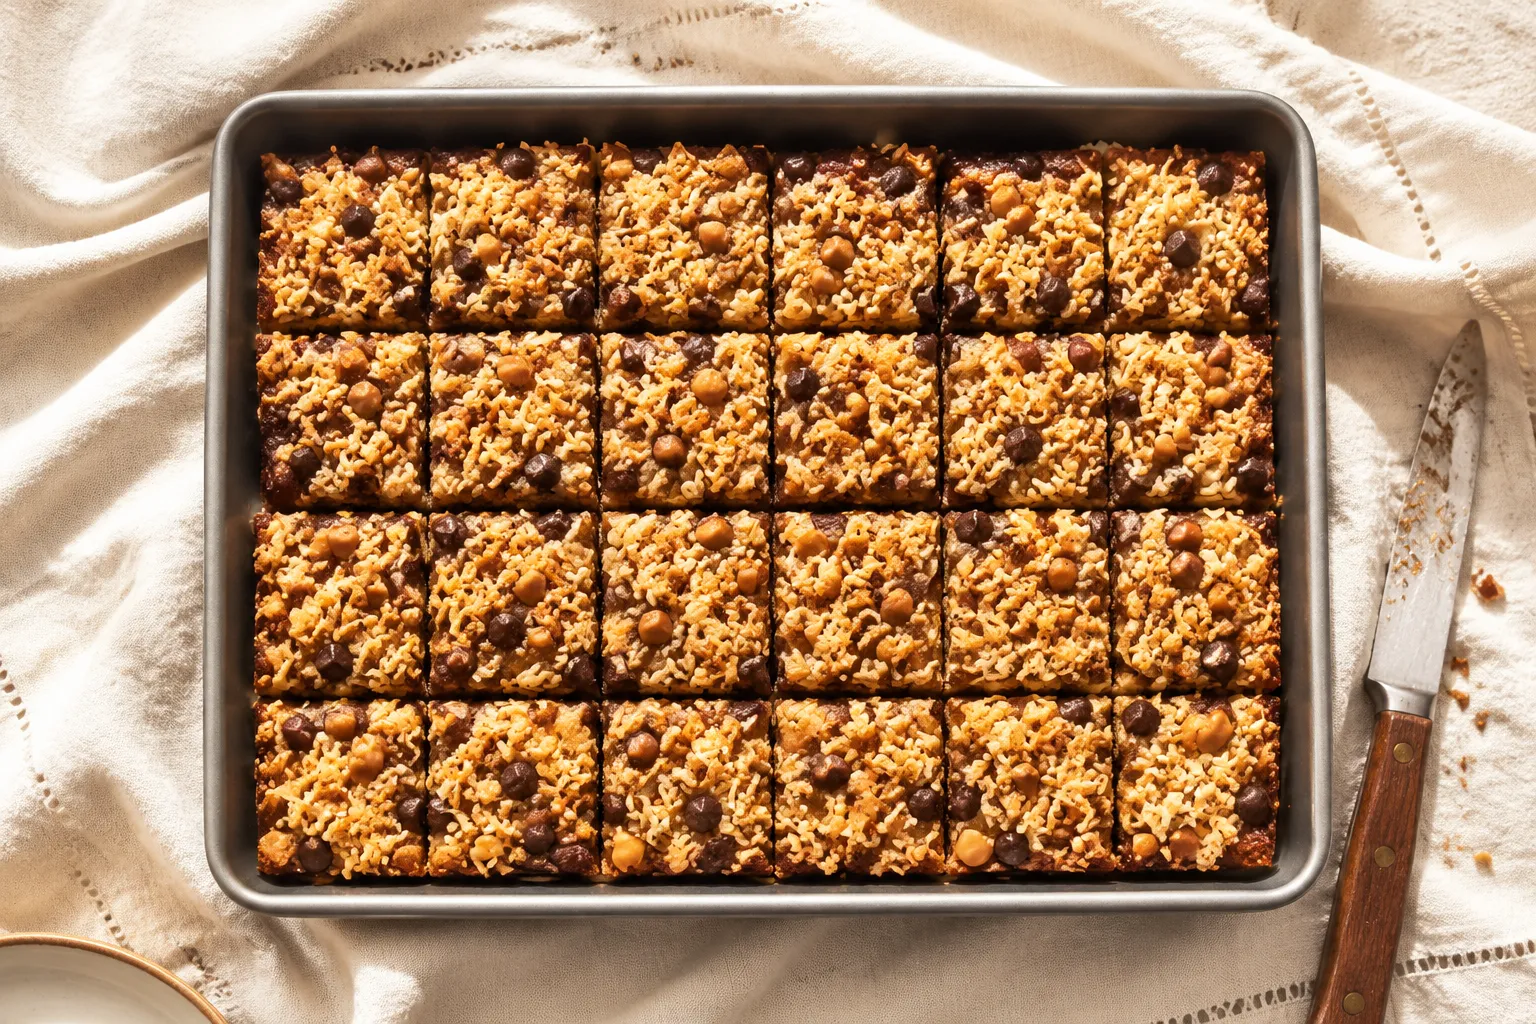
Once your bars are completely cooled and set, use the parchment sling to lift the entire block onto a large cutting board. Using a large, sharp chef's knife, cut the block into 24 even squares. Wiping the blade of your knife with a damp paper towel between cuts will help you achieve clean, bakery-worthy edges.
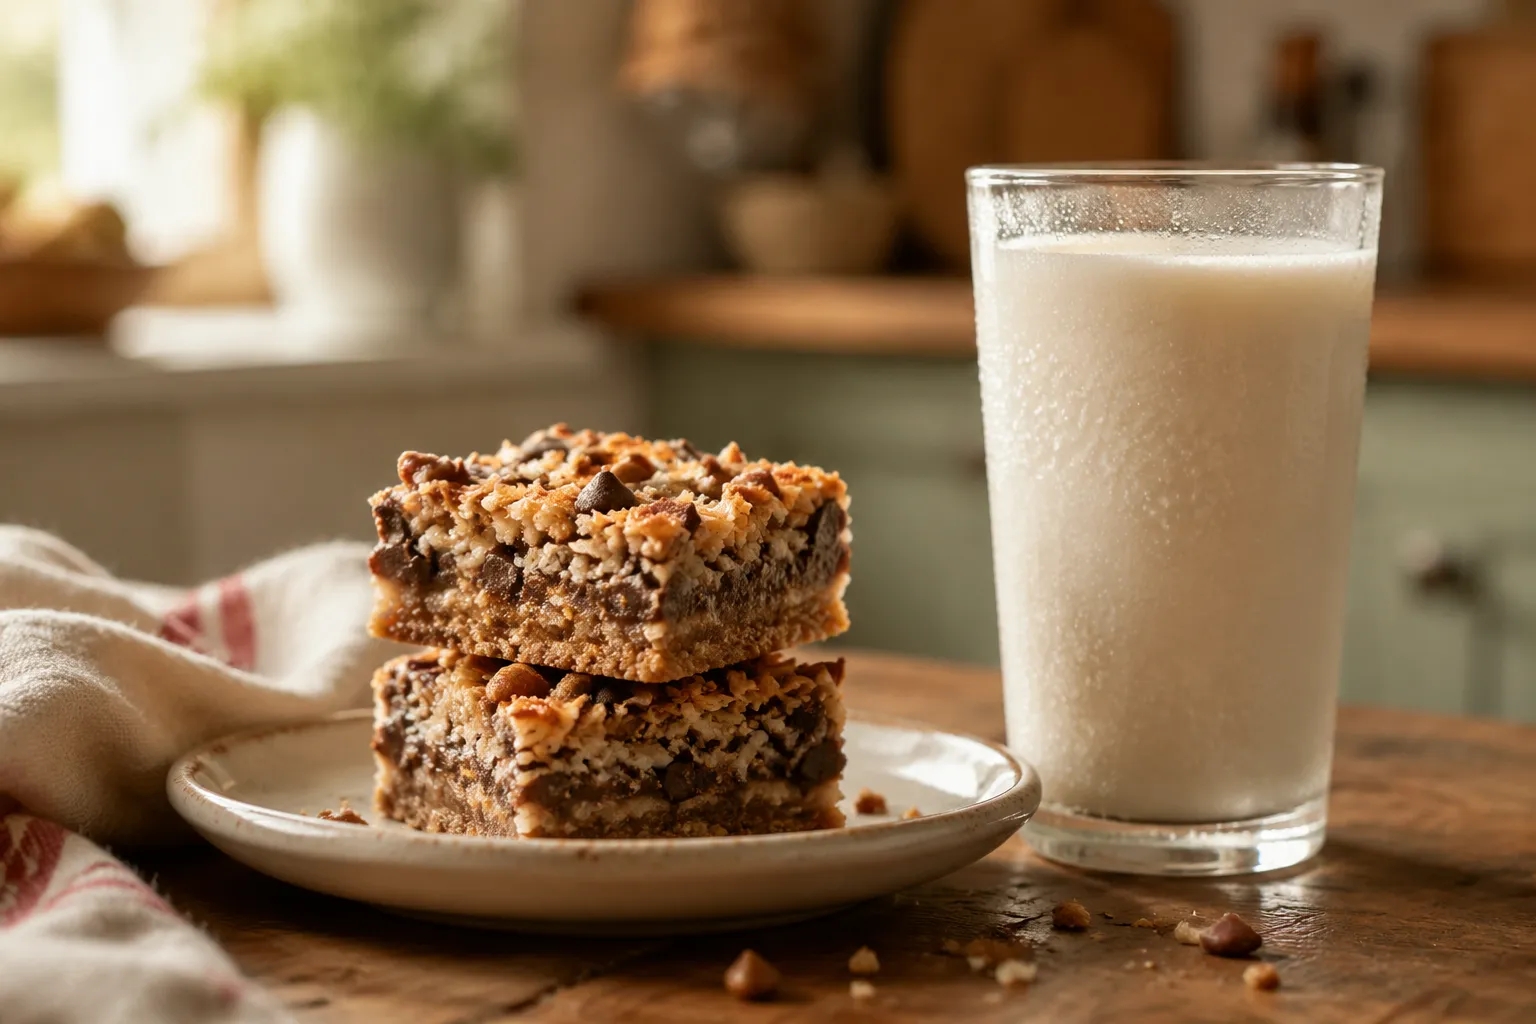
These treats are incredibly rich, so a small square goes a long way. They are best served at room temperature, perhaps alongside a tall glass of ice-cold milk or a hot cup of black coffee to cut the sweetness. Because they travel so well and do not require refrigeration, they are the ultimate make-ahead dessert for bake sales, holiday cookie tins, and care packages.
Slicing into 7 layer bars too early is a recipe for heartbreak, but once they are properly cooled and portioned, they are remarkably resilient. Whether you are baking them for a cozy weeknight treat or a massive holiday party, this classic recipe delivers a perfect bite of nostalgia every single time.
The beauty of this classic recipe is how easily it can be customized. As long as you keep the butter, crust, and condensed milk ratios the same, you can swap the middle layers to suit your cravings or accommodate allergies.
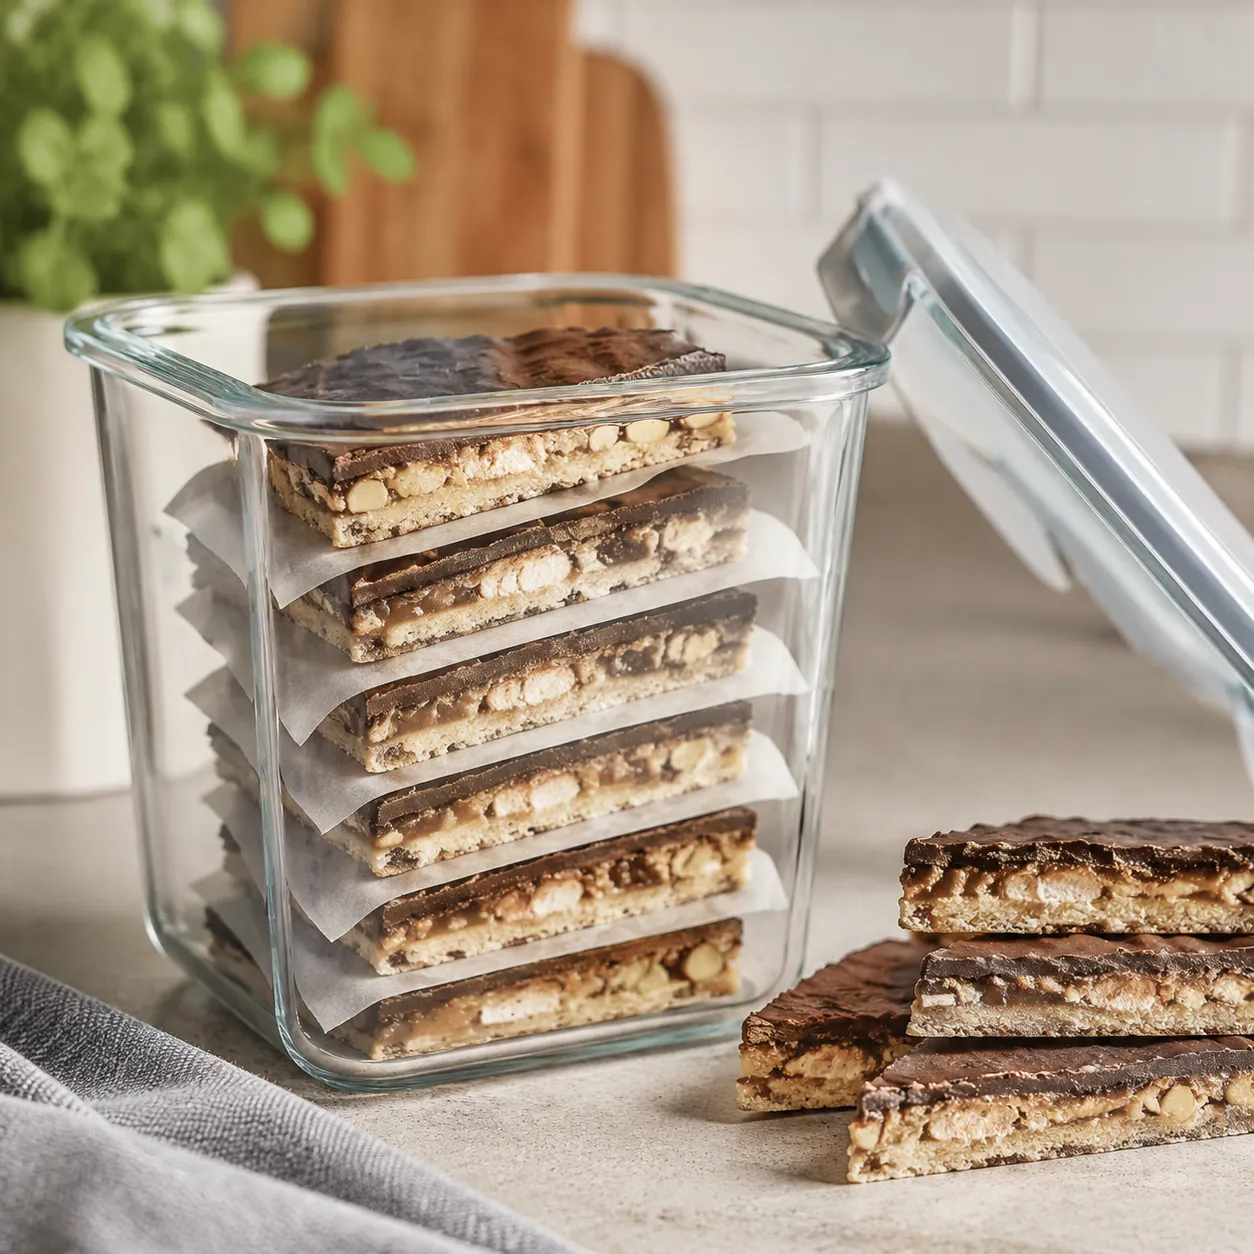
Room Temperature: Store your cut bars in an airtight container at room temperature for up to 5 days. To prevent them from sticking together, place a sheet of wax paper or parchment paper between the layers. They maintain their best chewy texture when kept on the counter.
Refrigerator: If your kitchen is particularly warm, or if you prefer a firmer, colder bar, you can store them in the refrigerator for up to a week. Let them sit at room temperature for 10 minutes before eating if you want the chocolate to soften slightly.