Tri Tip Steak: The Best Oven & Grill Recipe
Ingredients
Scale
Meet your new favorite cut: tri tip steak with a smoky Santa Maria rub, a deep mahogany crust, and a rosy, tender interior every single time.
Tri tip steak is the Western beef secret that fancy steakhouses charge triple for, and once you cook one in your own kitchen you'll wonder why you didn't try this cut years ago. This Santa Maria-style recipe gives you a deep mahogany crust, a rosy medium-rare center, and big, beefy flavor with nothing more than a coarse dry rub and a hot fire. It's the kind of dinner that makes you look like you've been grilling for decades, even if it's your first time touching this cut.
I grew up watching my uncles in Central California argue about whose tri tip technique was best — coals or gas, garlic salt or full rub, foil or no foil. After years of borrowing tricks from all of them, I landed on this method: a slow reverse sear that builds a beautifully even pink interior, finished with a hard cast iron crust that crackles when you slice it.
Whether you're feeding six people on a Saturday night or stretching leftovers into sandwiches and tacos all week, this is a recipe worth bookmarking. It's affordable, weeknight-fast once you get the rhythm down, and forgiving enough for first-time grillers who don't want to drop a hundred bucks on a ribeye to practice.
Tri tip steak is a triangular cut from the bottom sirloin, near the hip of the cow. Each animal yields just two of these roasts, which is part of why it stayed regional for so long — California butchers held onto them while the rest of the country sent that meat to the grinder. Today you can find it in most US grocery stores, often labeled as a tri tip roast even though it's perfect for slicing into thin steaks after cooking.
Compared to brisket, this cut cooks in a fraction of the time and has a much leaner, beefier flavor without the heavy fat cap to render. It's closer to picanha in spirit — both are small, intensely flavorful sirloin cuts beloved by grill cooks — but tri tip's looser grain and triangular shape make it a little more forgiving for beginners. Up and down the Central Coast it's known simply as the Santa Maria steak, named for the small town that turned red oak grilling into a regional religion in the 1950s.
If you've ever had a Santa Maria barbecue plate at a backyard cookout in Paso Robles or San Luis Obispo, you already know the magic: the smoke, the salt-pepper-garlic crust, the pink interior, and a stack of pinquito beans on the side. We're chasing that same plate at home tonight, and the only specialty equipment you need is a thermometer and a hot pan.
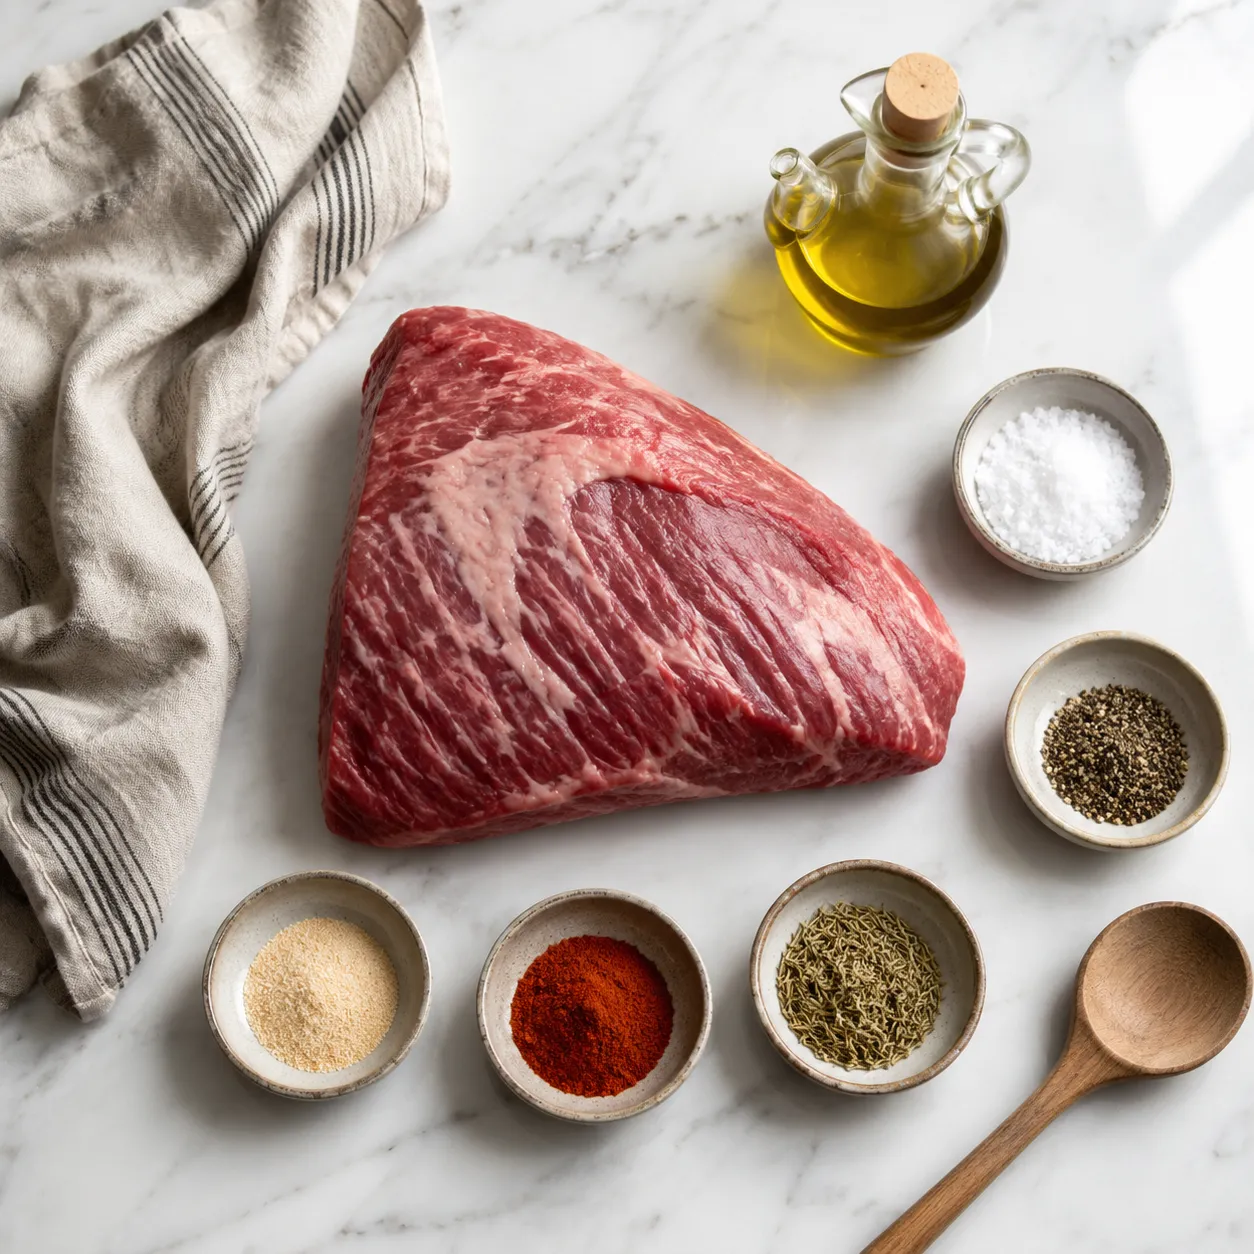
The beauty of this dish is its short shopping list. You need a good roast, a few pantry spices, and a glug of olive oil — that's it. Look for a 2 to 2.5 pound tri tip with a thin, even fat cap and bright cherry-red color. If your butcher offers Choice or Prime grades, grab one. Avoid roasts that are oddly trimmed or cut into a flat strip; you want the classic boomerang shape so the muscle fibers cook evenly.
For the rub, this is a true Santa Maria seasoning blend: kosher salt, coarse cracked pepper, garlic powder, smoked paprika, and a pinch of dried rosemary for that piney, herbal lift. The salt-to-pepper ratio matters. Don't go too fine on the pepper — coarse cracked grinds give you the iconic crackle and visible flecks on the crust that mark a real California-style roast.
If you'd rather skip the dry rub entirely, a quick wet brine works too. Whisk together soy sauce, olive oil, red wine vinegar, brown sugar, and crushed garlic for one of the best steak marinade combinations you'll ever try on this cut. Let the roast sit in it for 4 to 8 hours, then pat dry and proceed with the cook. The marinade route gives you a tangier, slightly softer bite, while the dry rub delivers that classic mahogany bark.
There are three reliable ways to cook this cut: reverse sear on a grill, oven-to-cast-iron, or low-and-slow on a smoker. All three follow the same logic — bring the meat up to temperature gently, then build the crust at the very end with high heat. That two-stage approach is the real secret to even pink edges and zero gray band of overcooked meat under the crust.
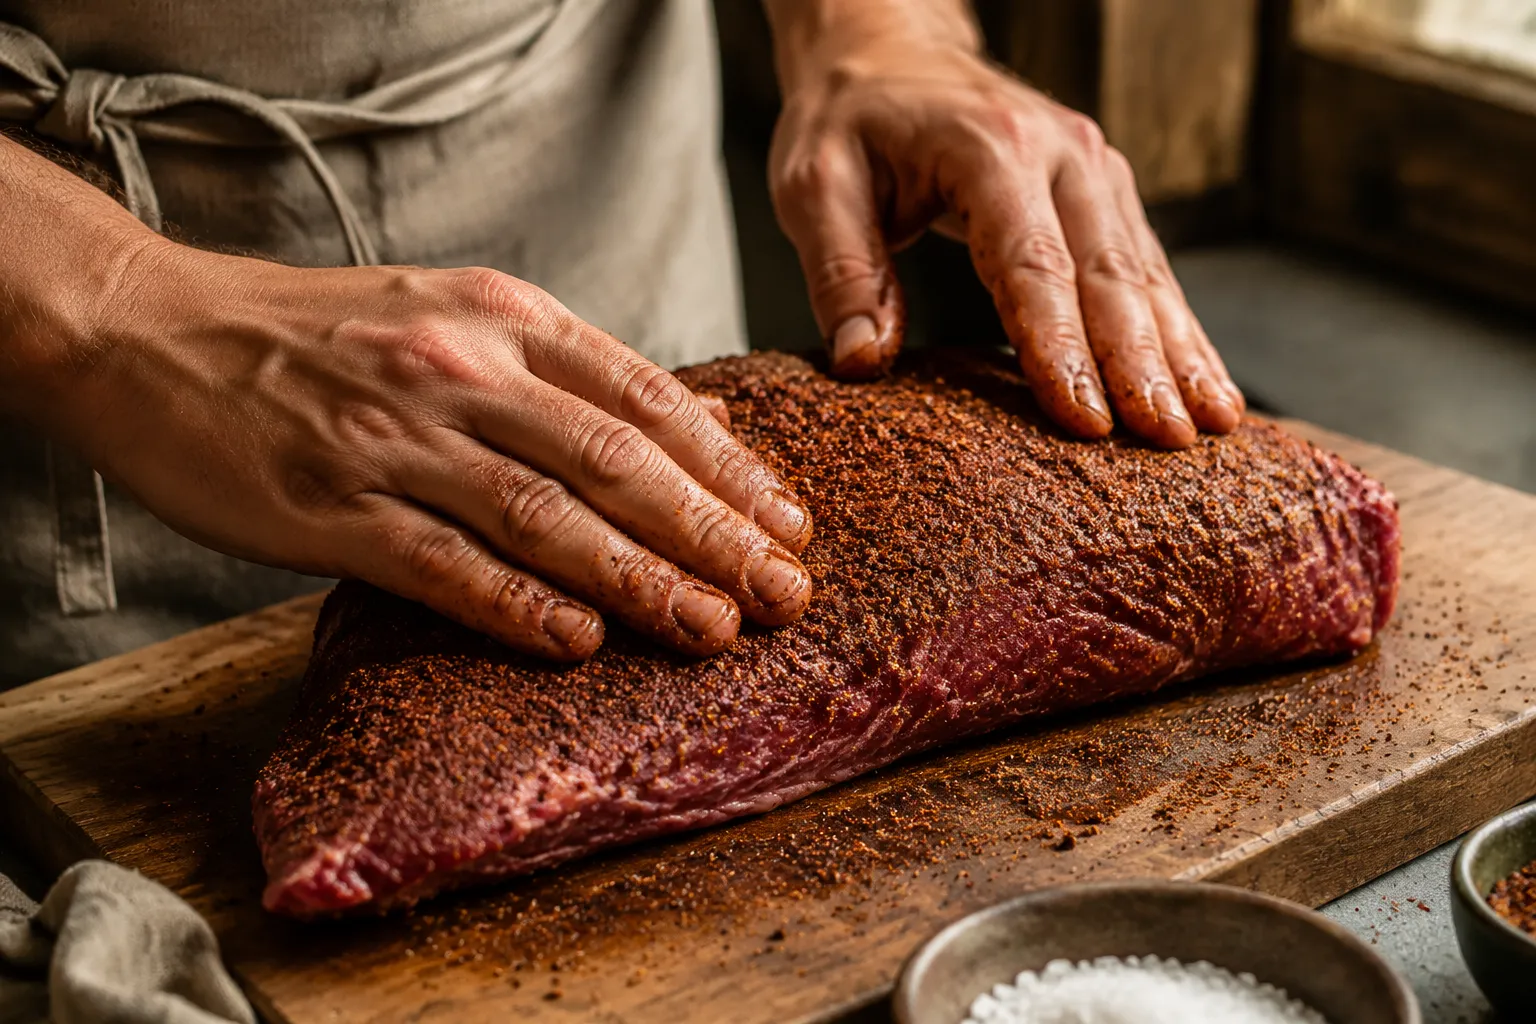
Start by pulling the roast from the fridge 45 minutes before cooking. Pat it bone dry with paper towels, drizzle lightly with olive oil, then press the dry rub into every surface. Don't be shy — this cut can carry a heavy-handed seasoning. Let it rest at room temperature while your grill or oven preheats so the interior isn't ice-cold when it hits the heat.
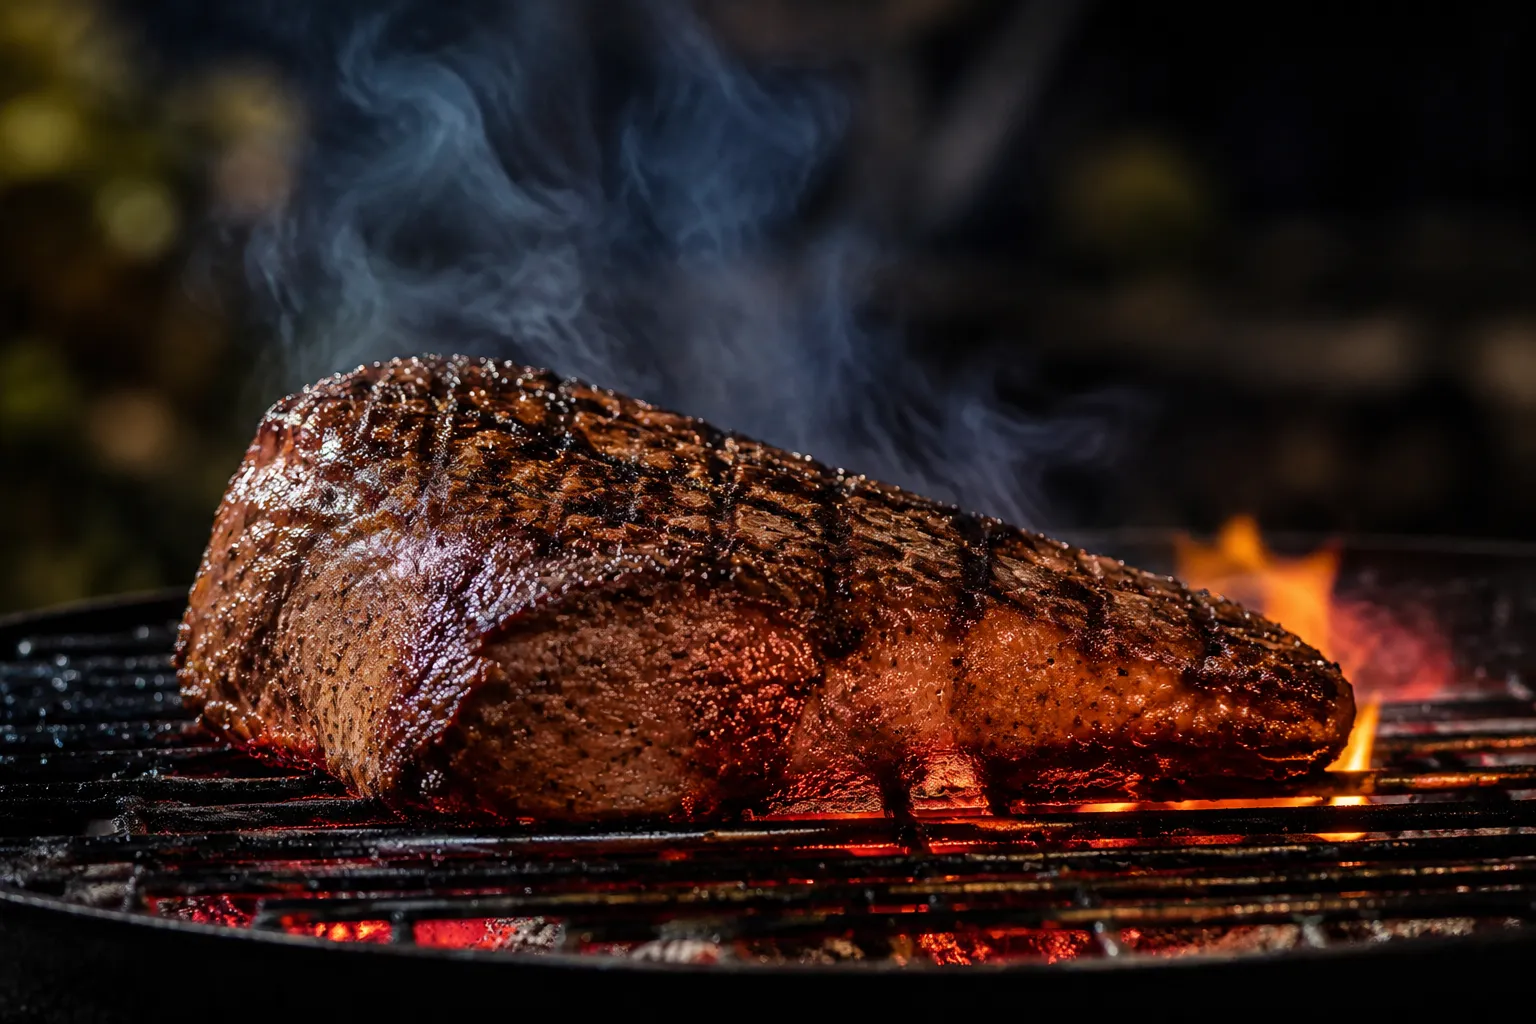
For the grill, set up two-zone grilling: lit coals or burners on one side, nothing on the other. Place the seasoned roast on the cool side, fat cap up, close the lid, and let it cruise at 250 to 275°F. This is the reverse sear method in action — you're slowly bringing the interior up so it cooks edge-to-edge evenly. It'll take 25 to 35 minutes depending on size and how cold the roast started.
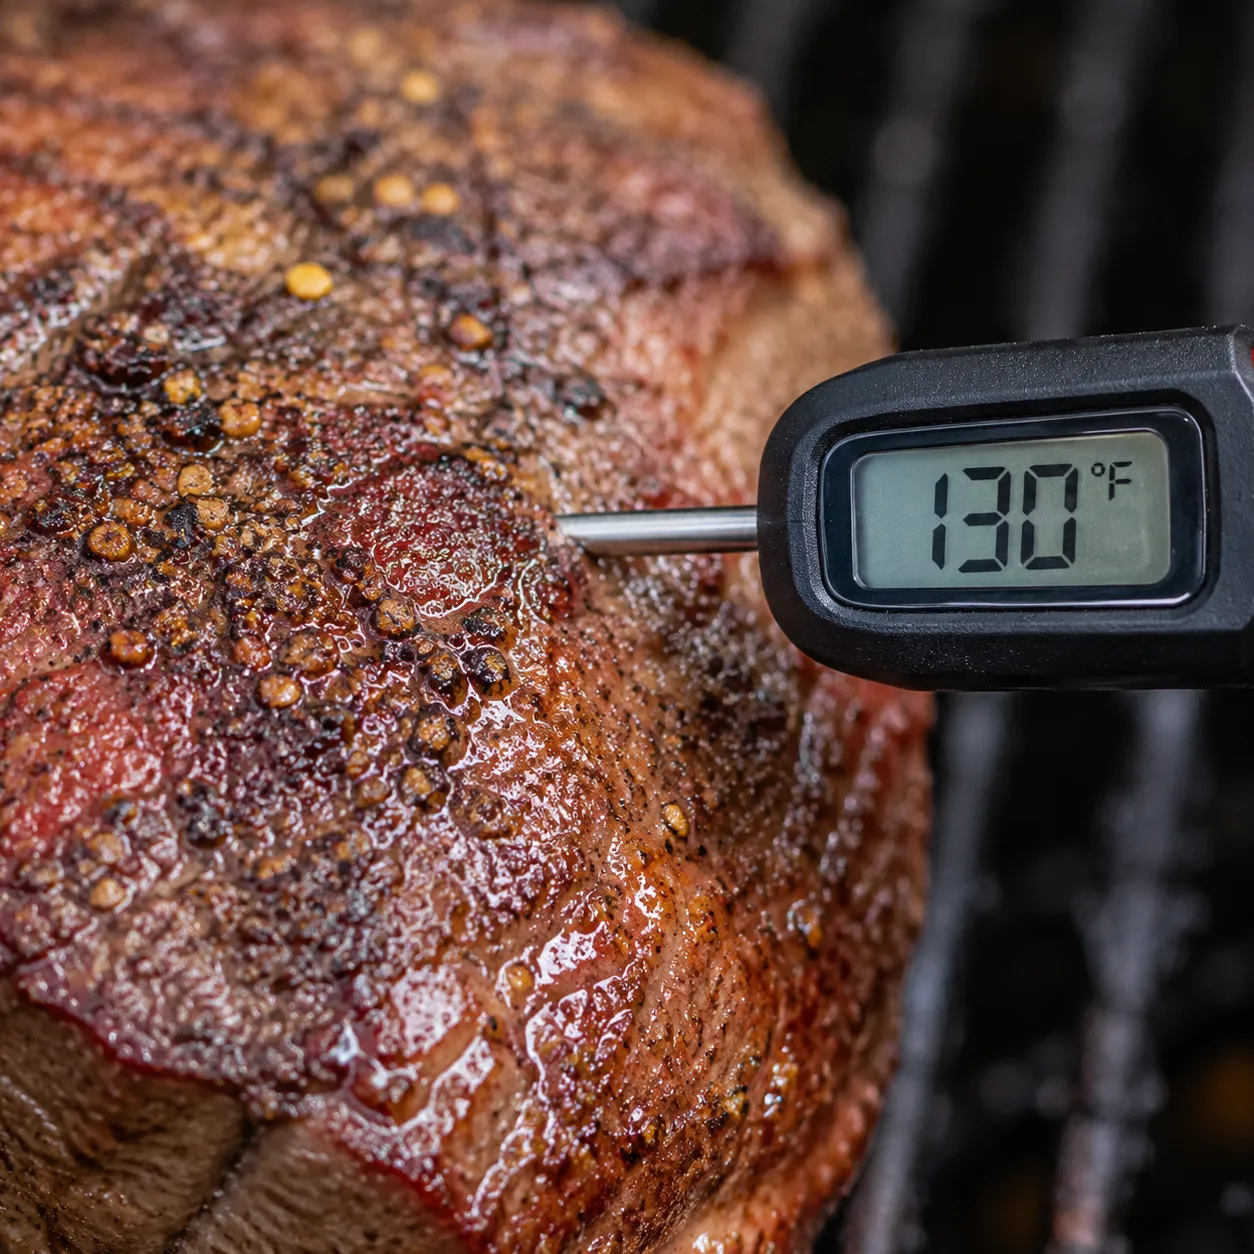
Pull the roast when the thickest part hits 120°F. Then crank the grill or move the meat directly over the coals and sear hard, about 2 minutes per side, until you've built a deep brown crust and the internal temperature climbs to 130°F for medium-rare. If you're cooking indoors, do the slow phase in a 275°F oven on a wire rack, then finish in a screaming-hot cast iron skillet with a splash of oil and a knob of butter for that restaurant-style sear.
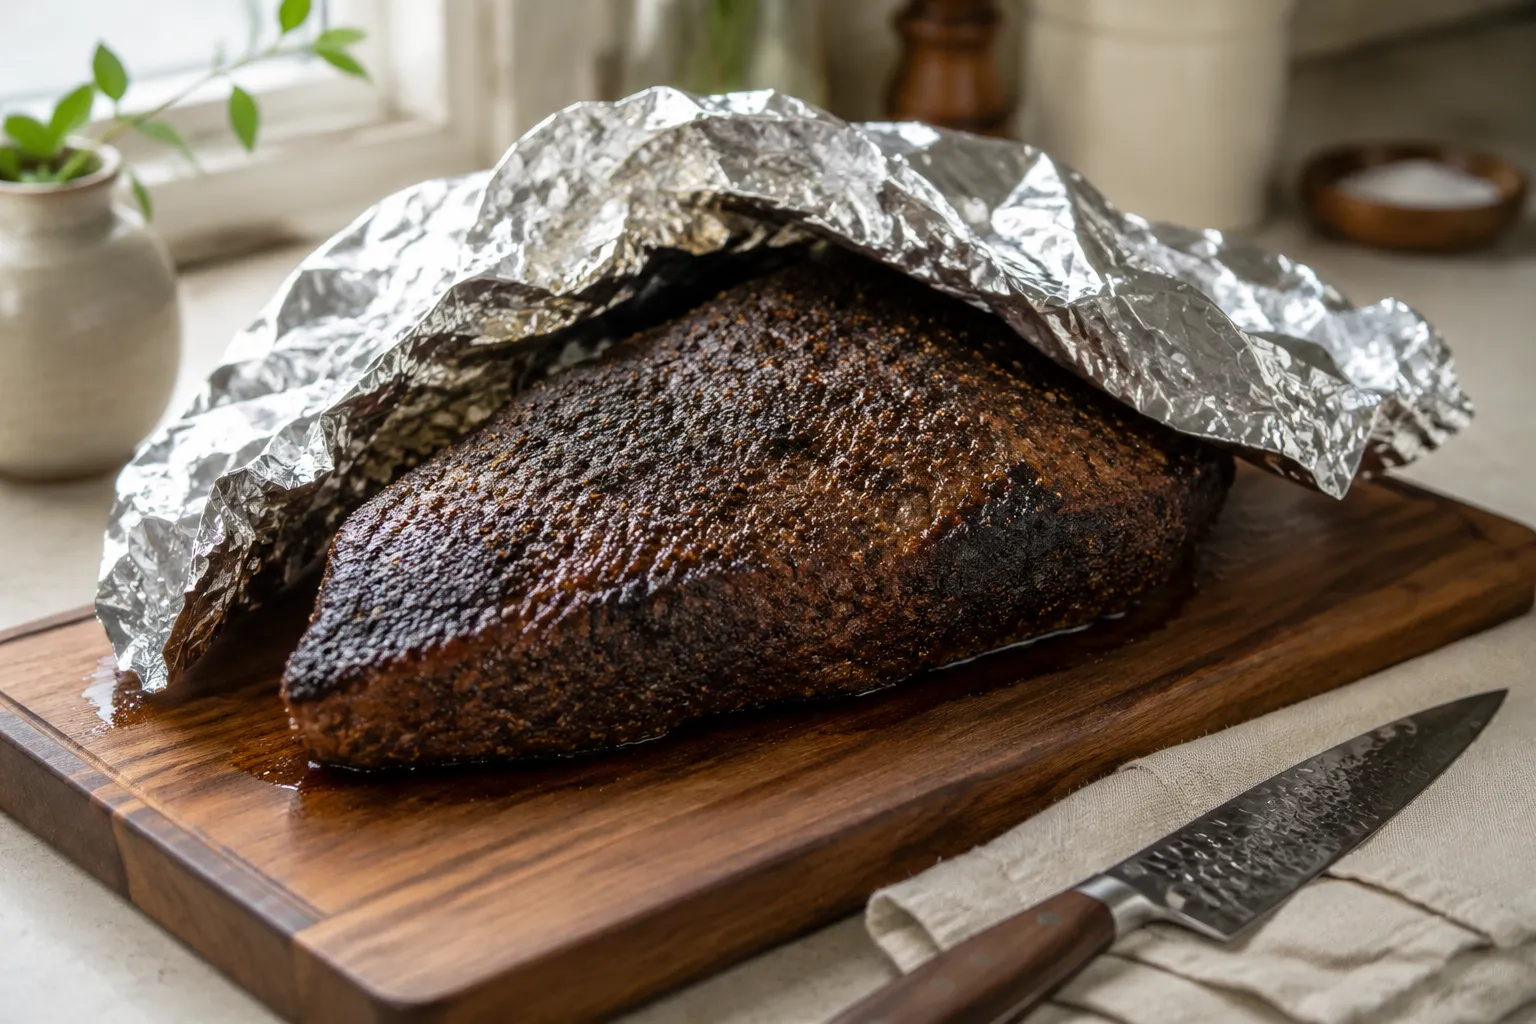
Resting is non-negotiable. Move the roast to a cutting board, tent loosely with foil, and walk away for at least 10 minutes. Carryover heat will push the center up another 5 degrees and the juices will redistribute through the muscle fibers instead of running out the moment your knife touches the meat. Skip this step and you'll end up with a puddle on the board and a dry slice on your plate.
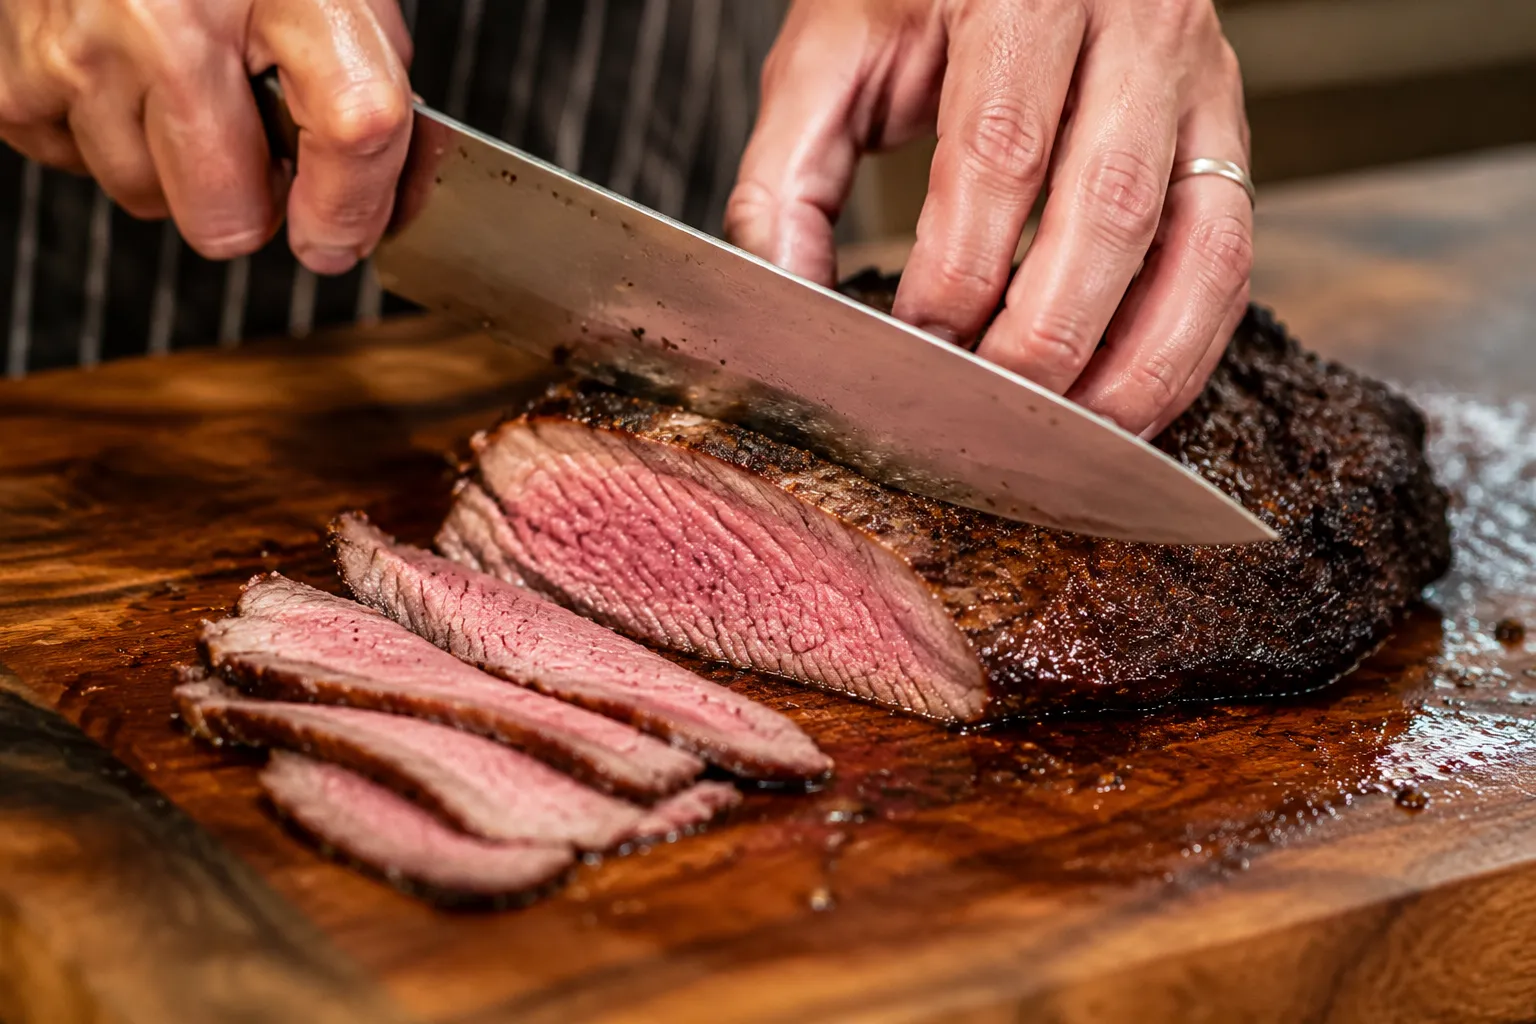
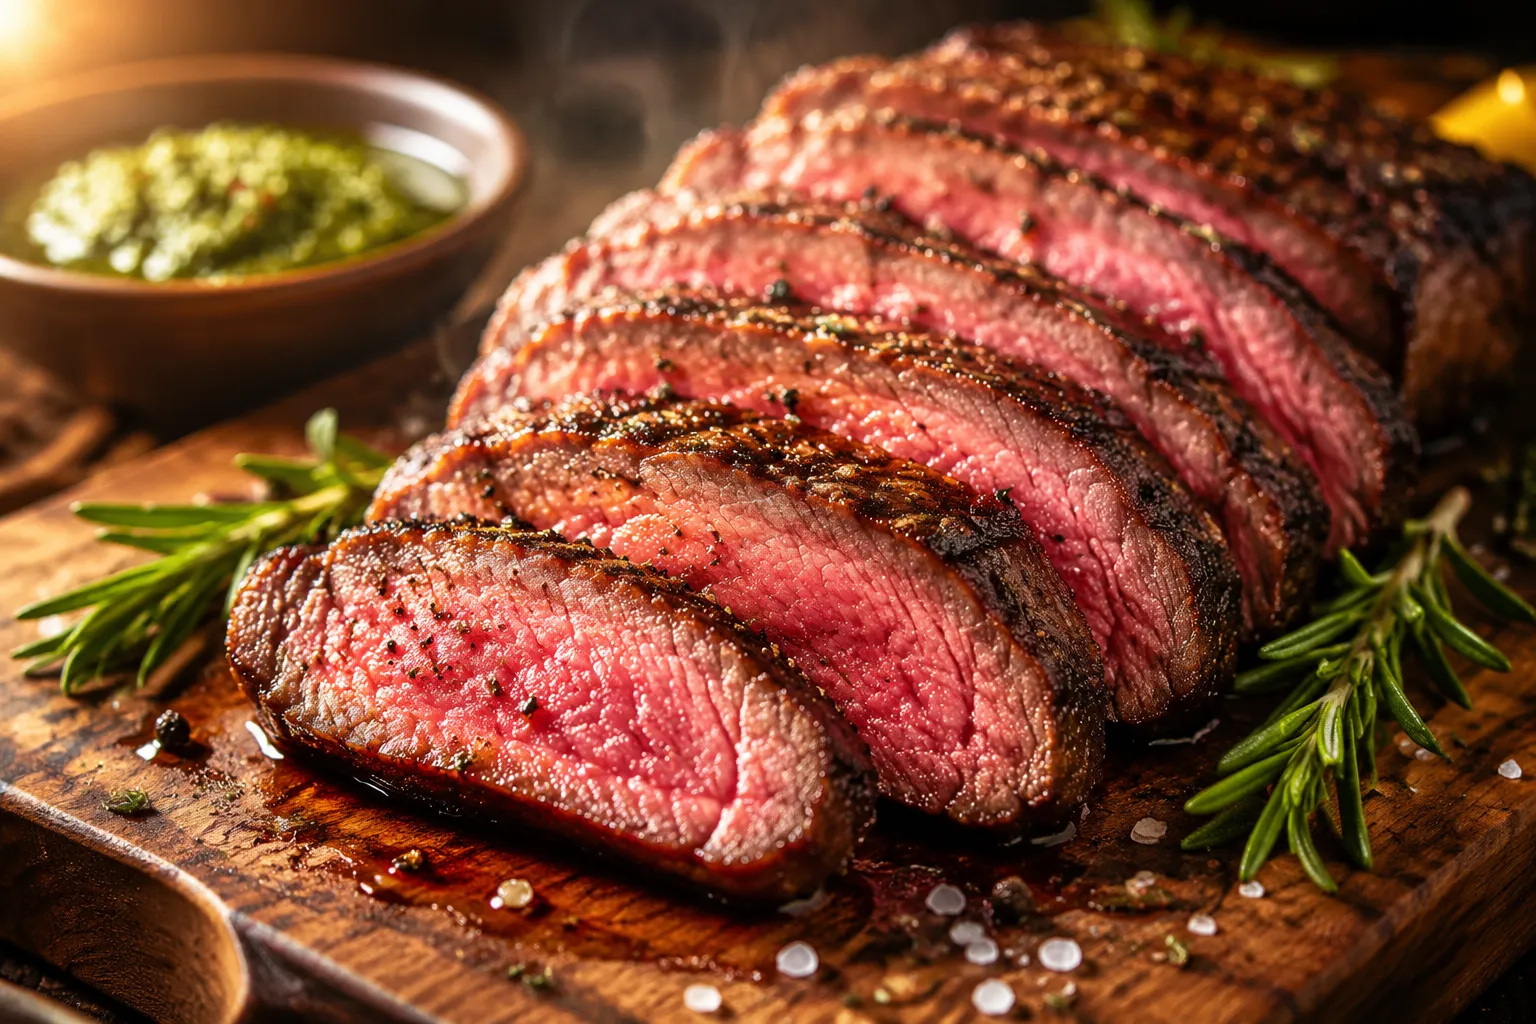
Now for the trick most blogs skip: how to slice against the grain. A tri tip roast actually has two grain directions that meet at a soft bend in the middle of the boomerang. Cut the rested roast in half at that bend, rotate each piece so the muscle fibers run left-to-right, then slice each half thinly across those fibers. Short fibers equal tender bites. Long fibers equal chew. This single move is the difference between a roast people remember and one they politely finish.
The single biggest difference between a great roast and a sad gray one is knowing exactly when to pull it. Use this internal meat temperature guide and a digital probe thermometer — guessing by time alone will burn you eventually, especially with a cut that varies in thickness from one end to the other.
Carryover cooking is real — a hot roast keeps cooking on the board for several minutes after you pull it. The thicker the cut and the harder the sear, the bigger the bump. Pulling 5 degrees shy of your target gives you the perfect window for that ideal medium-rare center.

In Santa Maria the traditional plate is non-negotiable: pinquito beans, grilled garlic bread, a simple green salad, and salsa or grilled corn. It's a working-rancher meal, and the sides are designed to soak up beef juices and balance the richness. If you're going California-traditional, that's the move and your guests will love you for it.
For something brighter and more modern, drape the slices with a generous spoonful of chimichurri sauce — the herbaceous Argentine condiment of parsley, garlic, red wine vinegar, and olive oil cuts through the deep crust like a dream. Or whisk together a quick pan sauce from the cast iron drippings with shallots, beef stock, and a splash of red wine, finished with cold butter for shine.
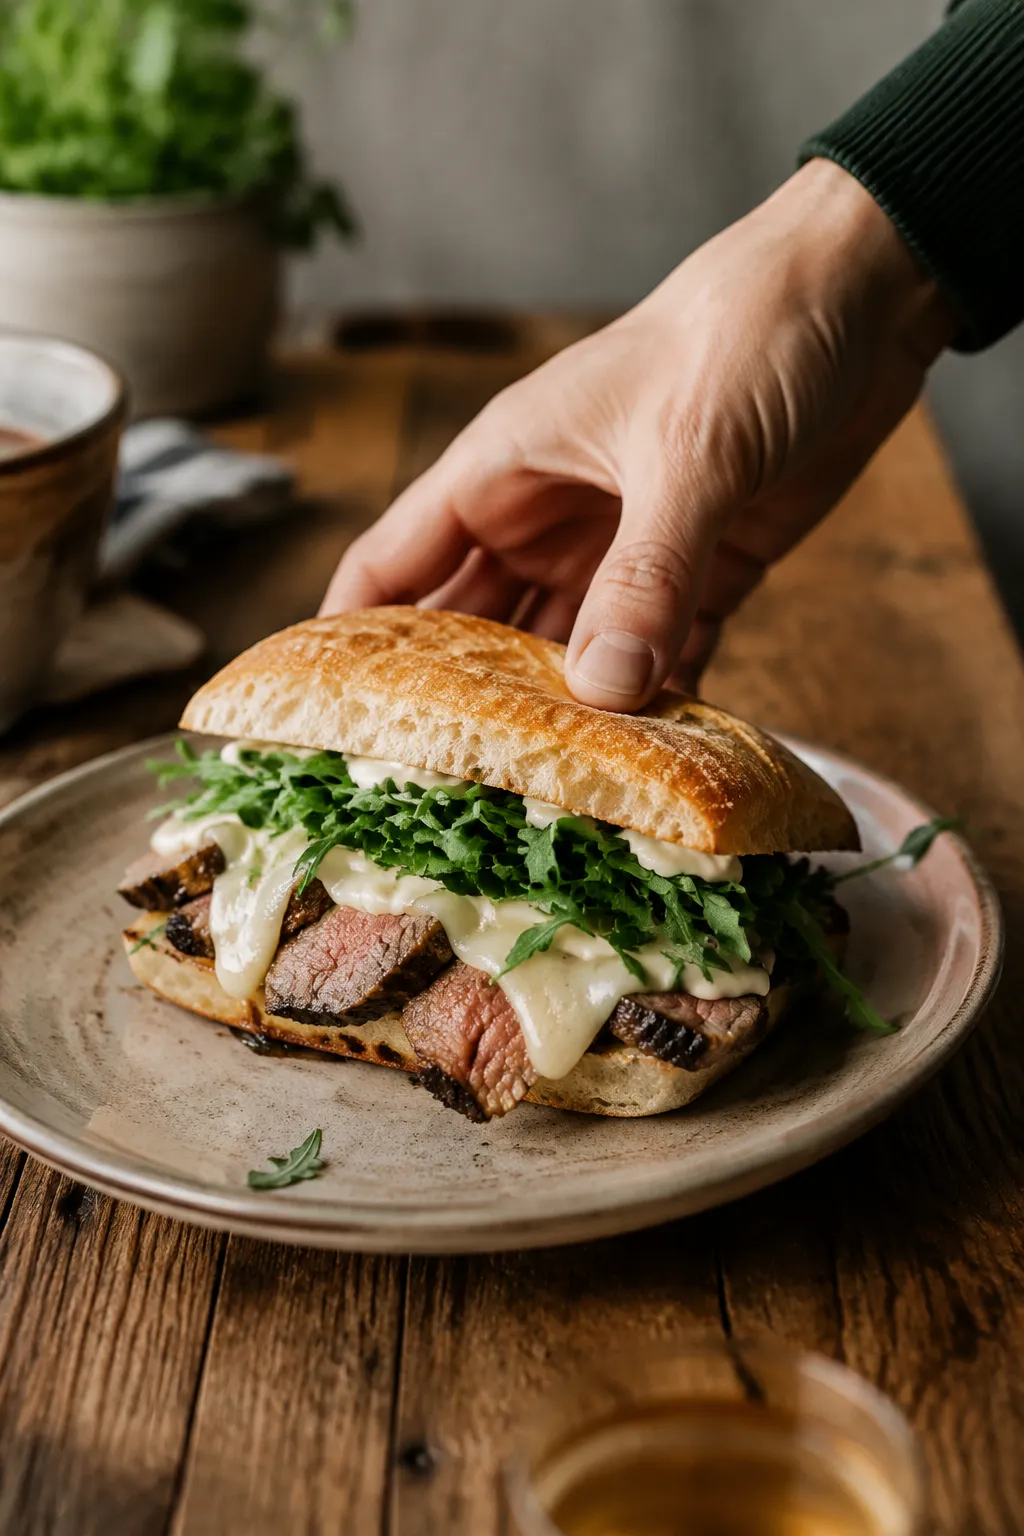
Leftovers are arguably the best part. Pile thin-sliced beef on a toasted ciabatta with melted provolone, peppery arugula, and creamy horseradish for the sandwich of the week. Tuck slices into warm flour tortillas with cilantro, lime, and avocado for tacos, or fan them over a romaine salad with blue cheese crumbles and pickled red onions. One roast, three meals, and zero complaints from the table.
The Santa Maria-style version is the gold standard, but this cut takes happily to almost any flavor direction you push it. Once you've nailed the base technique, swap the rub or the finishing sauce and you've got an entirely new dinner.
Refrigerate cooked, sliced tri tip in an airtight container with a splash of its resting juices for up to 4 days. Keeping it sliced rather than whole shortens reheating time, but slice only what you'll eat in a day or two — leftover whole roast holds moisture better than pre-cut pieces. Label the container with the date so it doesn't slip to the back of the shelf and become a science experiment.
For longer storage, vacuum-seal or wrap tightly in plastic and foil and freeze for up to 3 months. Thaw overnight in the fridge before reheating. The best reheat method is sous vide at 130°F for 30 minutes, but a low oven (250°F, covered, with a splash of beef stock) works beautifully. Avoid the microwave — it turns medium-rare into shoe leather in under a minute.