Baked Alaska Recipe: Showstopping Dessert Made Easy
Ingredients
Scale
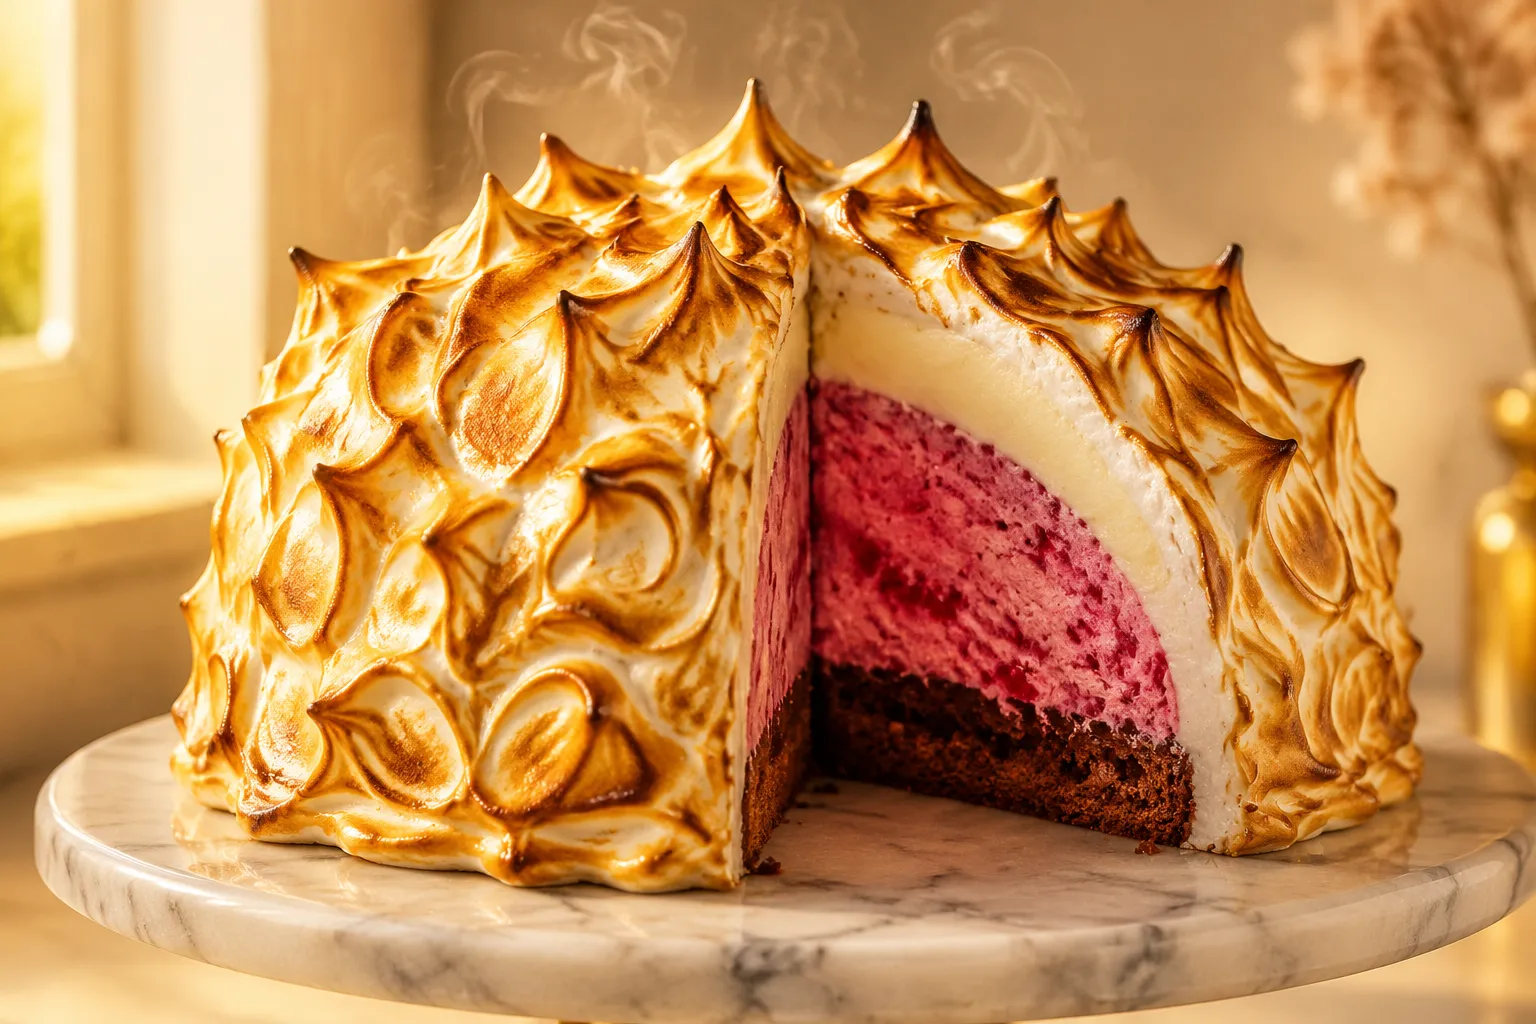
Baked alaska is the ultimate dinner-party showstopper: cold ice cream tucked under torched meringue on a tender cake base. Easier than it looks.
There's a reason baked alaska has been wowing dinner guests for over 150 years. Hot, golden, lightly torched meringue swirled over a frozen dome of ice cream that somehow doesn't melt, all perched on a tender cake base — it's the kind of dessert that earns audible gasps when it lands at the table. And while it looks like something only a pastry chef could pull off, the truth is that this old-school showstopper is well within reach for any home baker with a hand mixer and a freezer that runs cold.
I've made this dessert for birthdays, holidays, and one memorable Tuesday when I just felt like setting something on fire (safely, with a kitchen torch). Each time, it has the same effect: people stop talking, lean in, and reach for their phones. The secret is that almost everything happens ahead of time. You bake a simple cake, mold the ice cream into a dome, and stash it all in the freezer overnight. The meringue and the toasting? Five minutes of pure drama right before serving.
This guide walks you through both the kitchen torch and the broiler method so you can use whichever tool you already have on hand. We'll cover the science of why the ice cream stays cold, how to seal the meringue properly, and how to pull off the whole thing as a do-ahead dessert that actually tastes better after a night in the freezer.
What is baked alaska, exactly? It's a layered dessert built from sponge cake, brick-firm ice cream, and a thick blanket of glossy meringue that gets quickly browned in a hot oven or with a handheld torch. The name was reportedly coined in 1876 at Delmonico's restaurant in New York City to celebrate the United States' purchase of the Alaska Territory. The drama of pulling a frozen dessert out of a screaming-hot oven was a Gilded Age sensation, and it never really lost its grip on the imagination.
Variations exist all over the world. The French call it omelette norvégienne; in parts of Asia, you'll find a similar fried ice cream coated in tempura batter rather than meringue. But the American version we know today is the one with billowing, dramatically swirled peaks of toasted meringue, and that's exactly what we're making here.
The magic comes down to physics. Whipped meringue is mostly air — millions of tiny bubbles trapped in a stable protein foam. Air is a terrible conductor of heat, which means the meringue acts like a puffy down jacket wrapped around your ice cream. Add a brief, intense burst of heat (450°F to 500°F for a few minutes, or a quick pass with a torch), and the surface caramelizes long before the cold ever reaches the center. The cake base does similar insulating work from below, keeping the ice cream protected from the warmth of the plate.
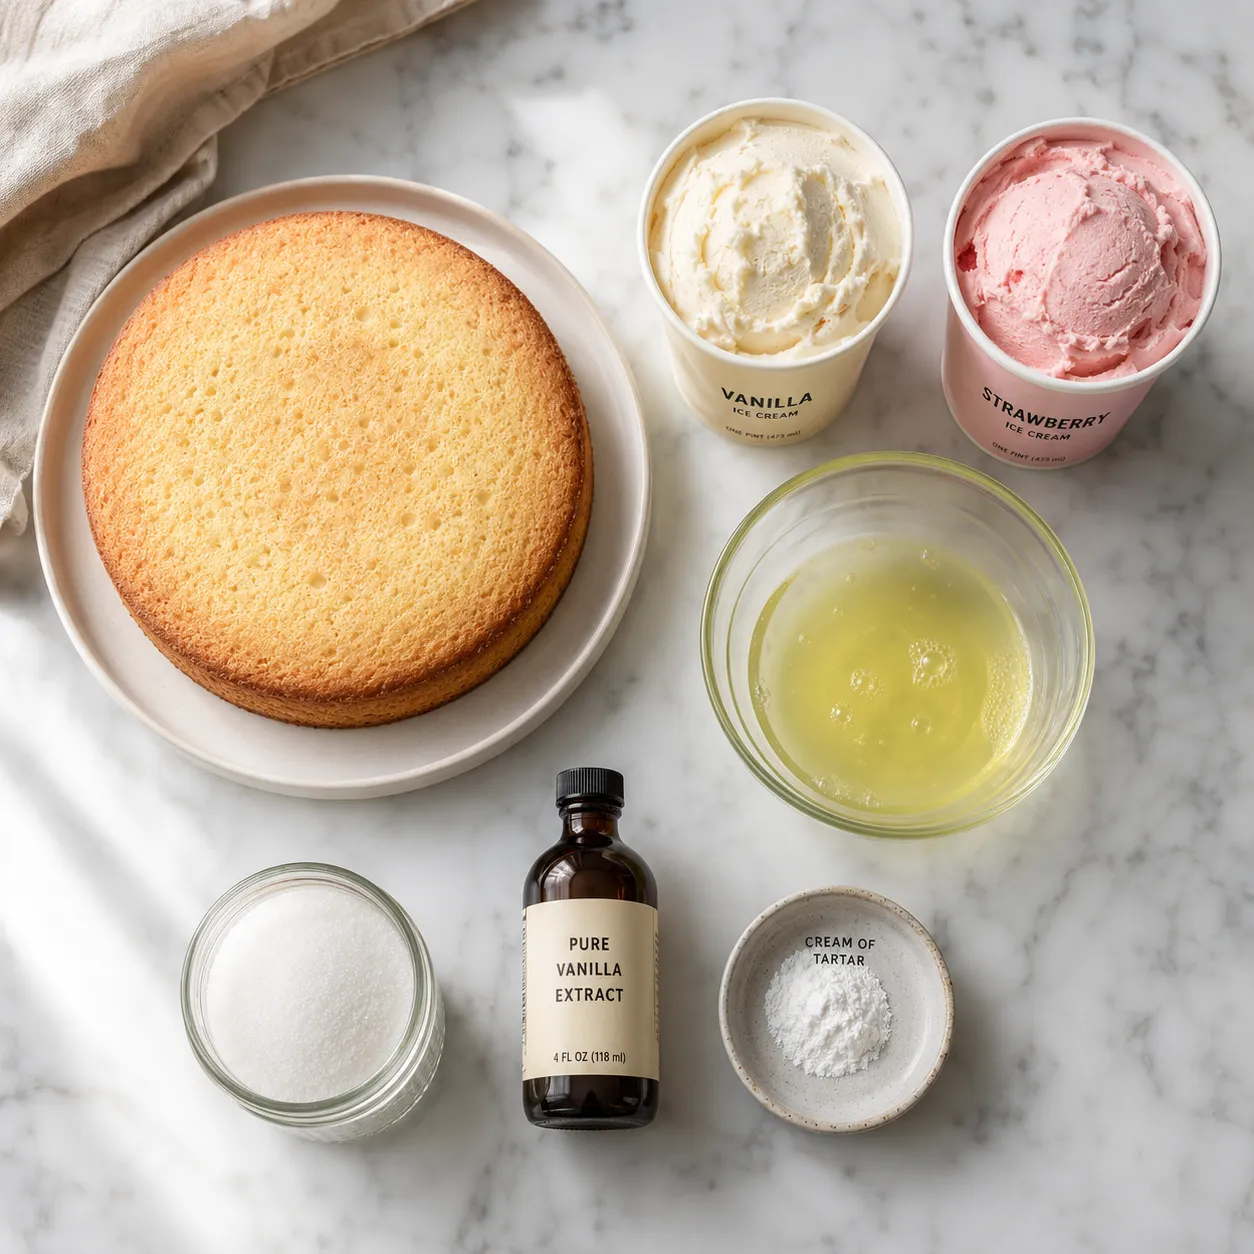
Most of what you need lives at any decent grocery store, and the full quantities are in the recipe card. Here's what each component brings to the finished dessert and the tradeoffs of each choice.
A round of sponge or pound cake gives the dessert structure and keeps the bottom from getting soggy when it meets the ice cream. You can absolutely use a store-bought pound cake, but if you want to go from scratch, a basic sponge cake recipe made with eggs, sugar, flour, and a little melted butter works perfectly. The cake should be sturdy enough to hold the weight of a half-gallon of ice cream without compressing — a chiffon-style sponge or a buttery pound cake round are both excellent choices.
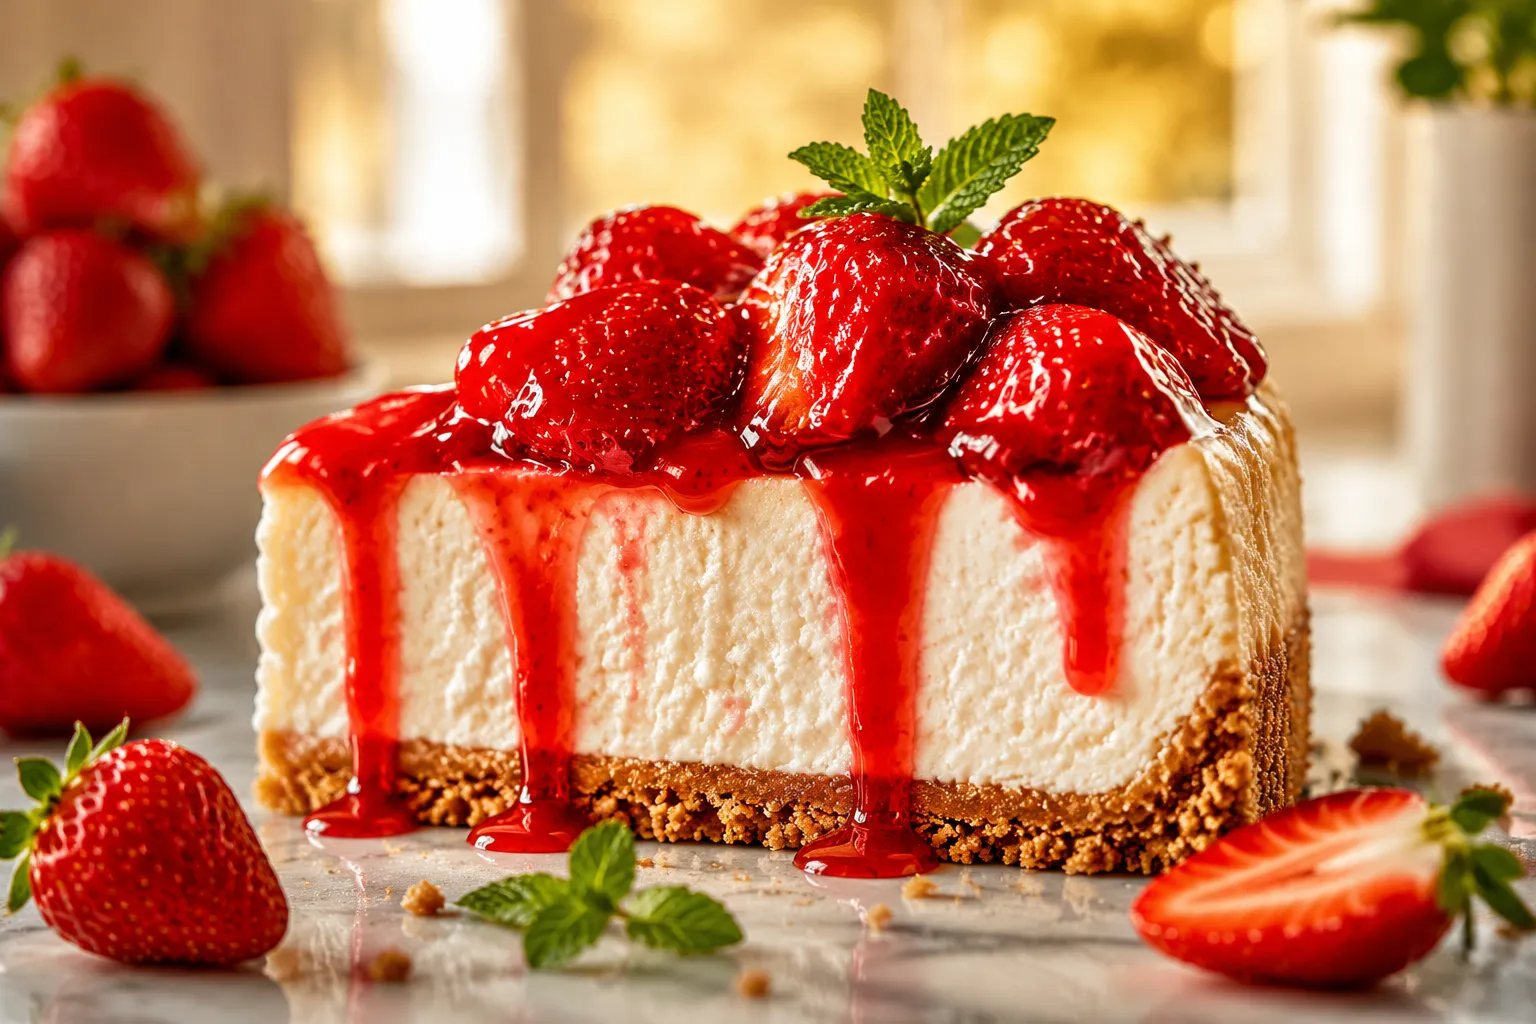
Use premium, dense ice cream — Häagen-Dazs, Tillamook, or any brand whose first ingredient is cream and whose pints feel surprisingly heavy in your hand. Cheaper ice creams are pumped full of air (legally up to 50% of their volume), which means they melt faster and lose their shape under the meringue. I love using one and a half pints of vanilla ice cream as the base layer with a contrasting flavor like strawberry, chocolate, or coffee tucked in the middle. If you want to go all-out, a batch of homemade vanilla ice cream churned the day before is genuinely unbeatable.
You only need three real ingredients here: egg whites, granulated sugar, and a pinch of cream of tartar to stabilize the foam. A teaspoon of vanilla extract rounds out the flavor at the very end. We'll be using a Swiss meringue, which means gently heating the whites and sugar over a water bath before whipping. This technique gives you a glossier, more stable foam than a French (raw) meringue and pasteurizes the whites in the process — a smart move for any dessert that won't be fully cooked through.
Don't let the steps intimidate you. Each one is short, and most of the work is hands-off freezer time. Plan to start at least four hours before serving, or ideally the day before.
If you're starting from scratch, bake your sponge or pound cake in an 8-inch round pan and let it cool completely on a rack. Trim the domed top flat and slice it horizontally to about one inch thick. Set that round on a parchment-lined sheet pan or directly on a freezer-safe serving plate. The cake base needs to be slightly larger than the diameter of your ice cream dome so the meringue can be sealed all the way down to the cake itself.
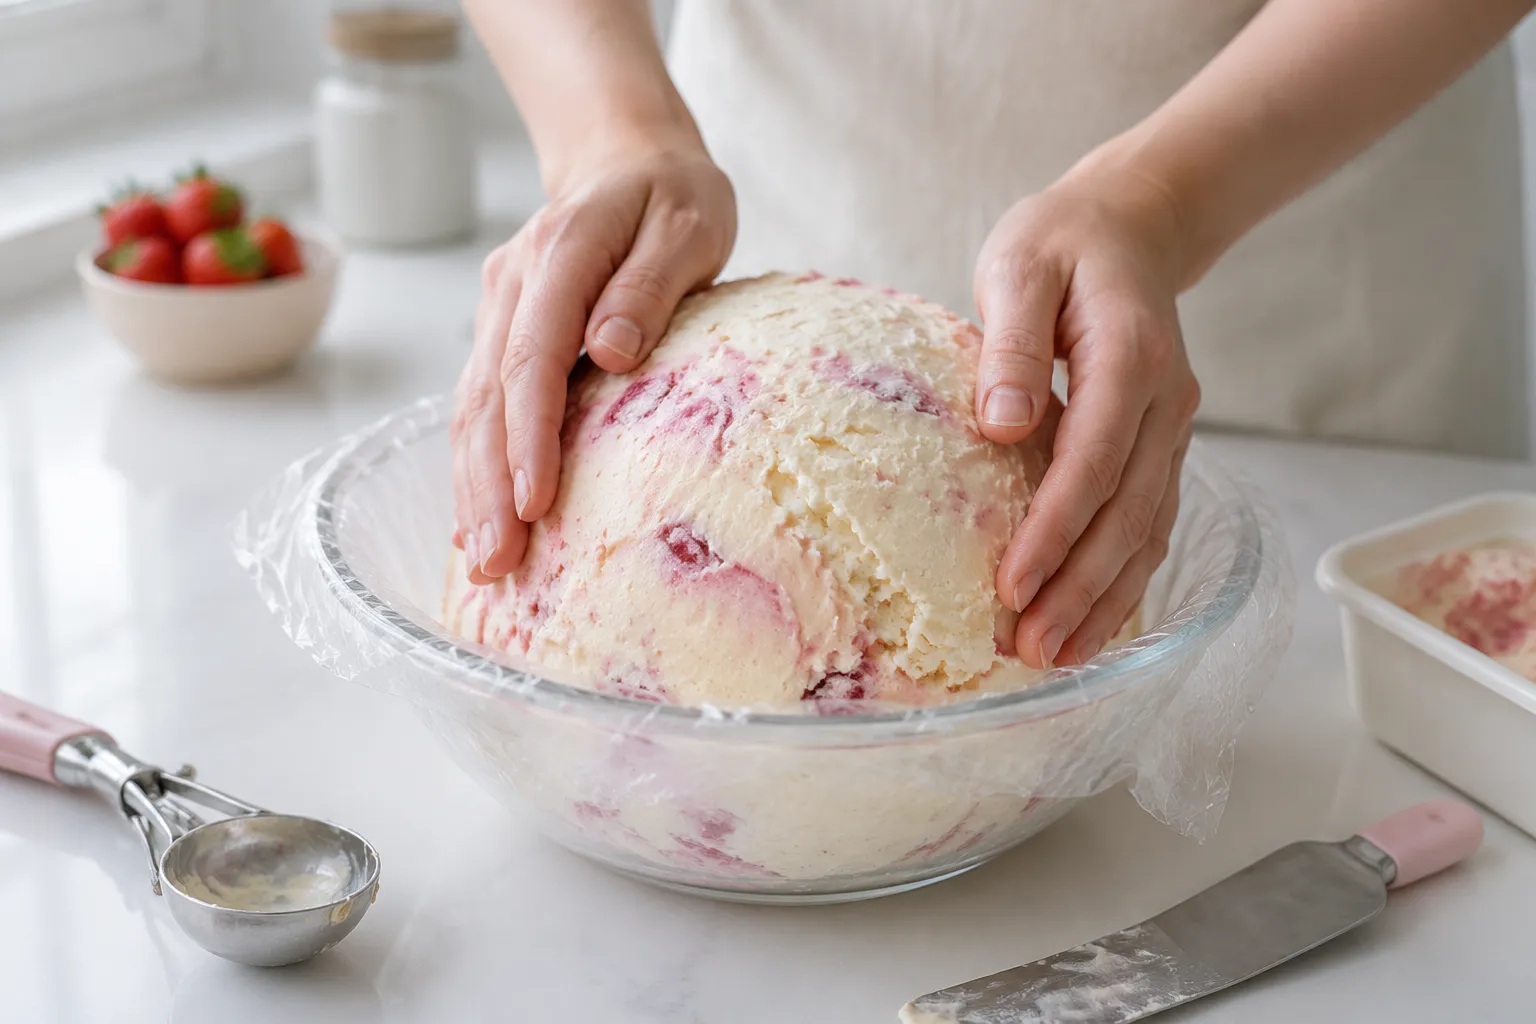
Line a 1.5-quart bowl (the rounder the better) with two overlapping sheets of plastic wrap, leaving plenty of overhang on all sides. Let your ice cream soften on the counter for 5 to 10 minutes — you want it scoopable but not soupy. Press a layer of vanilla ice cream against the inside of the bowl in a thick shell, fill the center with your contrasting flavor, then cap the bottom with more vanilla. Smooth the top flat, fold the plastic wrap over to seal, and freeze for at least 4 hours, ideally overnight, until rock-solid.
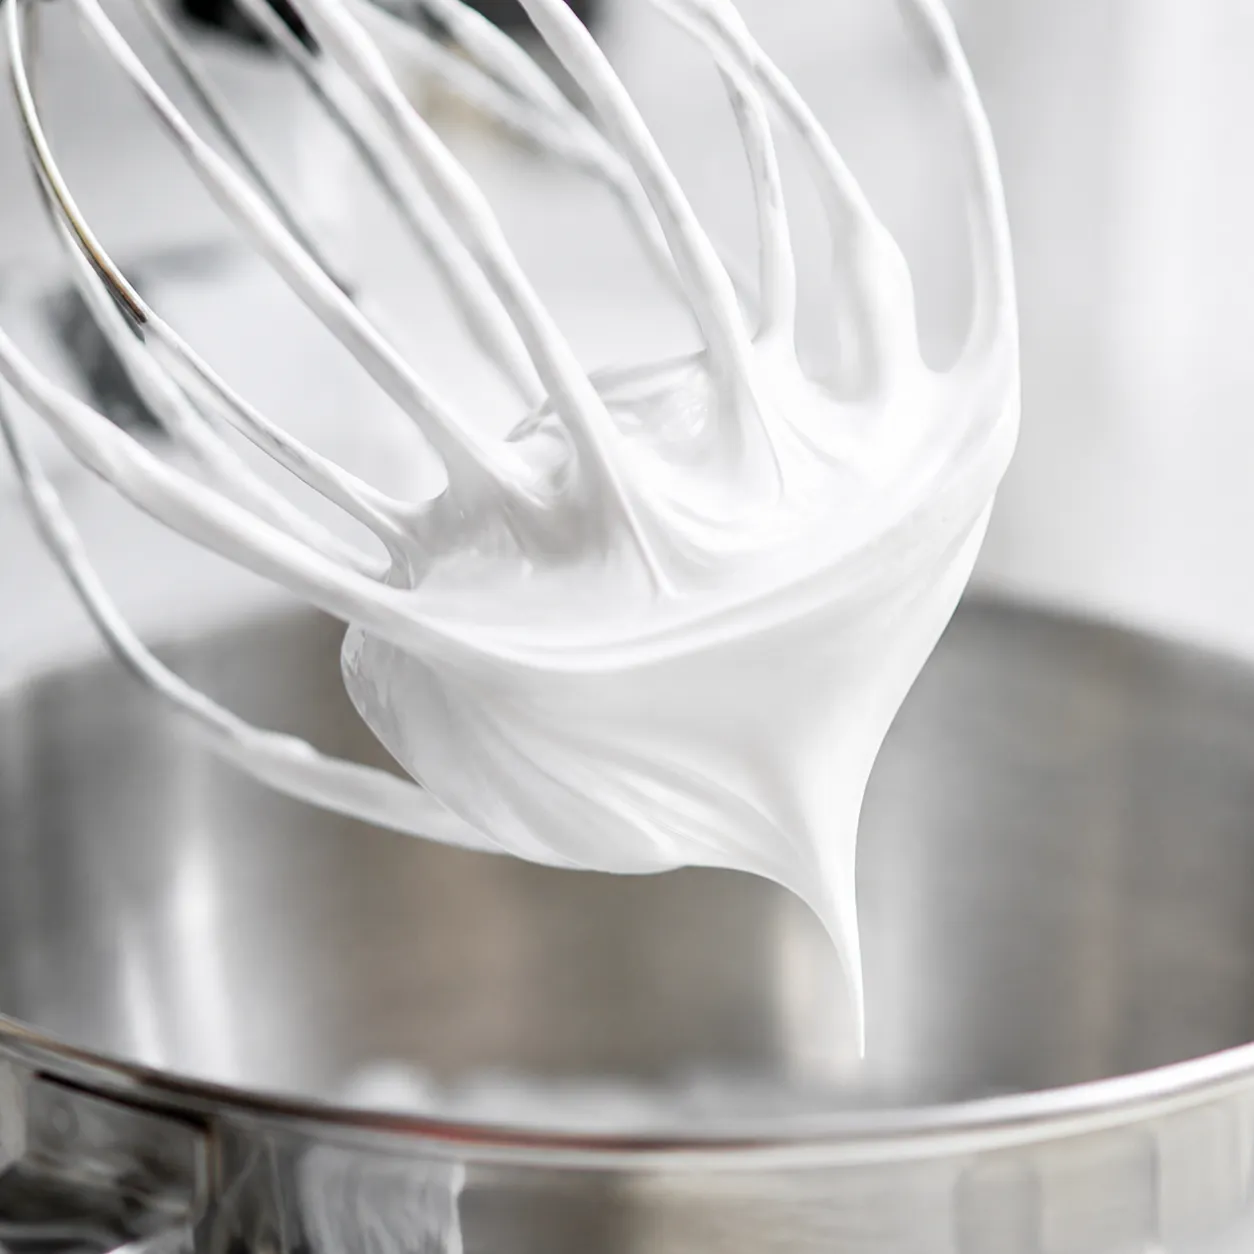
In the bowl of a stand mixer set over a saucepan of barely simmering water, whisk together the egg whites, sugar, and cream of tartar. Heat gently, whisking constantly, until the mixture reaches 160°F and the sugar has completely dissolved — rub a bit between your fingers and it should feel silky smooth, not gritty. Move the bowl to your stand mixer and whip on medium-high for 5 to 7 minutes, until the meringue is bright white, glossy, and holds stiff, glassy peaks. Whisk in the vanilla extract at the very end.

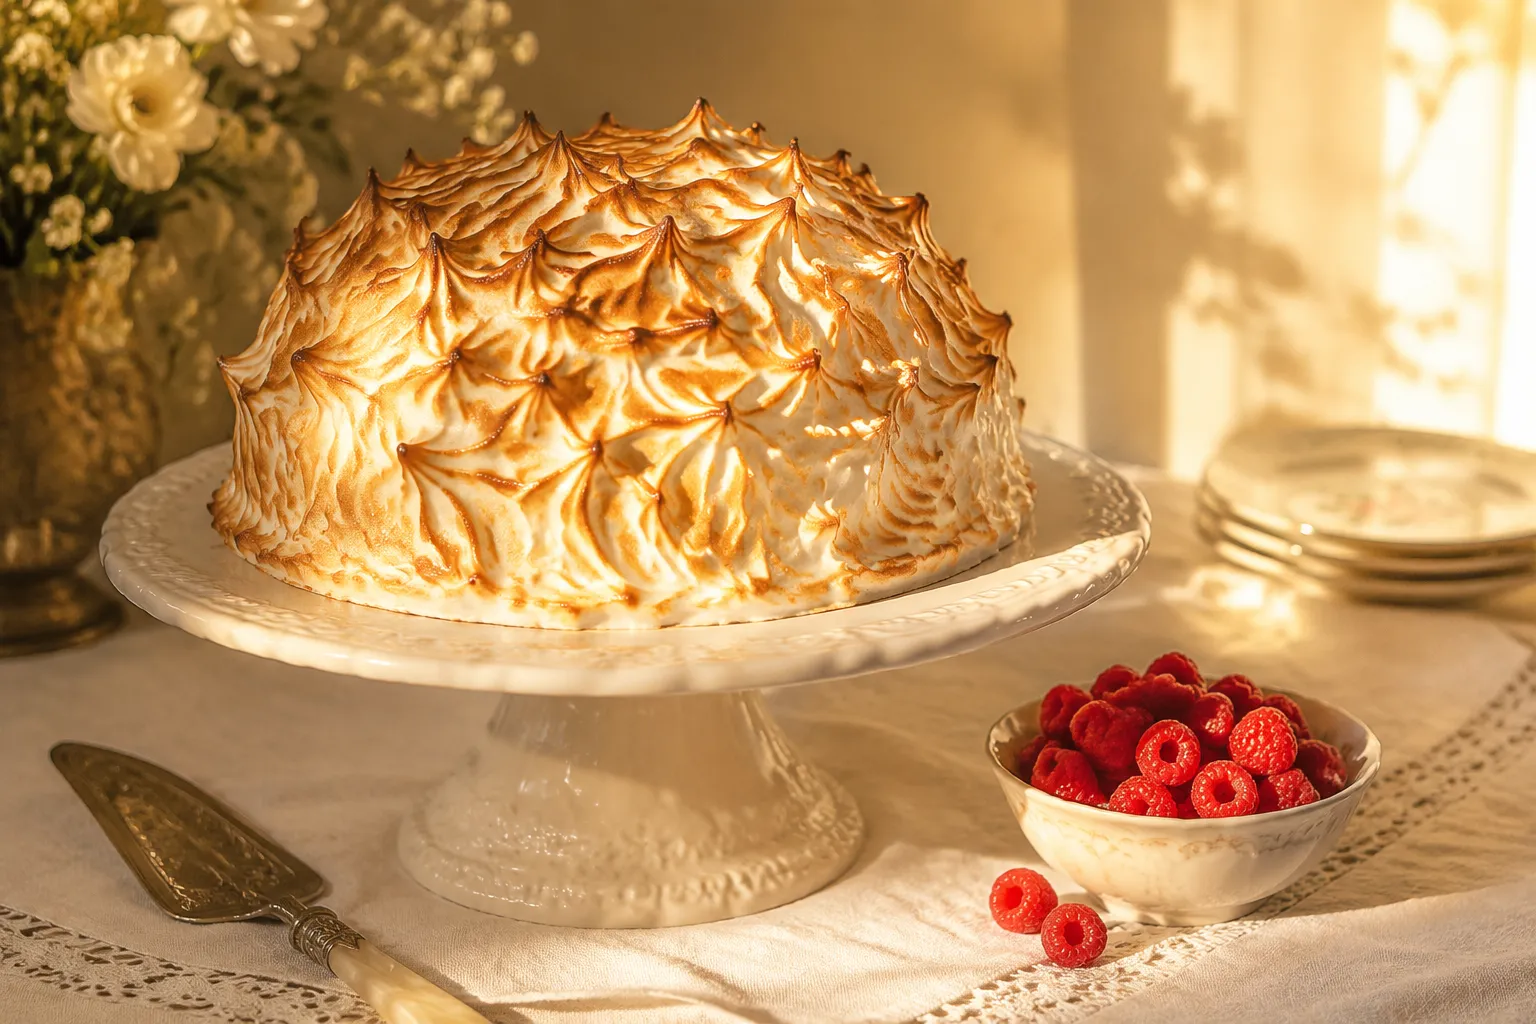
Unwrap the ice cream dome and invert it onto the cake base, peeling away the plastic. Working quickly, slather the entire surface with meringue using an offset spatula, sealing it all the way down to the cake with no gaps anywhere. Use the back of a spoon to pull dramatic peaks all over the surface; this is the part that toasts up beautifully under heat. Return the assembled dessert to the freezer for at least 30 minutes to firm everything back up.
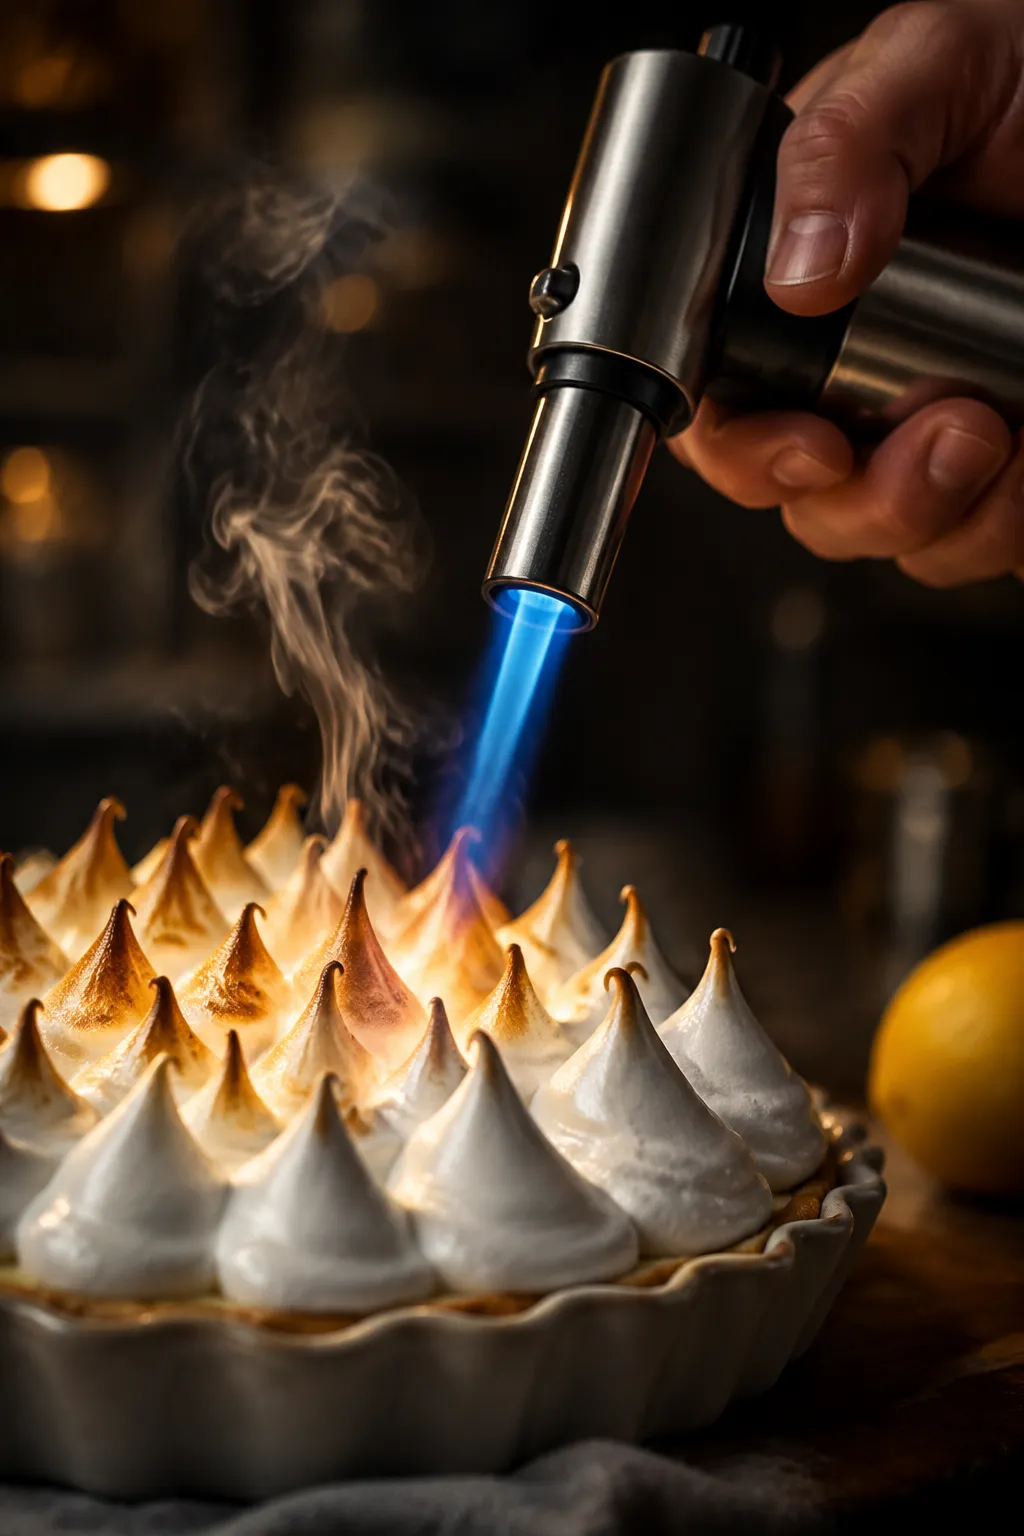
When you're ready to serve, choose your weapon. For the torch method, sweep the flame steadily across the meringue from a few inches away, browning each peak to a deep golden amber. Kitchen torch desserts give you the most control and don't add any extra heat to the ice cream beneath. For the oven method, preheat to 500°F and bake the assembled dessert straight from the freezer for 3 to 5 minutes, watching constantly until the peaks are toasted. Slice with a hot knife and serve immediately.
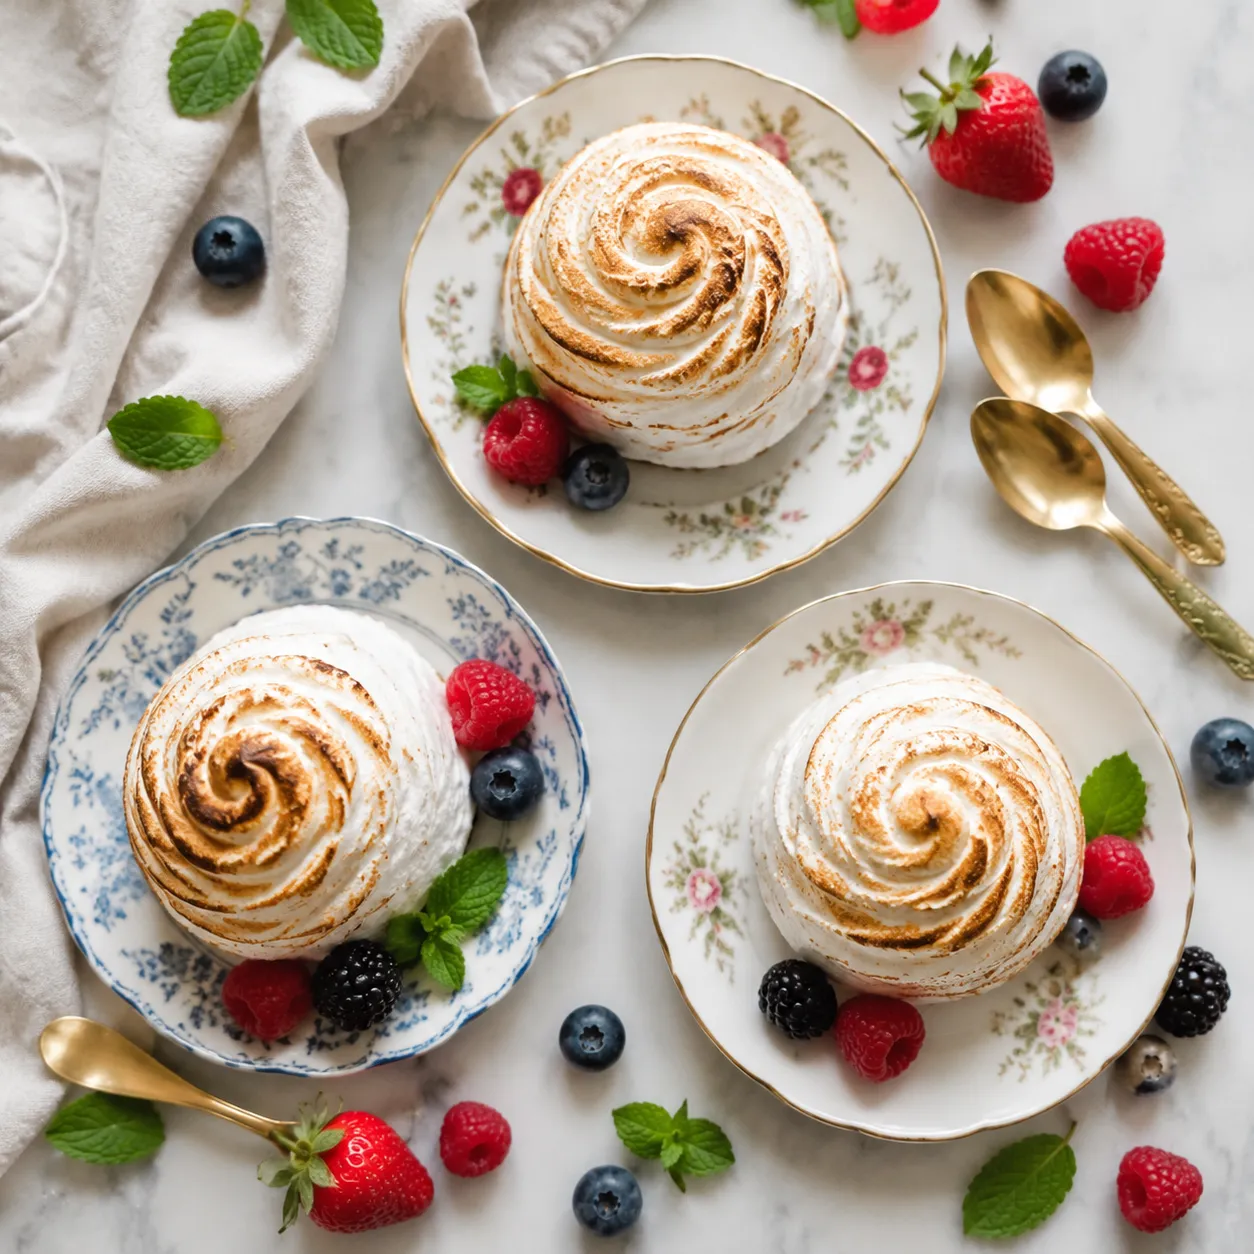
A finished alaska is rich and showy, so I like to serve it with something bright and acidic on the side to keep the palate awake. A spoonful of warm raspberry coulis drizzled over each slice cuts through the sweetness and adds a flash of jewel-tone color against the cream and amber meringue. Fresh berries, a glass of sparkling rosé, or a small pour of espresso are all excellent companions, and a few sprigs of mint never hurt the photo opportunity.
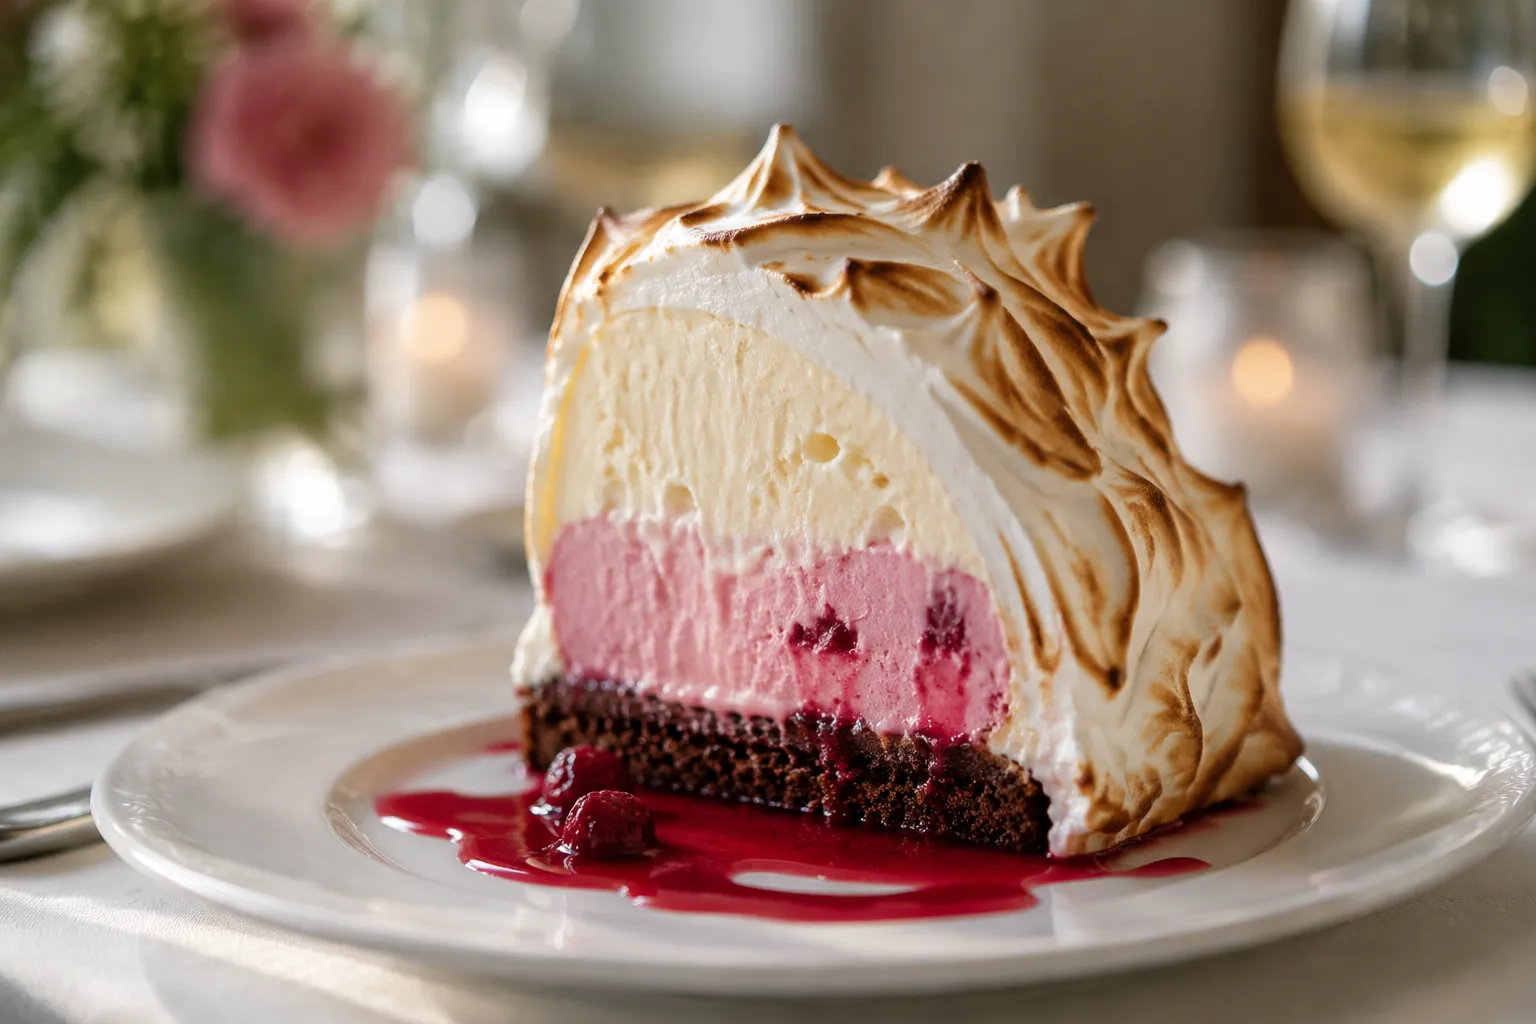
If you're plating individual slices, use a long, thin knife dipped in hot water and wiped between cuts — this technique gives you those clean architectural layers that make the whole thing photograph so well. Serve the dessert right away; the meringue is at its absolute best within ten minutes of toasting, when the contrast between warm caramelized peaks and the still-frozen interior is at its sharpest. Any longer and the magic begins to soften, though leftovers (in the rare event you have any) freeze surprisingly well.
What makes this such a dependable choice for hosting is how forgiving it is on timing. Unlike soufflés or last-minute custards, this is one of the great make-ahead desserts: every component can be prepped a full day in advance, with only the final torching done right before serving. That means you can pull a fully assembled dessert out of the freezer, brown it in the time it takes to clear the dinner plates, and have your guests cheering before the coffee even hits the table. It's old-fashioned hospitality theater, and it absolutely earns its standing ovation every single time you make it.
This dessert is essentially a template — once you've nailed the basic technique, you can swap nearly any component and make it your own. Here are a few of my favorite ways to riff on the classic.
Fully assembled and topped with meringue, this dessert keeps in the freezer for up to 24 hours before its final toasting. Wrap it loosely in plastic wrap once the meringue has firmed up so the peaks don't get smashed. Any longer than a day and the meringue can start to weep or develop ice crystals, so plan your assembly for the day of or the night before serving.
Leftover slices (if you somehow have them) can be wrapped tightly in plastic and frozen for up to a week. The toasted meringue won't be quite as crisp on day two, but the flavor holds up beautifully. Don't refrigerate — the meringue absorbs moisture and turns weepy. Always go straight from freezer to plate, and slice with a hot knife for clean layers.