Tri Tip Recipe: Juicy, Tender Santa Maria-Style Roast
4.8 from 12 reviews
0SHARES
Now Playing
Tri Tip Recipe: Juicy, Tender Santa Maria-Style Roast
0:00
0:00
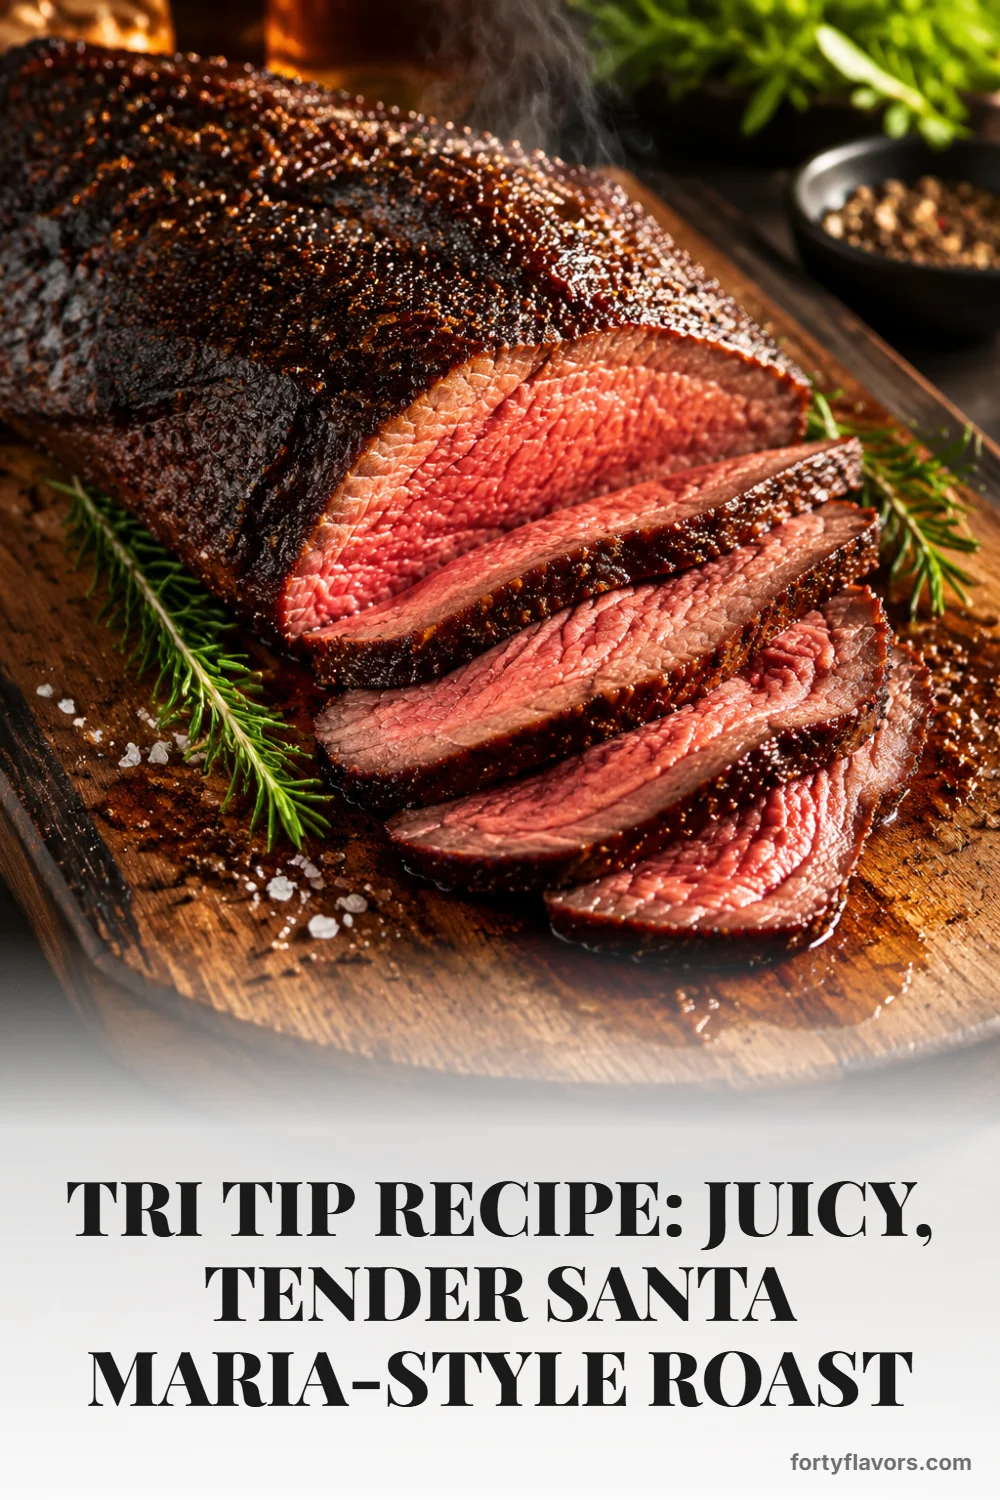
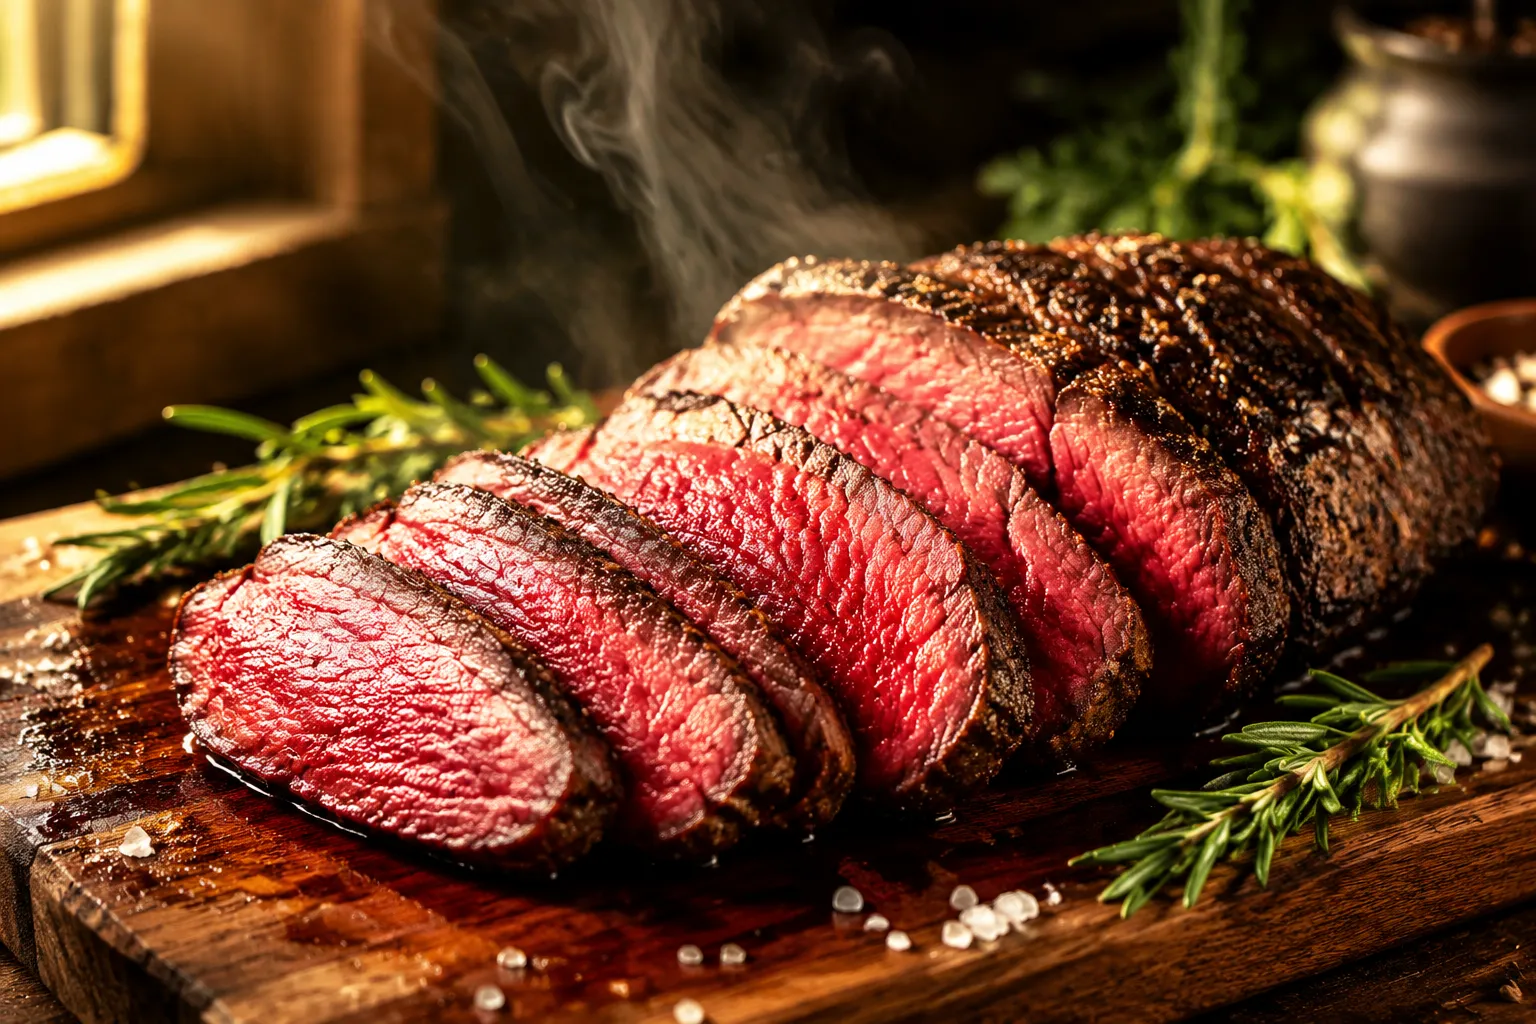
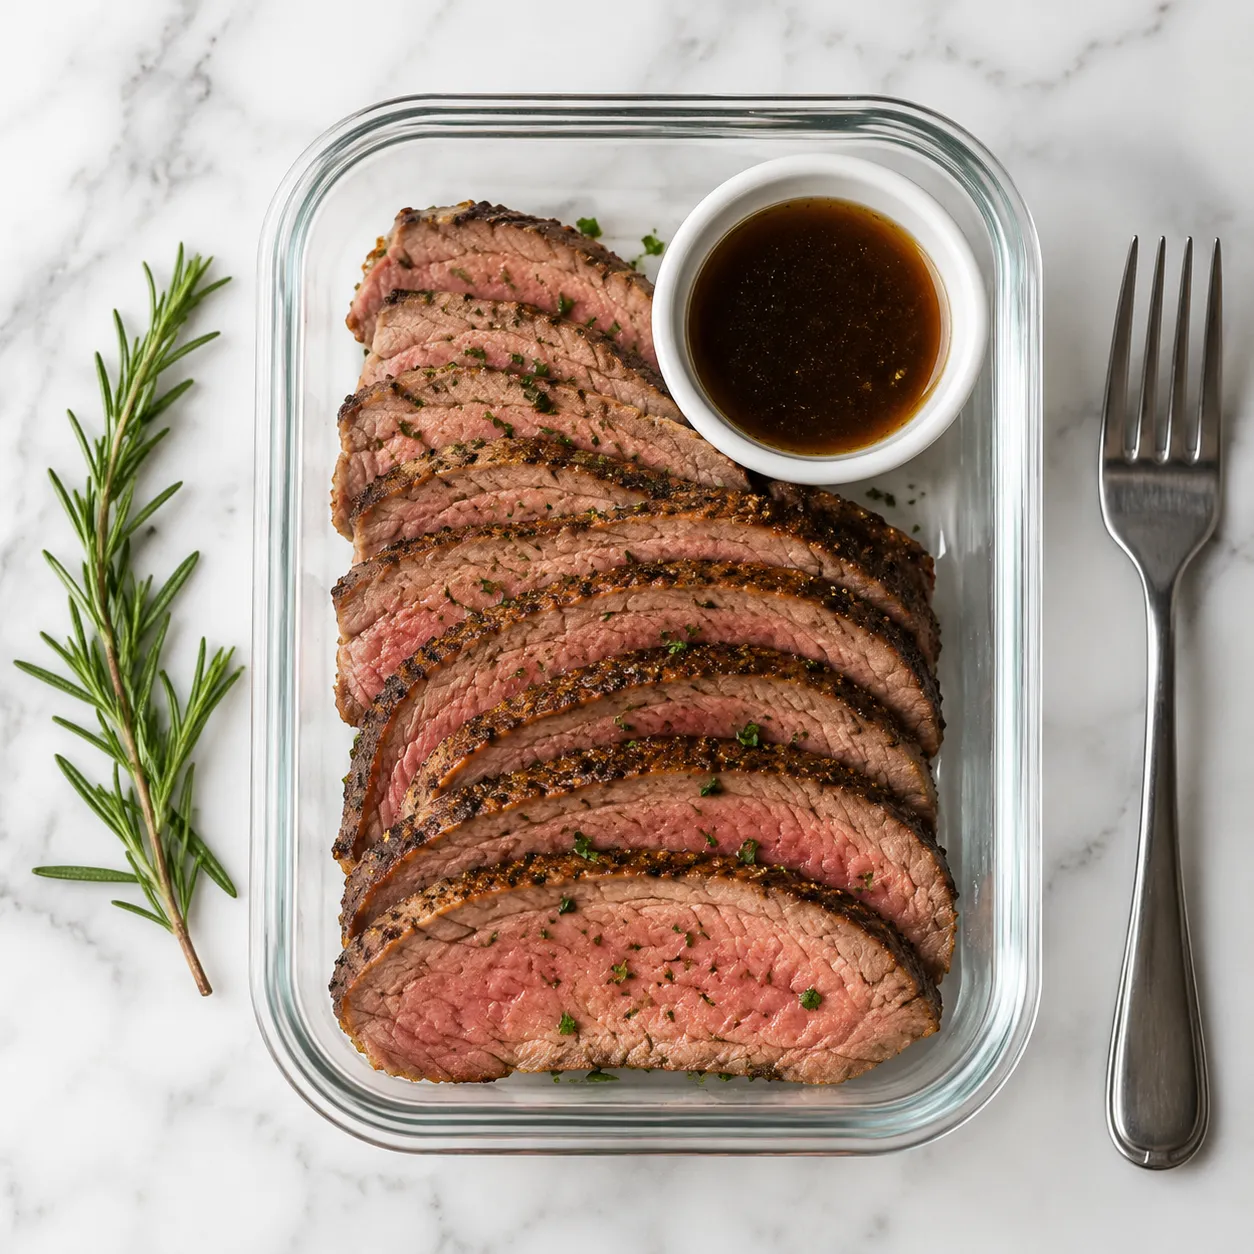
A perfectly seasoned, beautifully crusted tri tip with a rosy pink center, sliced against the grain for maximum tenderness in every bite.
Why You'll Love This Recipe
Big steakhouse flavor: A simple Santa Maria rub creates a savory, peppery crust without needing a long marinade.
Grill or oven friendly: Use a two-zone grill for smoky flavor or the oven reverse-sear method for year-round cooking.
Perfect for groups: One roast serves about six people and offers a range of doneness from the thicker end to the thinner tail.
Foolproof tenderness: Clear temperature targets and slicing guidance help you land juicy, medium rare beef.
Great leftovers: The slices are fantastic in sandwiches, tacos, salads, bowls, and breakfast hash.
Tri tip is the California beef roast that makes dinner feel like a backyard steakhouse night: deeply crusted, juicy in the center, and dramatic enough to bring to the table whole before slicing. This Santa Maria-style version keeps the seasoning simple and bold—salt, coarse pepper, garlic, smoky paprika, olive oil, and rosemary—so the beef stays the star.
The magic of a great tri tip recipe is not a long marinade or complicated technique; it is even heat, a confident sear, and knowing exactly how to slice the roast once it rests. You can cook it over a two-zone grill for that live-fire flavor, or use an oven-to-skillet reverse sear method when the weather is not cooperating. Either way, the goal is a rosy medium rare center, a savory crust, and thin slices cut against the grain.
What Is This Santa Maria Cut?
This triangular beef roast comes from the bottom sirloin, a hardworking but surprisingly tender section with a rich, steak-like flavor. It has a tapered shape, which is actually helpful: the thicker end stays juicy for medium rare slices, while the thinner end cooks a little more for guests who prefer beef closer to medium. In Santa Maria, California, this cut became a regional icon, traditionally cooked over red oak and served with pinquito beans, salsa, bread, and a crisp green salad.
What makes it special is the balance of price, flavor, and tenderness. It eats like steak but serves like a roast, which makes it perfect for cookouts, Sunday dinners, and casual holidays. The grain changes direction through the middle of the meat, so slicing technique matters just as much as seasoning. Once you learn the grain pattern, this becomes one of the most reliable beef cuts you can make at home.
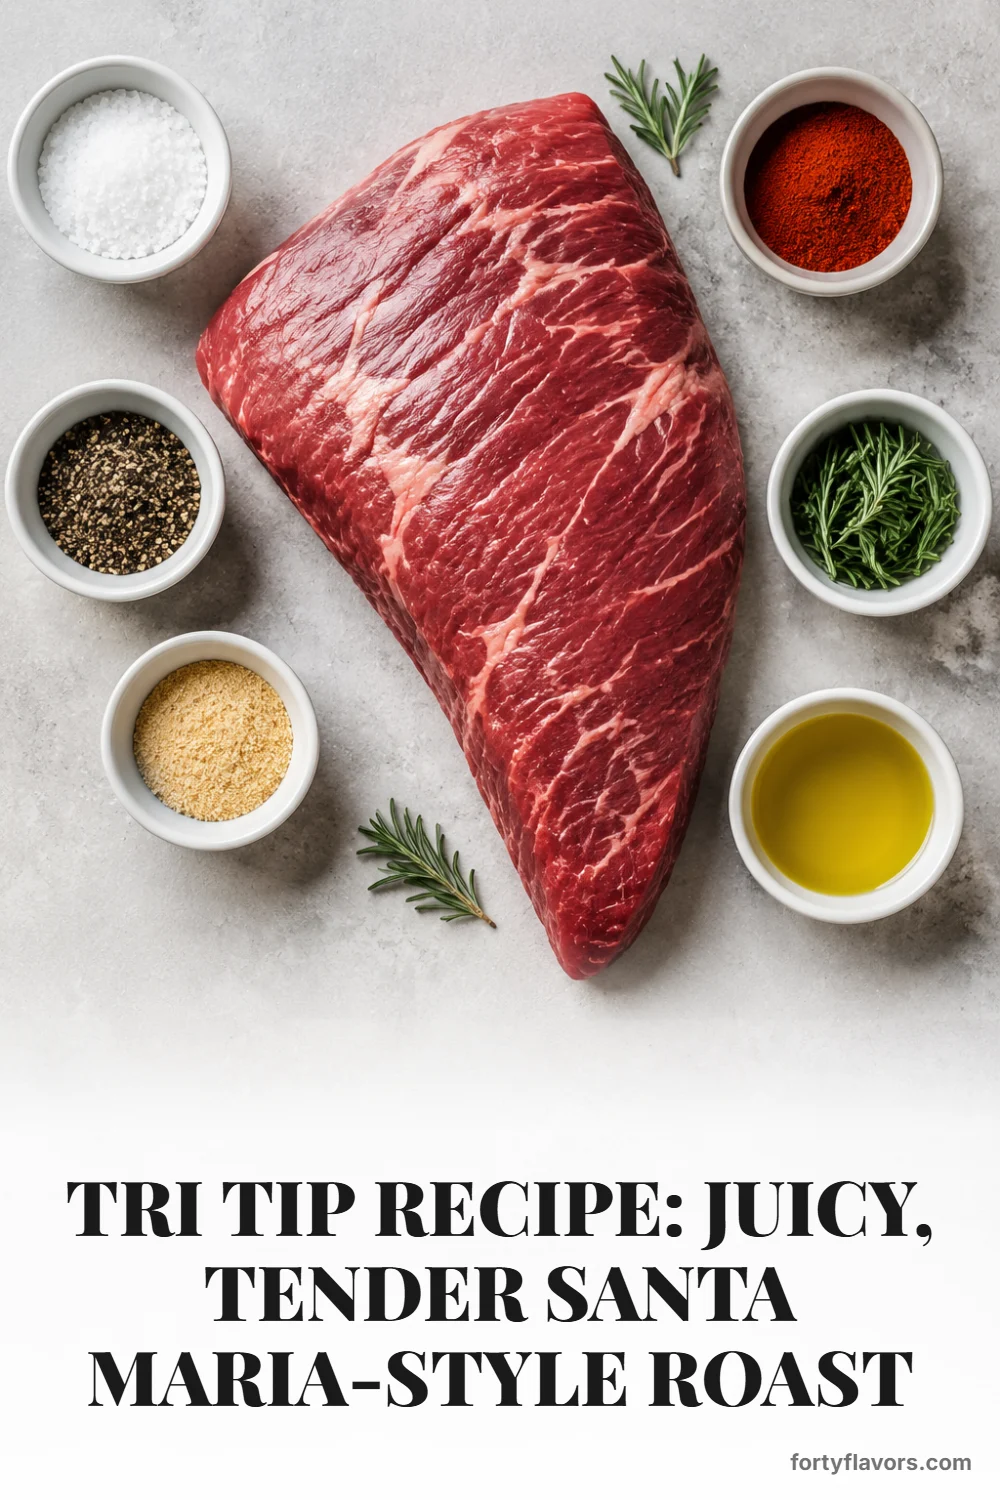
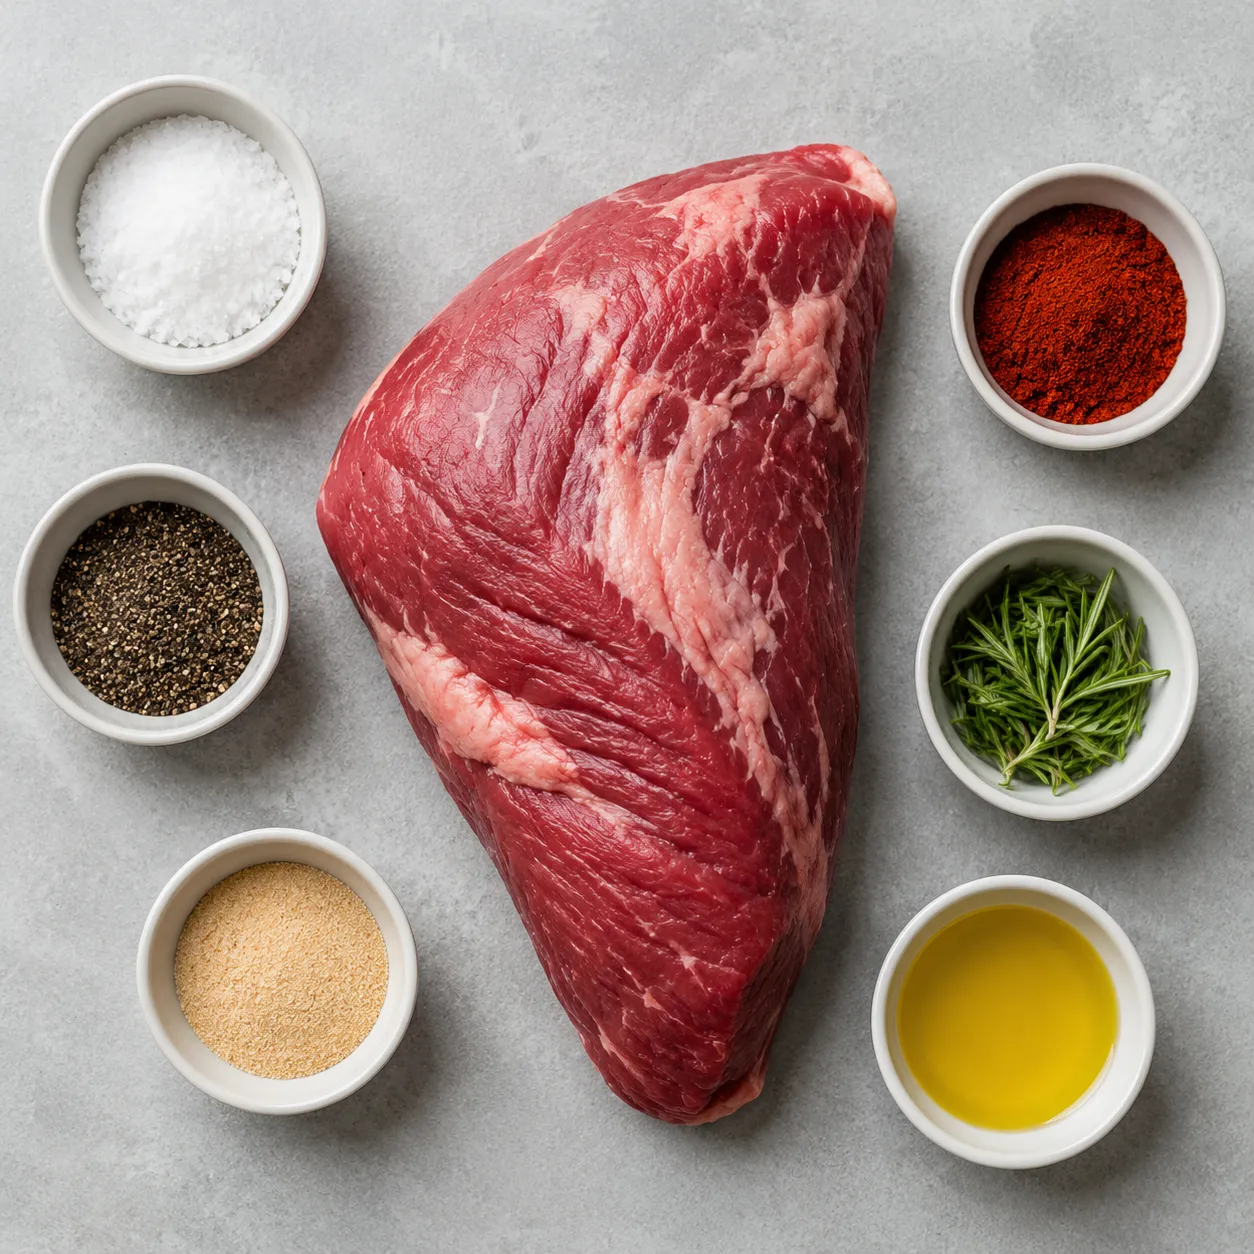
Ingredients for a Bold Beef Roast
The ingredient list is short, which means every choice counts. Look for a 2 1/2- to 3-pound roast with even thickness, a little marbling, and a trimmed fat cap of about 1/4 inch if possible. Too much surface fat can block the seasoning from reaching the meat, but a thin layer helps baste the roast and encourages a beautiful crust.
Santa Maria seasoning is famously unfussy: kosher salt, lots of coarse black pepper, garlic, and sometimes a little smoke or chile warmth. I like smoked paprika here because it nods to live-fire cooking even when you use the oven, and rosemary brings a piney, savory note that loves beef. If you already have a best beef rub you swear by, you can use it as inspiration, but keep sugar low so the crust does not burn during the final sear.
Santa Maria Seasoning and Prep
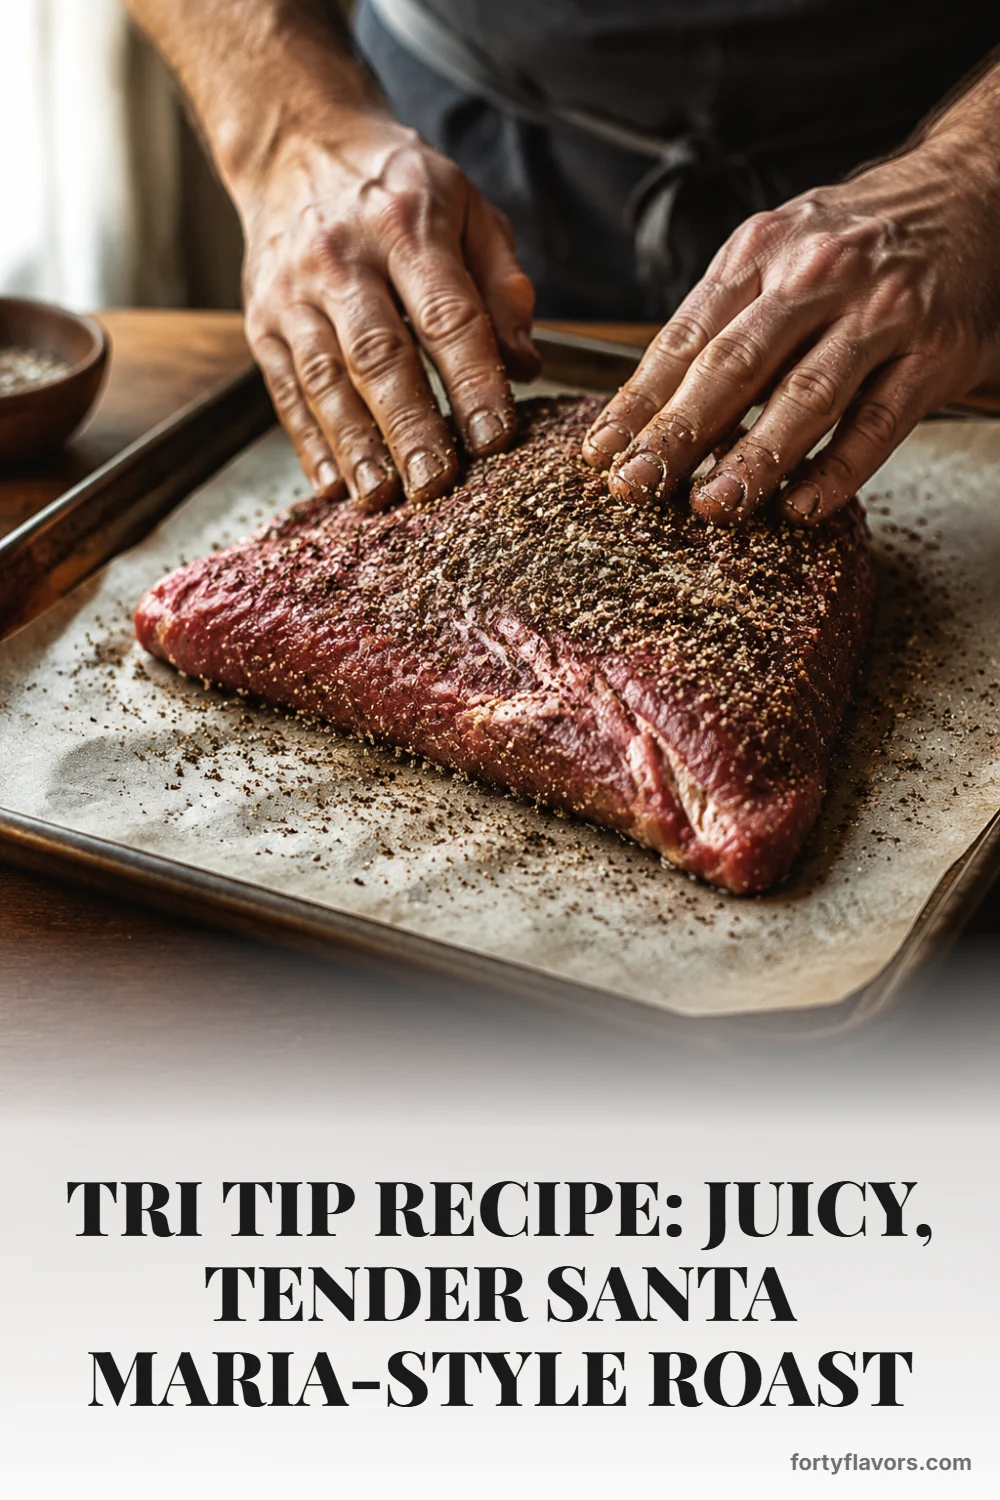
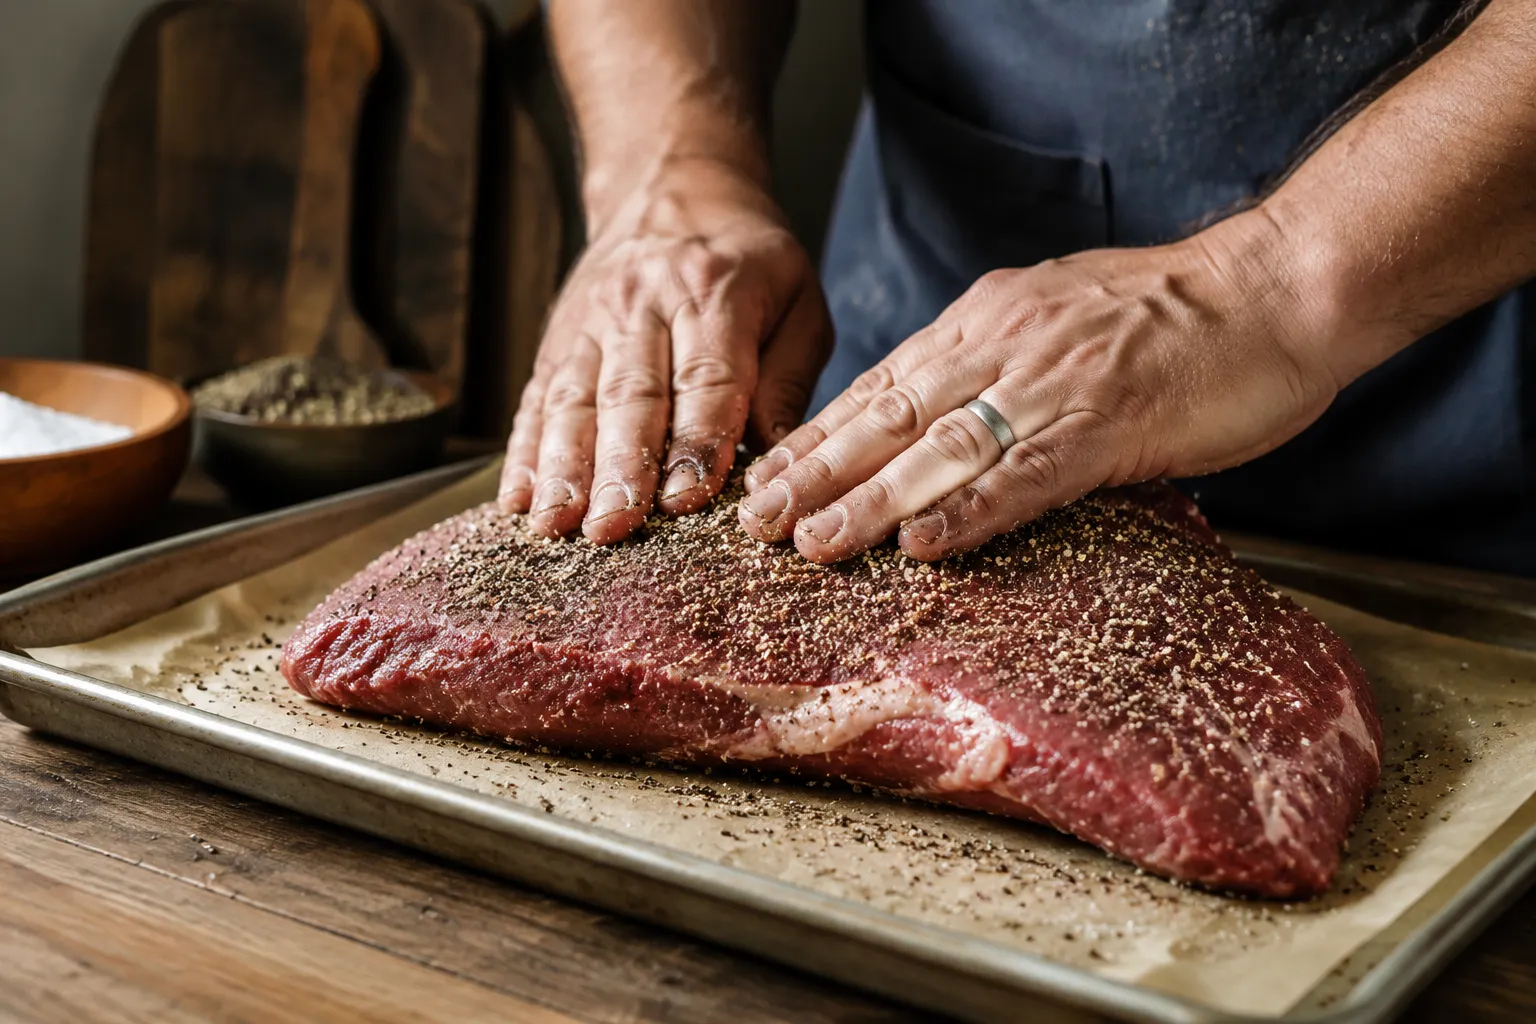
Pat the meat very dry before you add oil or spices. Moisture is the enemy of browning, and a dry surface is what lets the peppery crust turn dark and savory instead of steaming. Rub the roast lightly with olive oil, then coat every side with the seasoning blend, pressing it into the edges and the thicker end.
If you have time, let the seasoned roast sit at room temperature for 30 to 45 minutes before it hits the heat. This takes the chill off and helps it cook more evenly, especially near the center. Do not leave it out for hours; the goal is simply to relax the meat slightly while the grill preheats or the oven comes up to temperature.
How to Cook a Juicy California-Style Roast
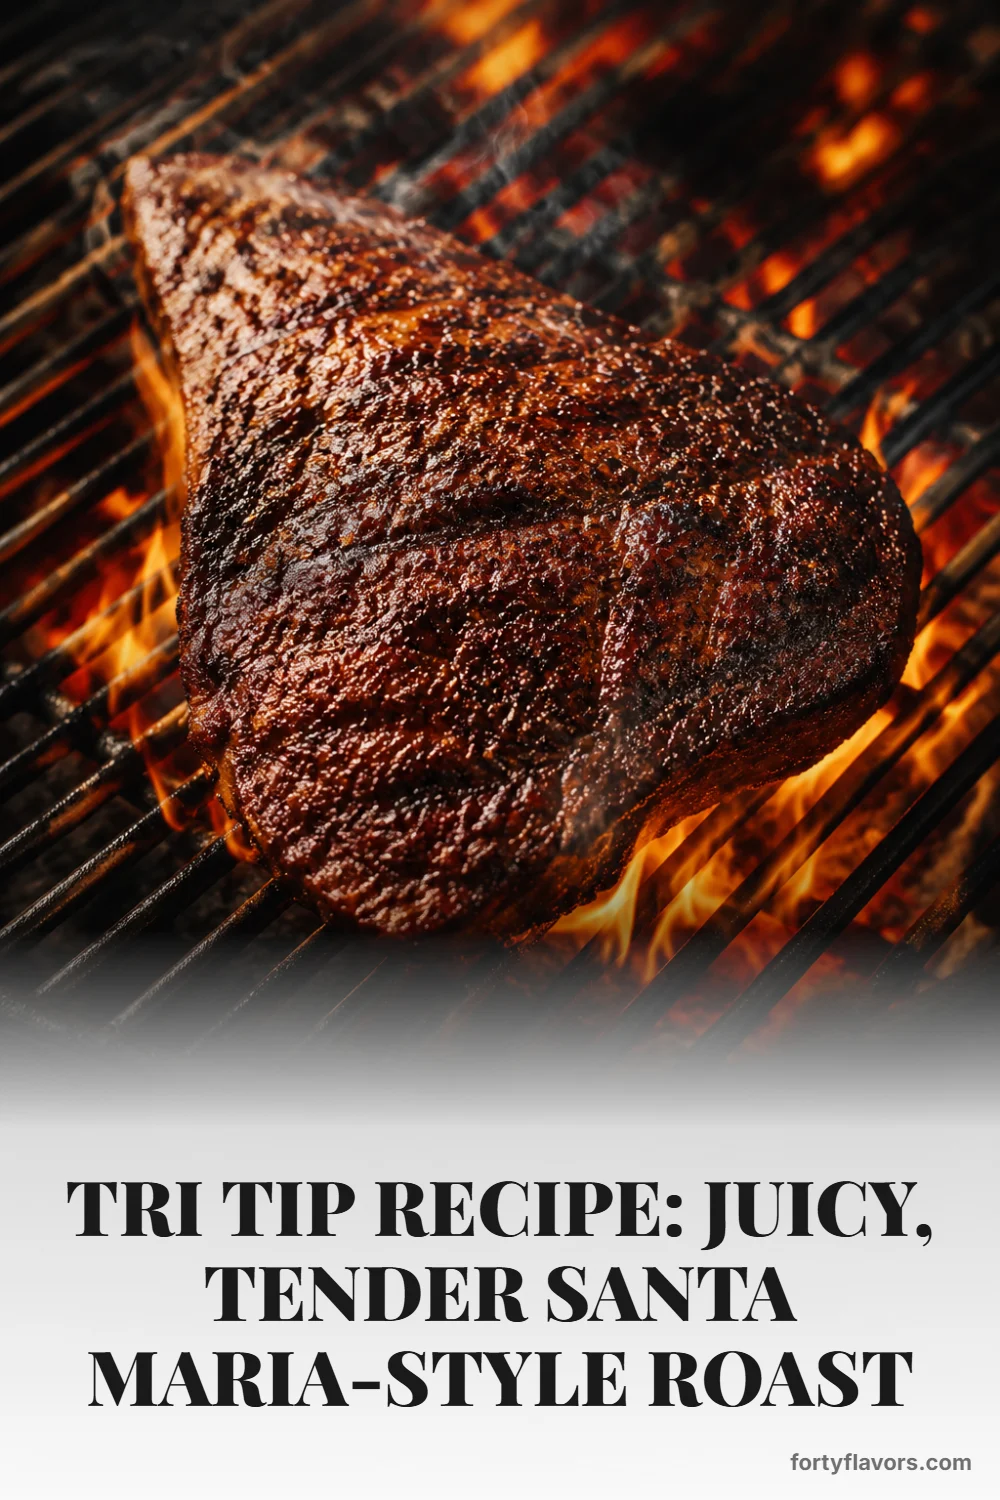
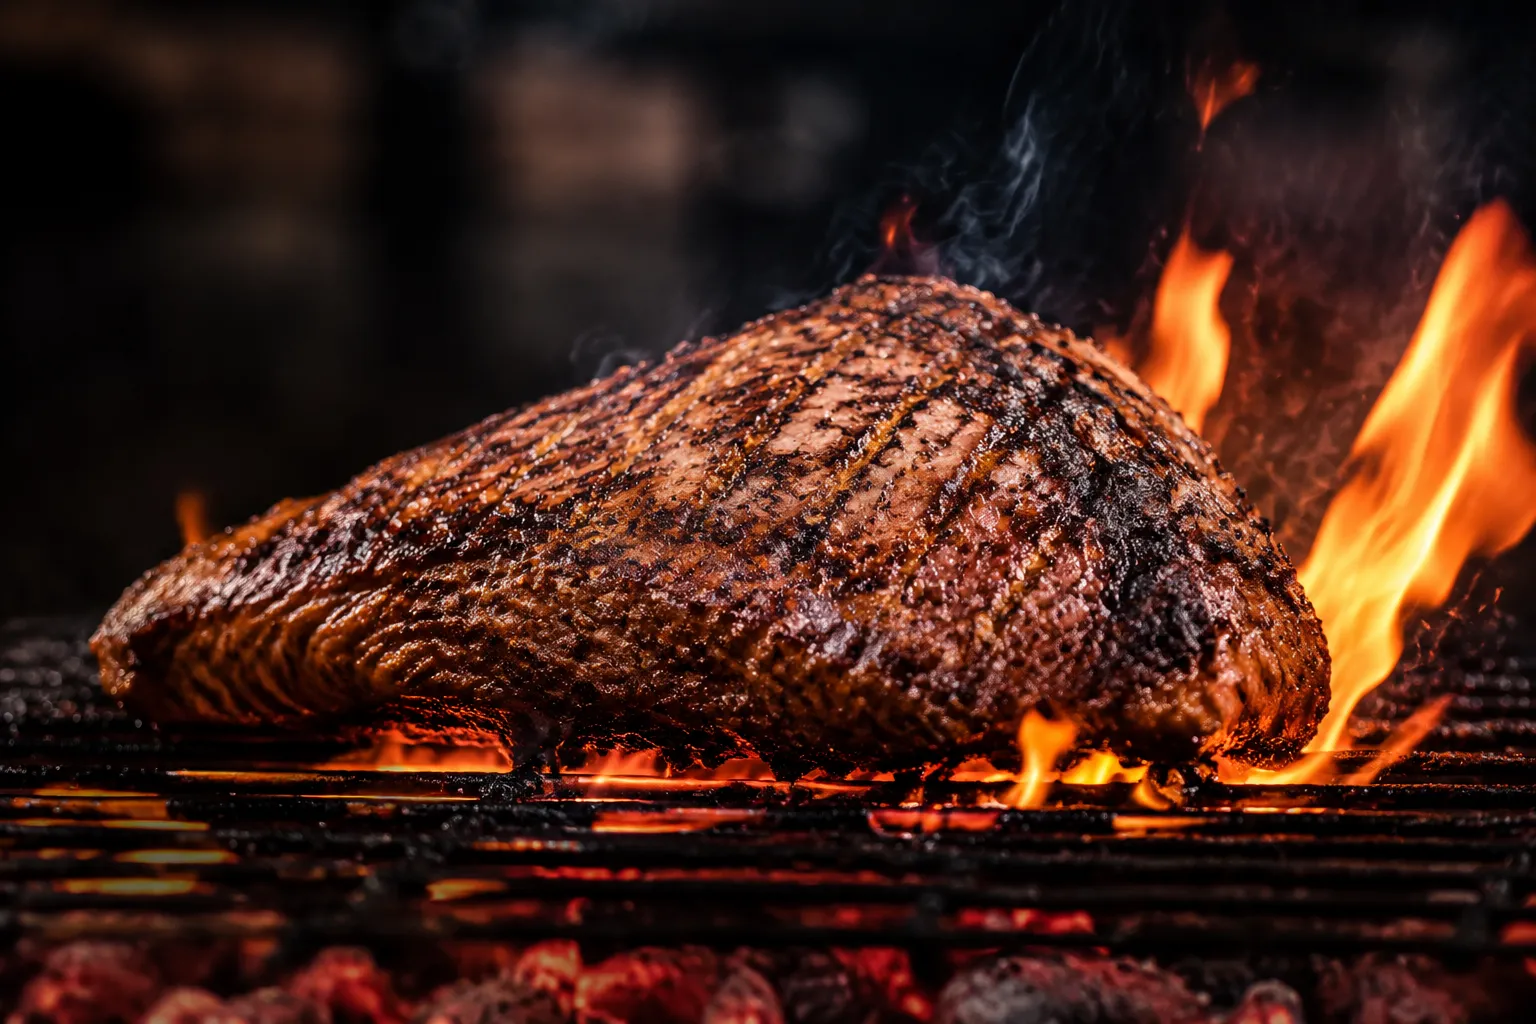
The grill method uses two zones: one hot side for searing and one cooler side for finishing. Start by searing the seasoned roast over direct heat until the crust is deeply browned, then move it to indirect heat and close the lid. This keeps the outside flavorful while the center climbs gently to the right internal temperature.
If you prefer the oven, use the same logic in reverse. Roast low and slow at 275°F until the center is just shy of your target, then finish in a screaming-hot cast iron skillet for that restaurant-style crust. It is the same principle many cooks love for grilled ribeye steak: build doneness gradually, then use high heat only long enough to create color and texture.
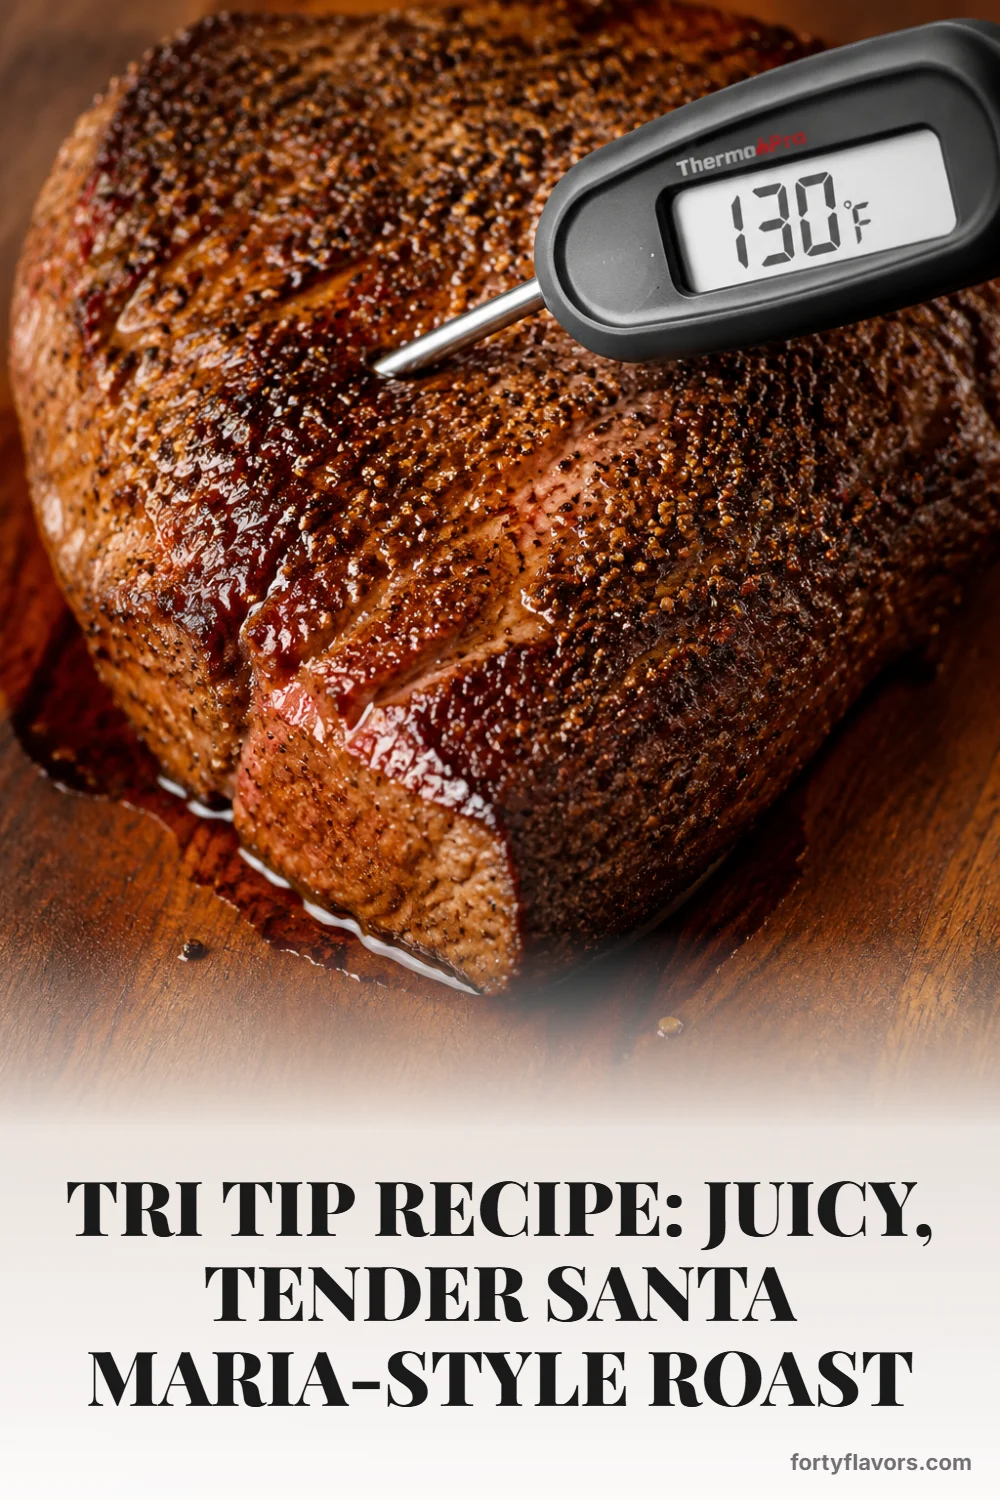
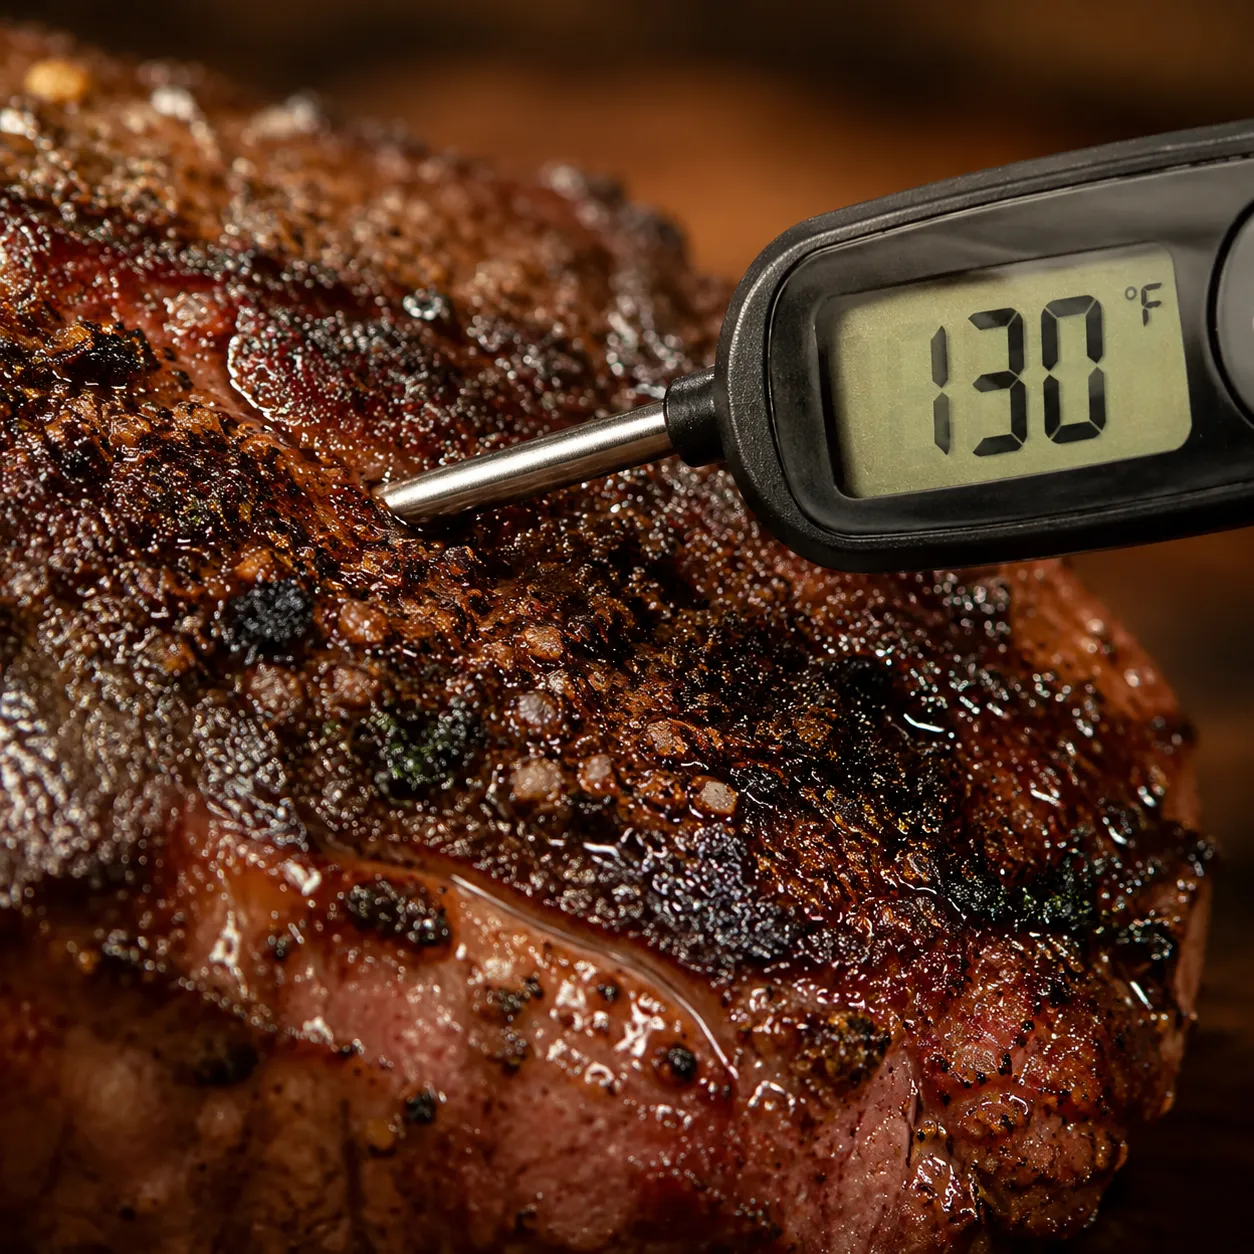
For medium rare, pull the roast when an instant-read thermometer registers 130°F to 135°F in the thickest part. Carryover heat will raise the temperature about 5 degrees while it rests, so do not wait until the meat looks done from the outside. A thermometer is the difference between juicy, rosy slices and a dry roast that needed five fewer minutes.
Internal Temperature Guide
Temperature is the easiest way to make this roast repeatable. Pull at 125°F to 130°F for rare, 130°F to 135°F for medium rare, and 140°F to 145°F for medium. The thinner tail will usually be a few degrees warmer than the thick end, giving you a nice range of doneness on one board.
Measure from the side and aim the probe into the thickest central portion, not just the surface. If you hit a pocket of fat or push too far through the meat, the reading may be misleading. Check in two spots, especially if your roast is thick on one side and narrow on the other.
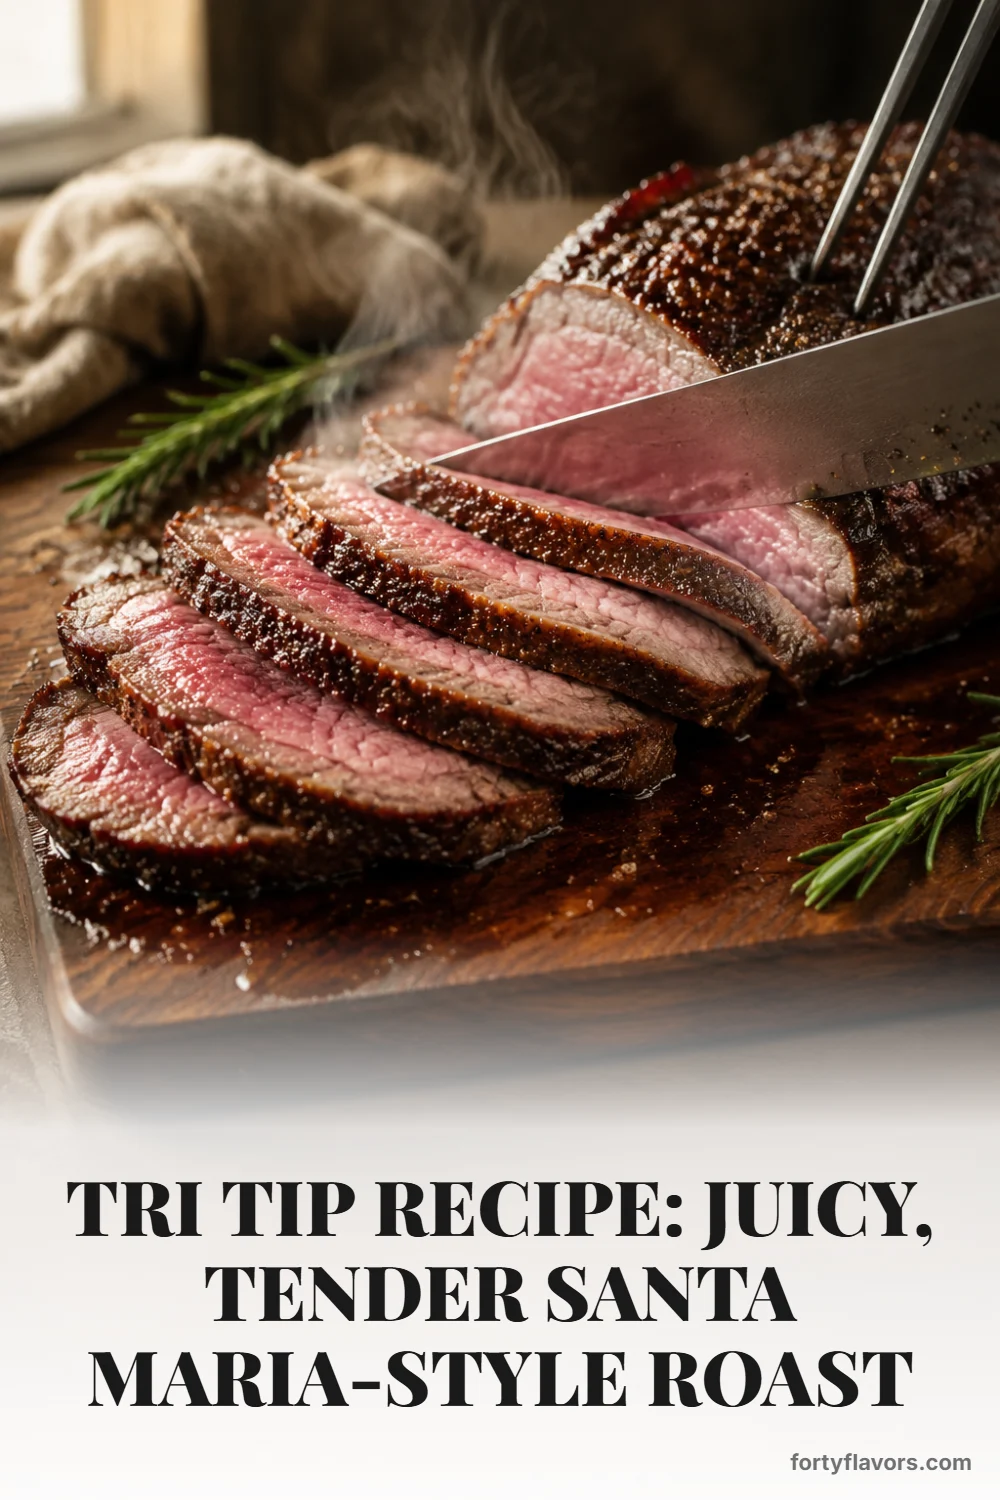
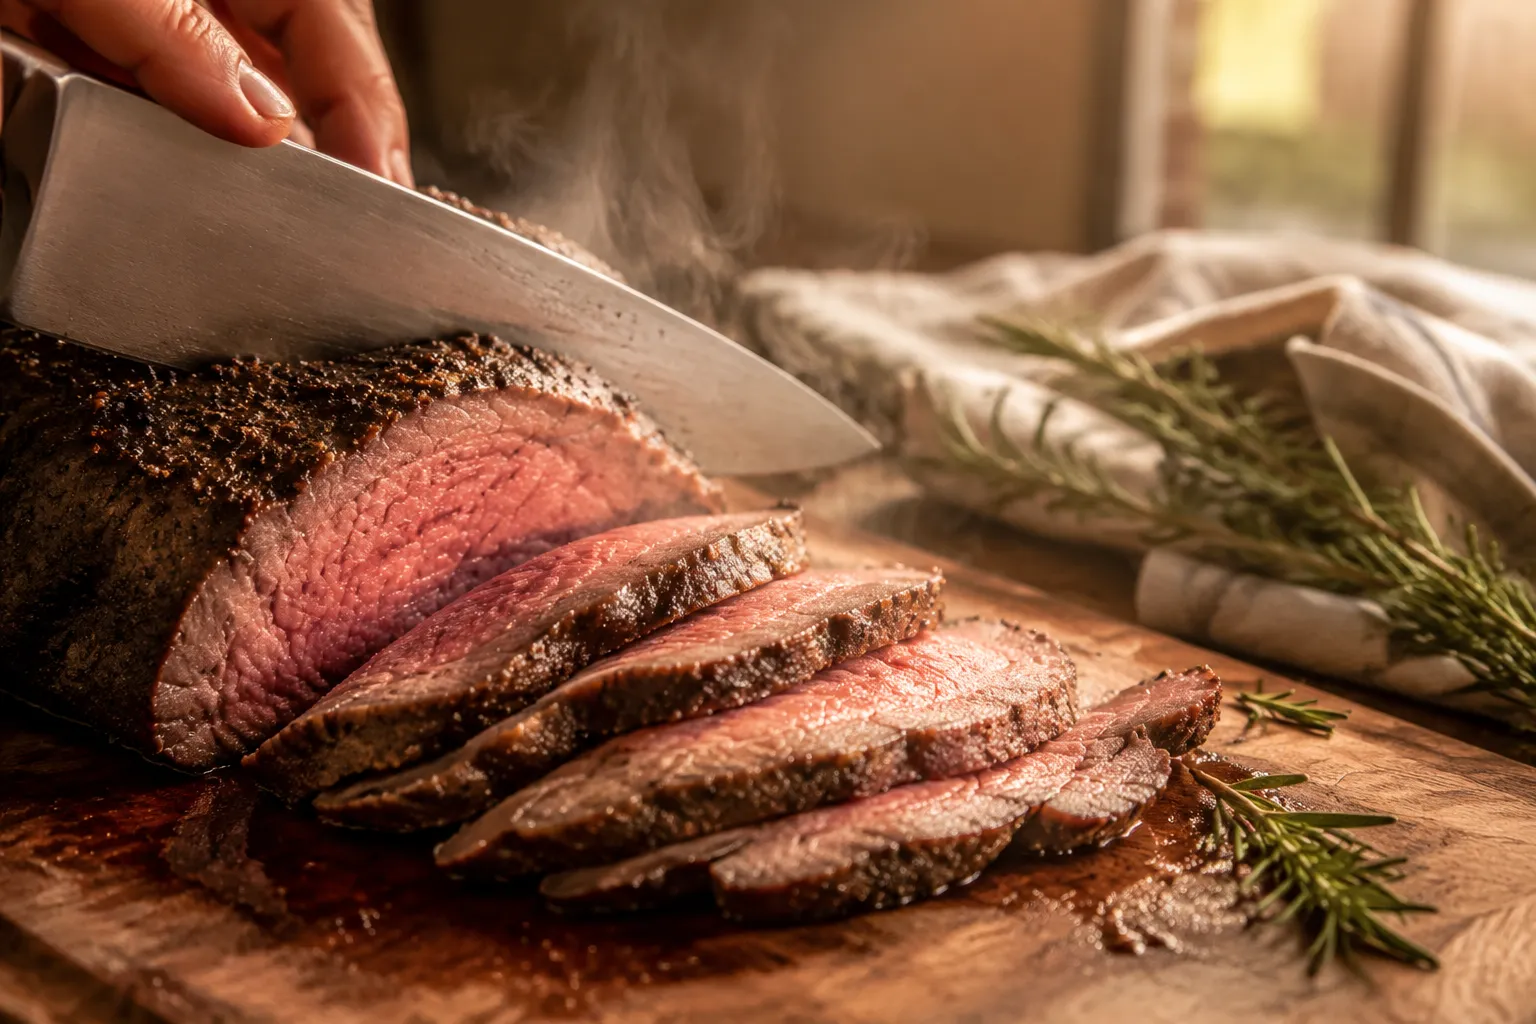
How to Slice Against the Grain
Slicing is where this recipe becomes truly tender. After cooking, rest the roast for 10 to 15 minutes so the juices redistribute and the muscle fibers relax. If you slice immediately, those juices spill onto the board instead of staying in the meat.
The key is that the grain does not run in one direction from end to end. Look closely and you will see the lines of muscle fibers shift near the center, almost like two pieces meeting at an angle. Cut the roast in two at that transition point, then rotate each piece so your knife crosses the grain rather than following it.
Use a sharp slicing knife and cut thin pieces, about 1/4 inch thick or a little less. Thin slices make the beef feel more tender and give every bite a little crust. This same grain-awareness is one reason carne asada tastes so good when it is sliced properly for tacos.
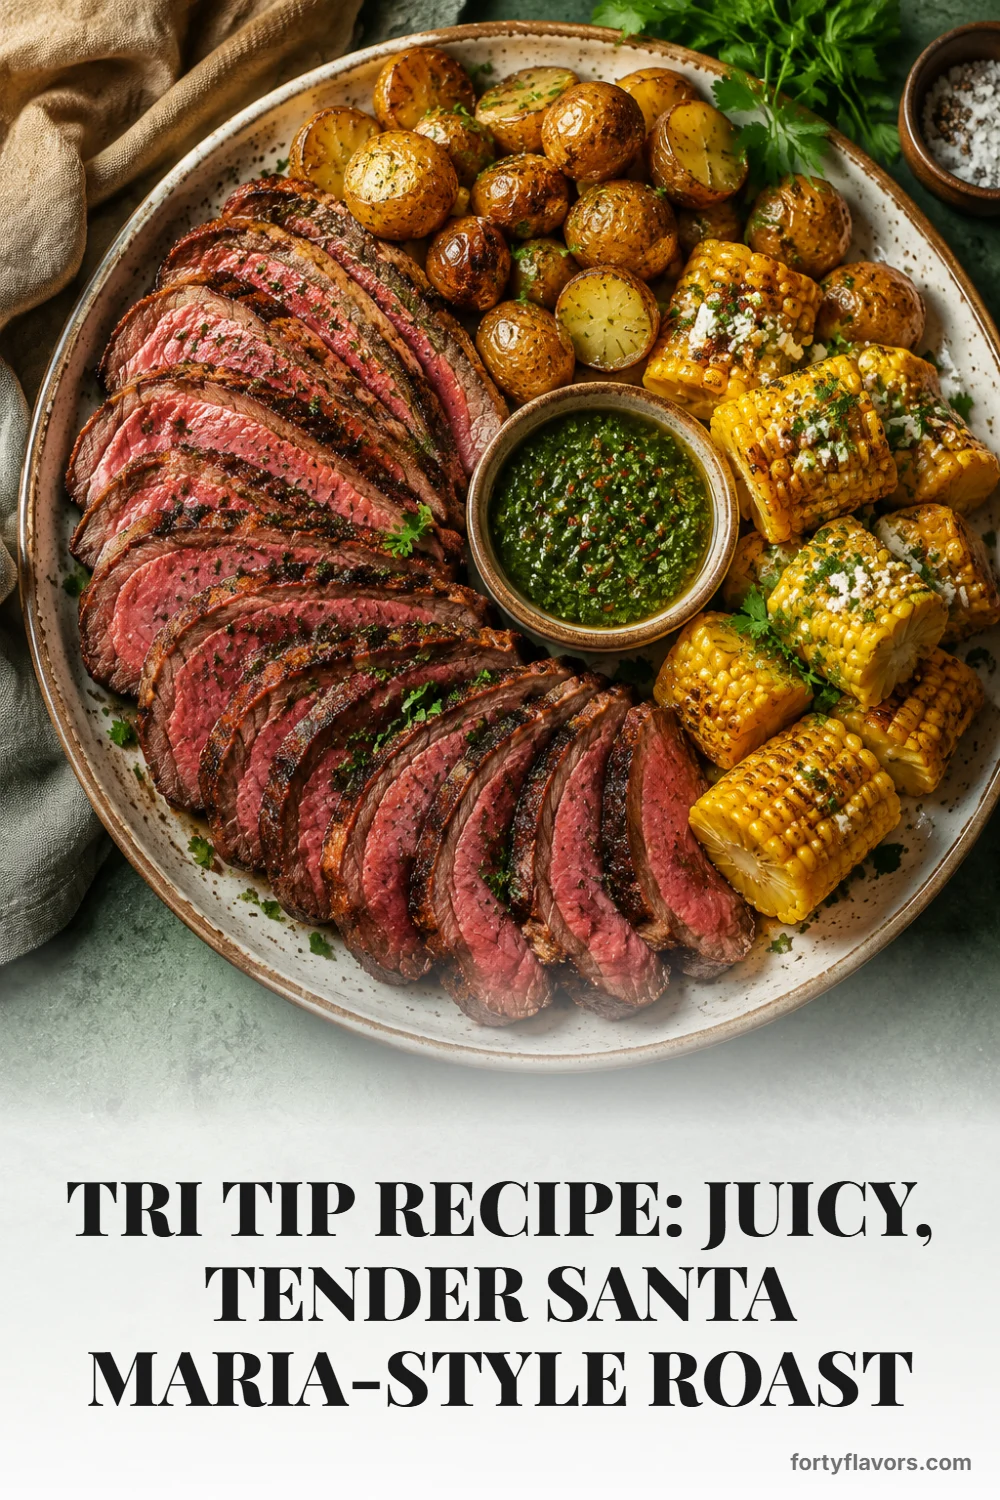
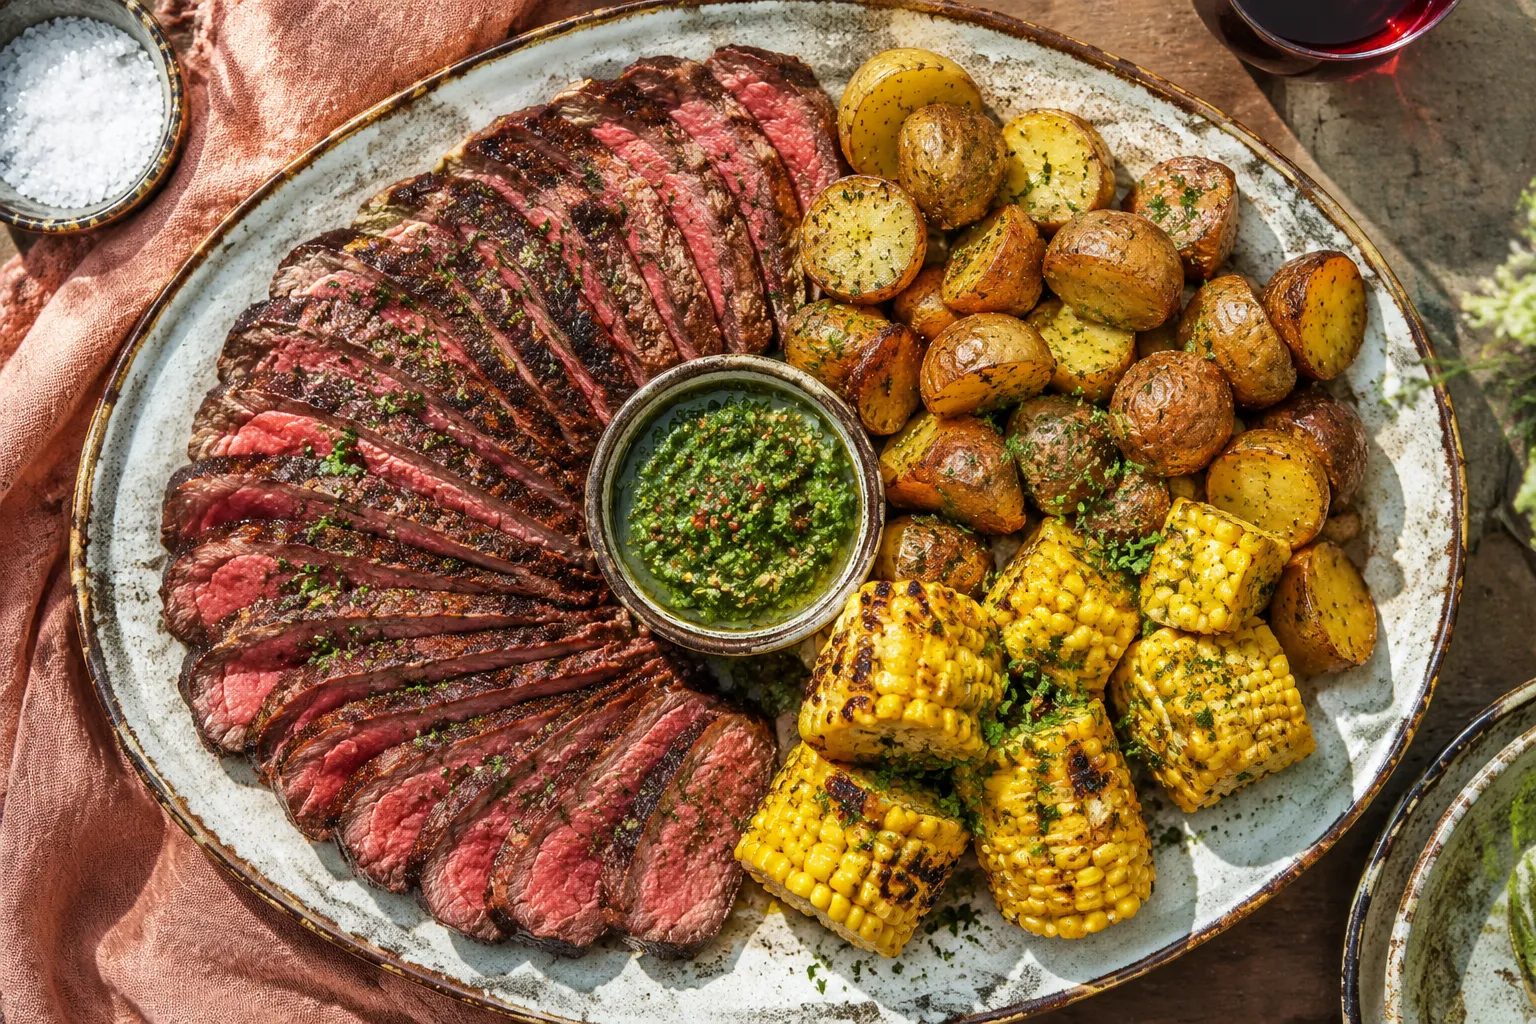
Serving Suggestions for a Santa Maria Plate
For a classic Santa Maria-style meal, serve the sliced beef with beans, grilled bread, salsa, and a simple salad with a sharp vinaigrette. The bright acidity balances the richness of the meat, while the beans make the plate feel hearty without stealing attention. A spoonful of chimichurri sauce is not traditional to every Santa Maria table, but the herbs, garlic, and vinegar are wildly good with the peppery crust.
For a cozier dinner, pair the beef with garlic mashed potatoes and roasted vegetables, letting the board juices mingle with the potatoes like a quick pan sauce. In summer, I love it with grilled asparagus, blistered tomatoes, corn salad, or a smoky pepper relish. Leftover slices are also excellent tucked into tortillas with avocado, onion, and lime, or piled over a big chopped salad.
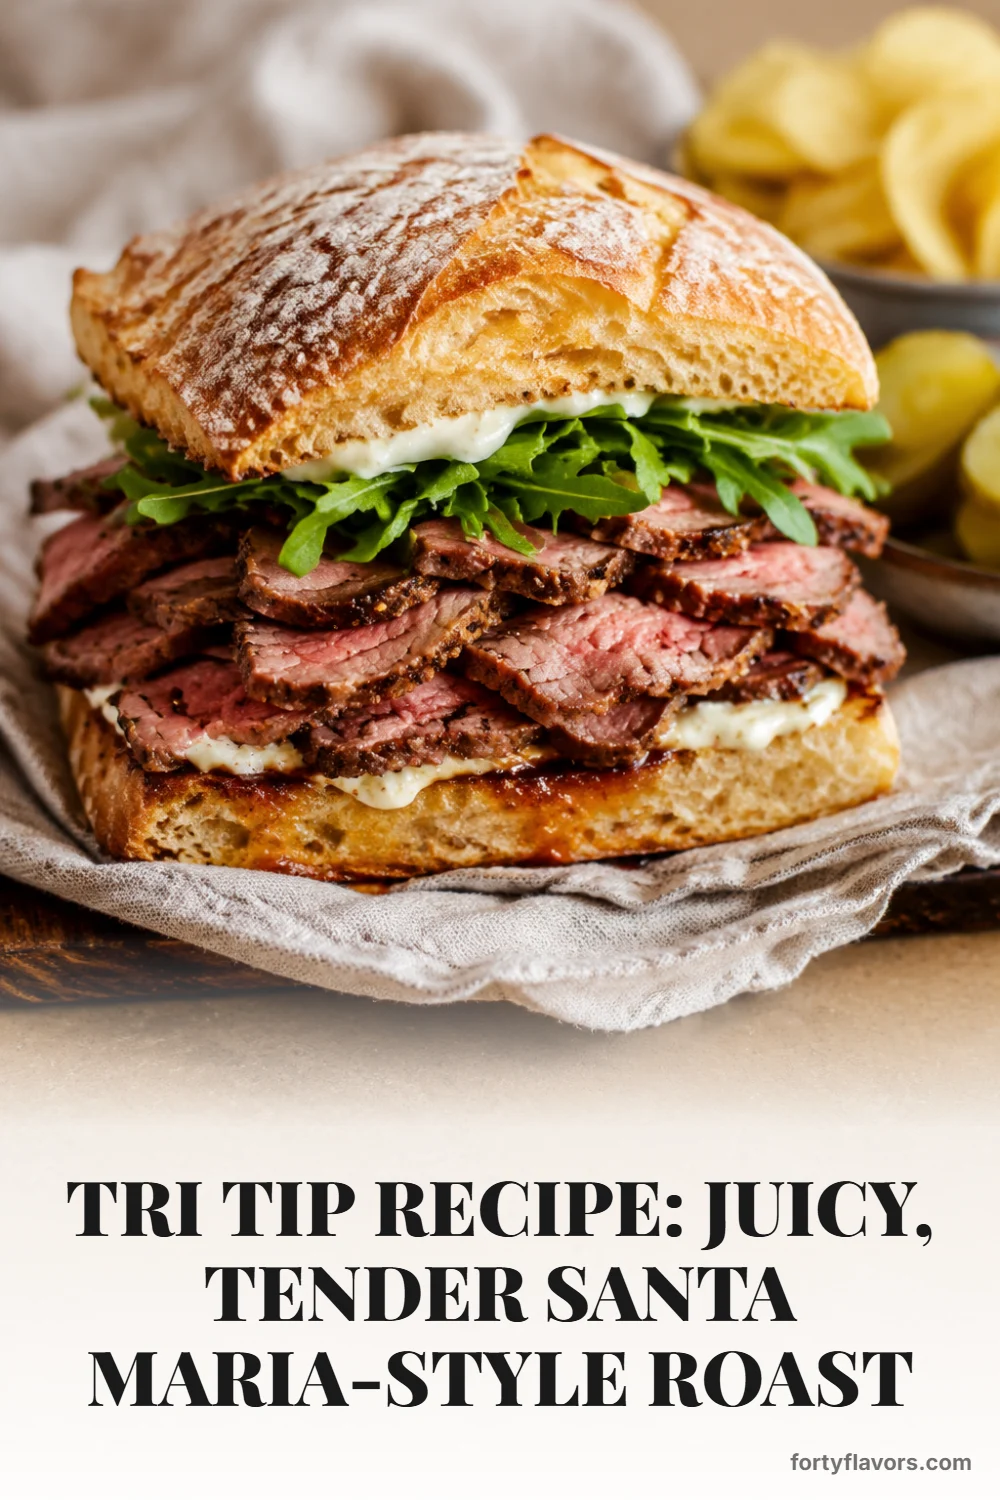
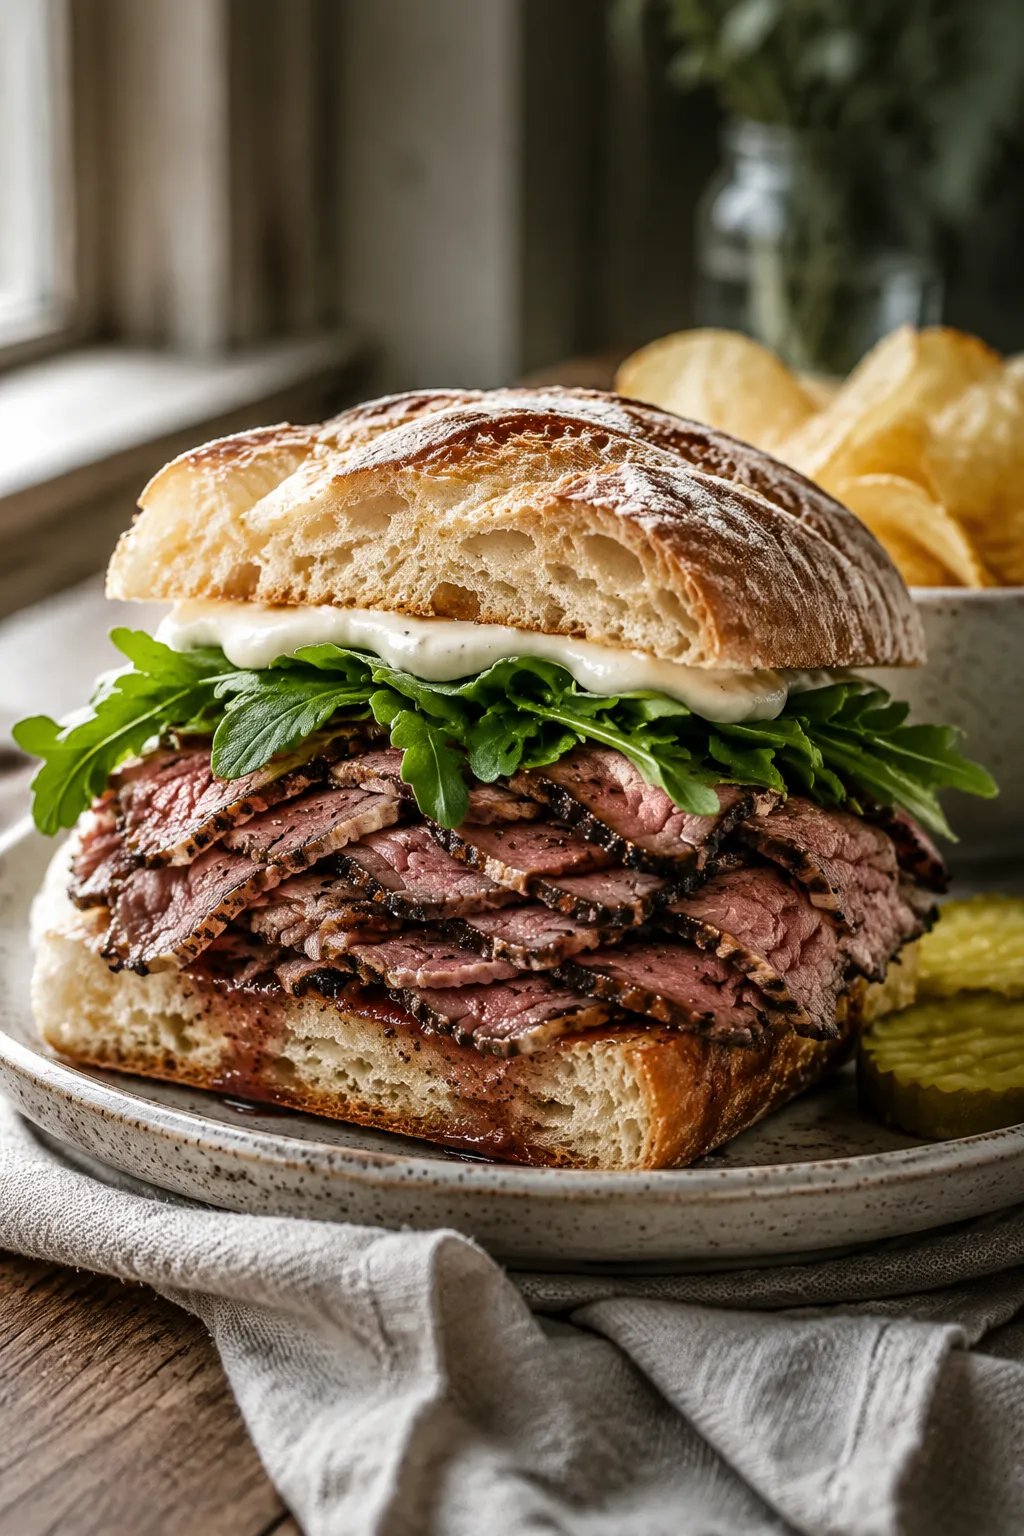
Sandwiches, Tacos, and Next-Day Meals
This roast is one of those rare dinners that might be even more exciting the next day. Thinly sliced leftovers make an incredible sandwich on toasted ciabatta with horseradish cream, arugula, pickled onions, and a swipe of mustard. Keep the beef barely warm so it stays tender instead of tightening up.
For tacos, chop the slices into bite-size pieces and warm them quickly in a skillet with a splash of broth or the reserved board juices. Add charred tortillas, salsa, cilantro, and a squeeze of lime for an easy weeknight dinner that feels completely new. You can also fold the beef into quesadillas, grain bowls, breakfast hash, or a steak salad with blue cheese and crisp vegetables.
Make It With Confidence
The beauty of this tri tip recipe is that it gives you steakhouse flavor without requiring steakhouse fuss. Season generously, cook with intention, trust the thermometer, and give the roast time to rest before you slice. Once you understand the two grain directions, the carving becomes simple and the texture is consistently tender.
Whether you cook over glowing coals or finish indoors in cast iron, this is the kind of meal that brings people into the kitchen asking when dinner is ready. Serve it on a big board with herbs, sauce, and something starchy on the side, and let everyone choose their perfect slice. It is rustic, generous, and exactly the sort of California-style beef dinner worth putting on repeat.
💡 Expert Tips
Use an instant-read thermometer: This cut cooks quickly, and guessing by time alone can lead to overcooking. Check the thickest part and pull a few degrees before your final target.
Dry the surface well: Patting the roast dry before seasoning helps the crust brown instead of steam.
Rest before slicing: Give the beef 10 to 15 minutes so the juices settle back into the meat.
Map the grain first: Identify where the grain changes direction before you start carving, then slice each section against its own grain.
Keep slices thin: Thin slices make the roast taste more tender and let the seasoned crust shine in every bite.
🔄 Variations & Substitutions
Once you have the core method down, you can nudge the flavor in different directions while keeping the same cooking and slicing technique.
Spicy rub: Add 1/2 teaspoon cayenne or chipotle powder to the seasoning blend.
Herb-forward: Add minced thyme, oregano, or parsley after cooking for a fresh finish.
Garlic butter finish: Brush the rested roast with melted garlic butter before slicing.
Southwestern style: Add cumin, coriander, and ancho chile powder, then serve with tortillas and salsa.
Red wine board sauce: Mix the carving juices with a splash of red wine vinegar, olive oil, and chopped herbs.
🧊 Storage & Leftovers
Store leftover beef in an airtight container in the refrigerator for up to 4 days. For the best texture, keep slices as whole and thick as possible until you are ready to use them; thin slices dry out faster once chilled.
To reheat, warm gently in a covered skillet over low heat with a splash of beef broth, water, or reserved juices just until heated through. You can also freeze cooked slices for up to 2 months, wrapped tightly and sealed in a freezer bag, then thaw overnight in the refrigerator before reheating.
Save This Recipe to Pinterest
Hover any image and hit “Pin it” to save it to your Pinterest boards.
Tri tip is a triangular cut of beef from the bottom sirloin. It is especially popular in California, where Santa Maria-style barbecue made it famous for its big beefy flavor, relatively affordable price, and tender texture when cooked and sliced correctly. Because it is leaner than brisket or chuck, it does best cooked to medium rare or medium rather than low-and-slow to shredding temperatures.
What temperature should tri tip be cooked to?
For medium rare, pull the roast when the internal temperature reaches 130°F to 135°F in the thickest part. It will usually rise about 5 degrees as it rests, giving you a warm, rosy center. If you prefer medium, pull around 140°F to 145°F. Try not to cook it much beyond 145°F, because this cut is fairly lean and can become dry when overdone.
Should I cook tri tip fat side up or down?
If your roast has a fat cap, start fat side up while it cooks over indirect heat so the fat can gently render and baste the meat. During the searing stage, flip it fat side down briefly over the hotter zone to crisp and brown that surface. If the fat begins to flare over direct heat, move the roast back to the cooler side until the flames calm down.
How do you slice tri tip correctly?
Let the roast rest first, then look for the spot where the grain changes direction. Cut the roast into two pieces at that transition point. From there, turn each piece so your knife cuts across the visible muscle fibers, not parallel with them. Thin slices cut against the grain are the secret to making this beef feel tender and juicy instead of chewy.
Can I cook tri tip in the oven instead of grilling?
Yes, the oven works beautifully. Roast it at 275°F on a rack set over a sheet pan until the center reaches about 125°F for medium rare, then sear it in a very hot cast iron skillet for 1 to 2 minutes per side. This oven reverse-sear approach gives you an evenly cooked interior and a dark, flavorful crust without needing an outdoor grill.
Tri Tip Recipe: Juicy, Tender Santa Maria-Style Roast