Crispy Homemade Onion Rings (Better Than Any Diner)
Ingredients
Scale
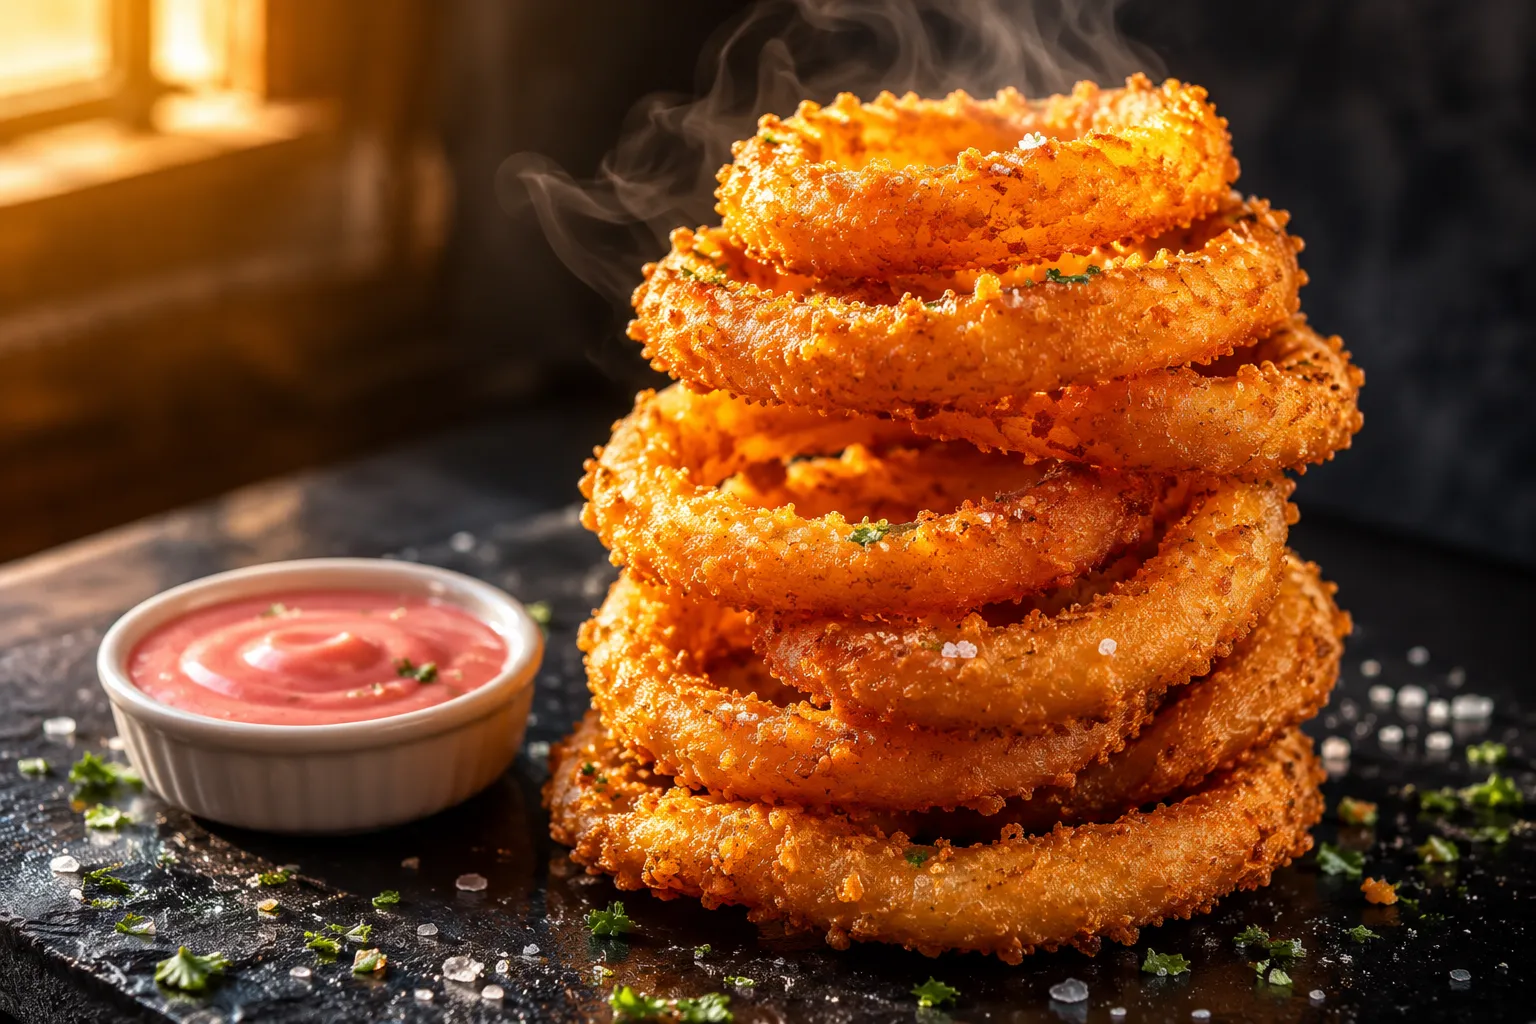
These crispy onion rings have a shatteringly crunchy beer batter, sweet tender onions inside, and stay crisp for hours. The diner-style classic, made better at home.
Onion rings are the kind of golden, crackly appetizer that can make a weeknight burger feel like a full-on diner moment. This version is audibly crisp, deeply savory, and tender in the middle, with a light beer batter that clings beautifully instead of sliding off after the first bite.
The secret is a double-coat method: a quick flour-cornstarch dredge, a cold bubbly batter, and then one more dusty layer before the rings hit the oil. You do not need a restaurant fryer or any special equipment, just a heavy pot, a thermometer, and a little patience while the oil comes back to temperature between batches.
Think of this as the onion ring recipe to keep in your back pocket for burger night, game day, backyard cookouts, or the kind of snack dinner where everyone stands around the counter dunking hot rings into sauce. They are best eaten warm, salted right away, and piled high enough to feel a little dramatic.
A truly crispy coating is all about contrast: dry meets wet, cold batter meets hot oil, and sturdy onion slices meet a crust that sets fast. Cornstarch is the quiet workhorse here because it lowers the gluten load and creates that delicate, glassy crunch you usually associate with great crispy fried onions. Baking powder adds just enough lift to make the coating bubble and crag instead of frying up flat and dense.
The other big move is temperature. A cold beer batter shocks against 375°F oil, which helps the crust firm before it can absorb too much oil. That means the outside goes golden and crisp while the onion inside turns sweet and silky. If you have ever had a breaded ring where the onion slips out in one long strand, this batter-and-dredge approach helps solve that too.
For the best texture, slice the onions thick enough to hold their shape but not so thick that the centers stay sharp. About 1/2 inch is the sweet spot. The rings soften into tender ribbons, but they still have enough structure to hold the coating.
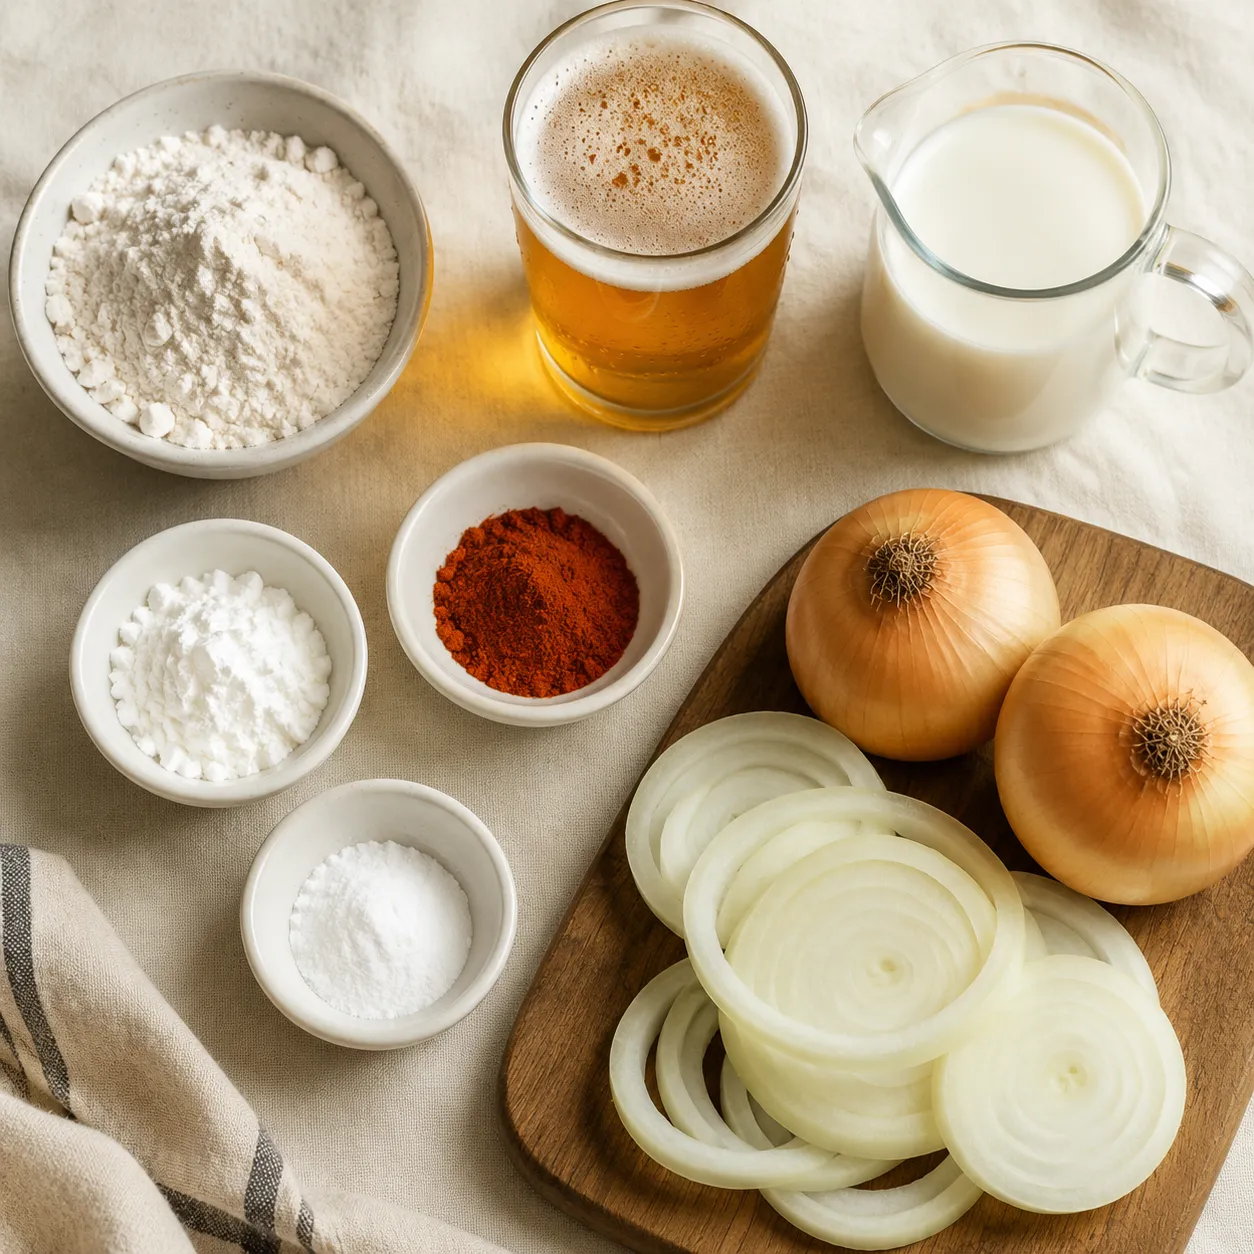
The ingredient list is simple, but each piece earns its place. A Vidalia onion is my first choice when it is in season because it fries up mellow, sweet, and almost buttery. Regular sweet yellow onions also work beautifully, and Walla Walla onions are another great option if you find them. Avoid red onions for this particular method; they can be a little sharper and do not soften quite as gently in the short fry time.
The dry mix starts with all-purpose flour and cornstarch. Flour gives the coating enough body to grab onto the onion, while cornstarch keeps the finished crust light and extra crisp. Paprika brings a warm diner-style color, baking powder adds lift, and kosher salt seasons both the coating and the onion itself. If you like a little heat, a pinch of cayenne is a natural fit here.
For the liquid, cold beer is classic because it brings carbonation, a faint malty depth, and a batter that fries up lacy and crunchy. Club soda or sparkling water works if you want to skip the beer, and buttermilk adds tang and helps the dry coating cling. In this recipe, the buttermilk is used as part of the batter for flavor and tenderness, while the beer does the lifting and lightening.
If you are comparing this to a basic onion ring batter, the difference is in the balance. Too much flour makes the coating bready, too much liquid makes it slide off, and warm batter can turn heavy fast. Keep everything cold until it is time to fry, and mix only until combined so the coating stays delicate instead of chewy.
Start with large onions so you get a generous mix of wide outer rings and smaller centers. Trim off the root and stem ends, peel away the papery skin, and slice crosswise into sturdy rounds. The ideal thickness is around 1/2 inch; thinner pieces can collapse in the oil, while very thick ones may taste too oniony in the center.
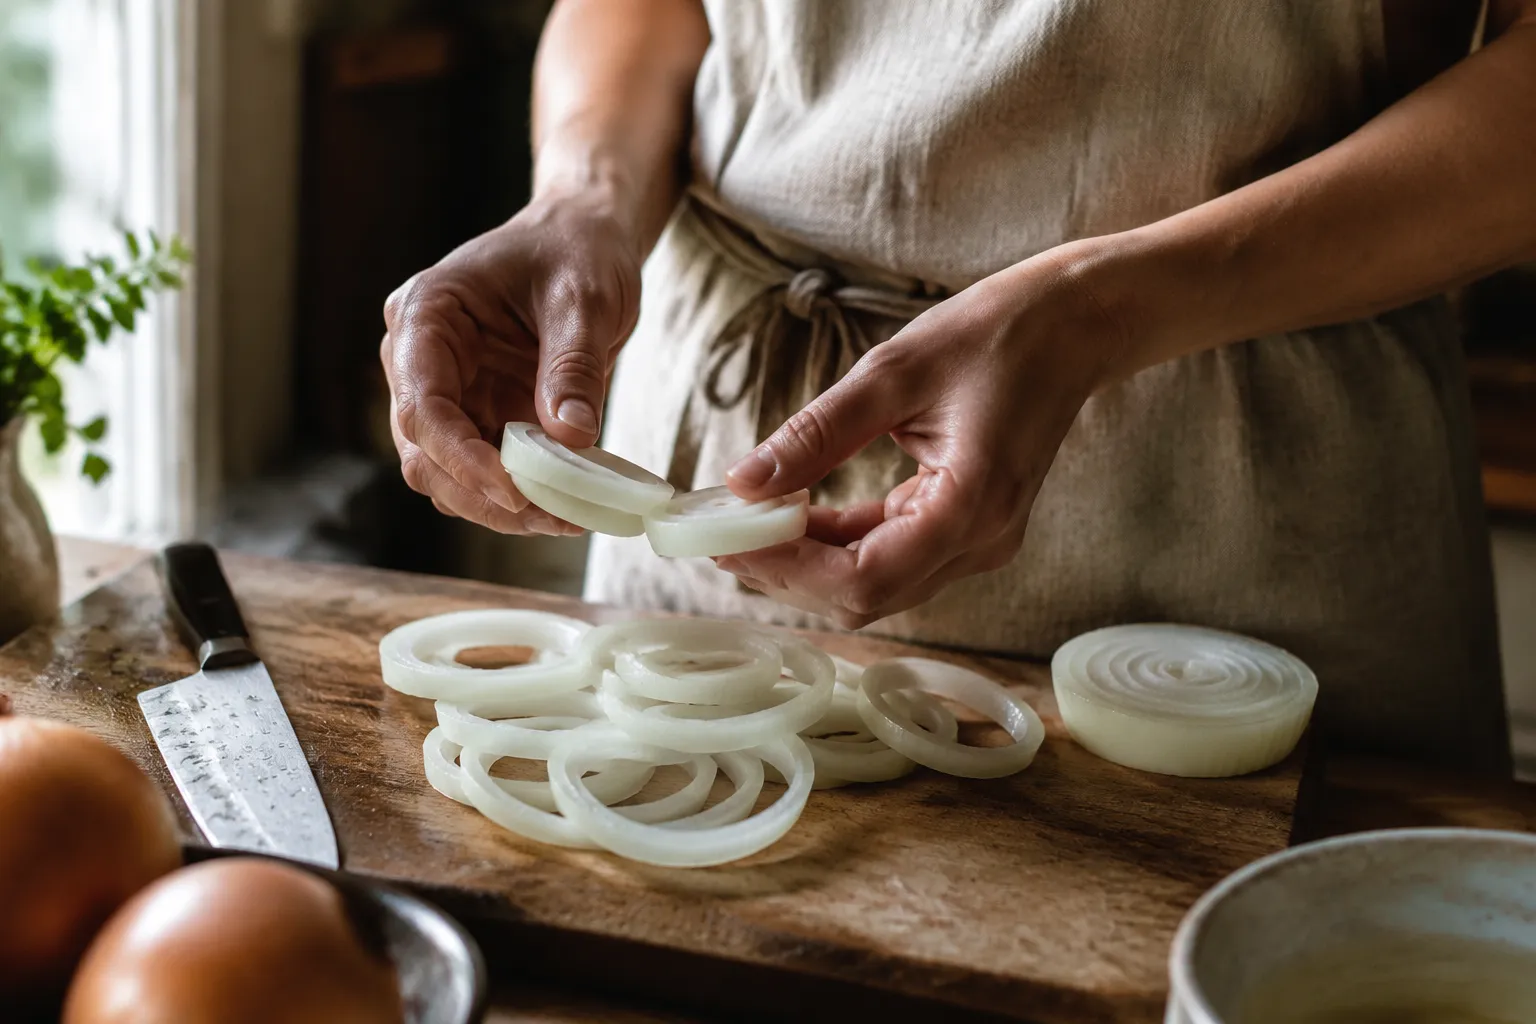
Once sliced, gently separate the rounds into individual rings. Save the tiny centers for another use, like omelets, soups, or a quick pan of sautéed onions. If any rings have a very thin inner membrane, you can loosen it with your fingers; removing that slippery layer helps the coating hold on better. This little prep step is one of those quiet details that makes the finished batch feel restaurant-level.
A short soak can also help mellow sharper onions. If your onions smell particularly pungent, place the separated rings in cold water for 10 minutes, then drain and pat them very dry. Dry surfaces matter because batter grips better to onion than to water. Moisture trapped between the onion and coating is one reason fried foods lose their crunch too quickly.
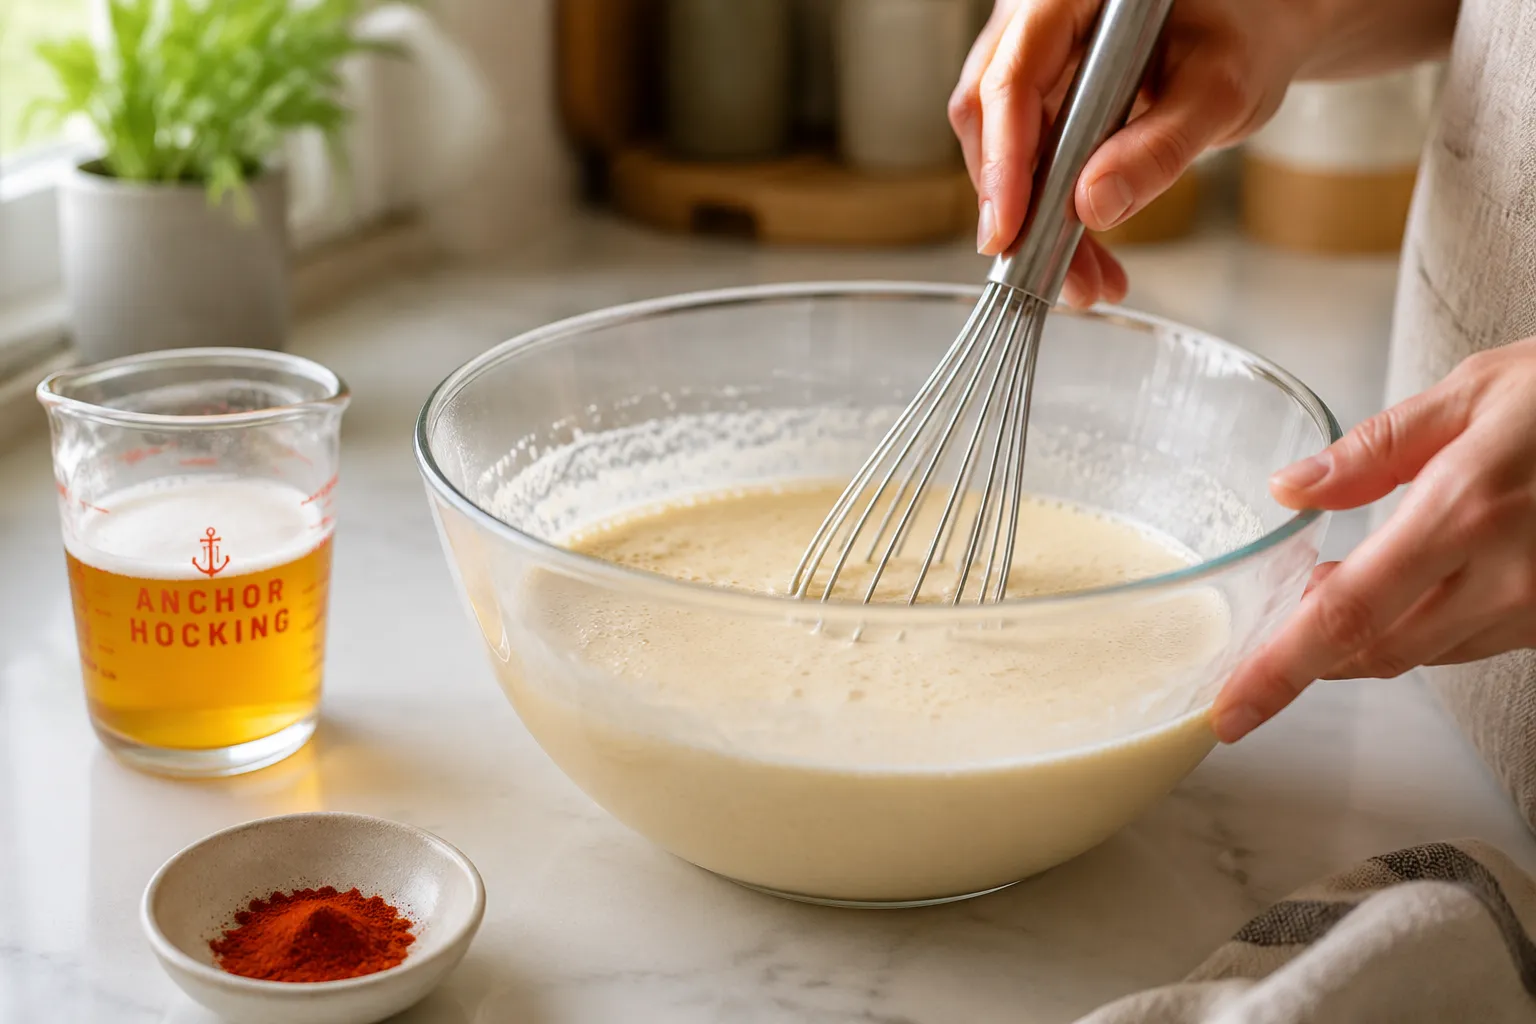
Set up two bowls: one for the dry dredge and one for the wet batter. The dry bowl gets flour, cornstarch, salt, paprika, and baking powder. For the wet bowl, whisk a portion of that dry mixture with cold beer and buttermilk until you have a thick, spoon-coating batter. It should be looser than pancake batter but not watery; when you lift the whisk, it should fall in ribbons.
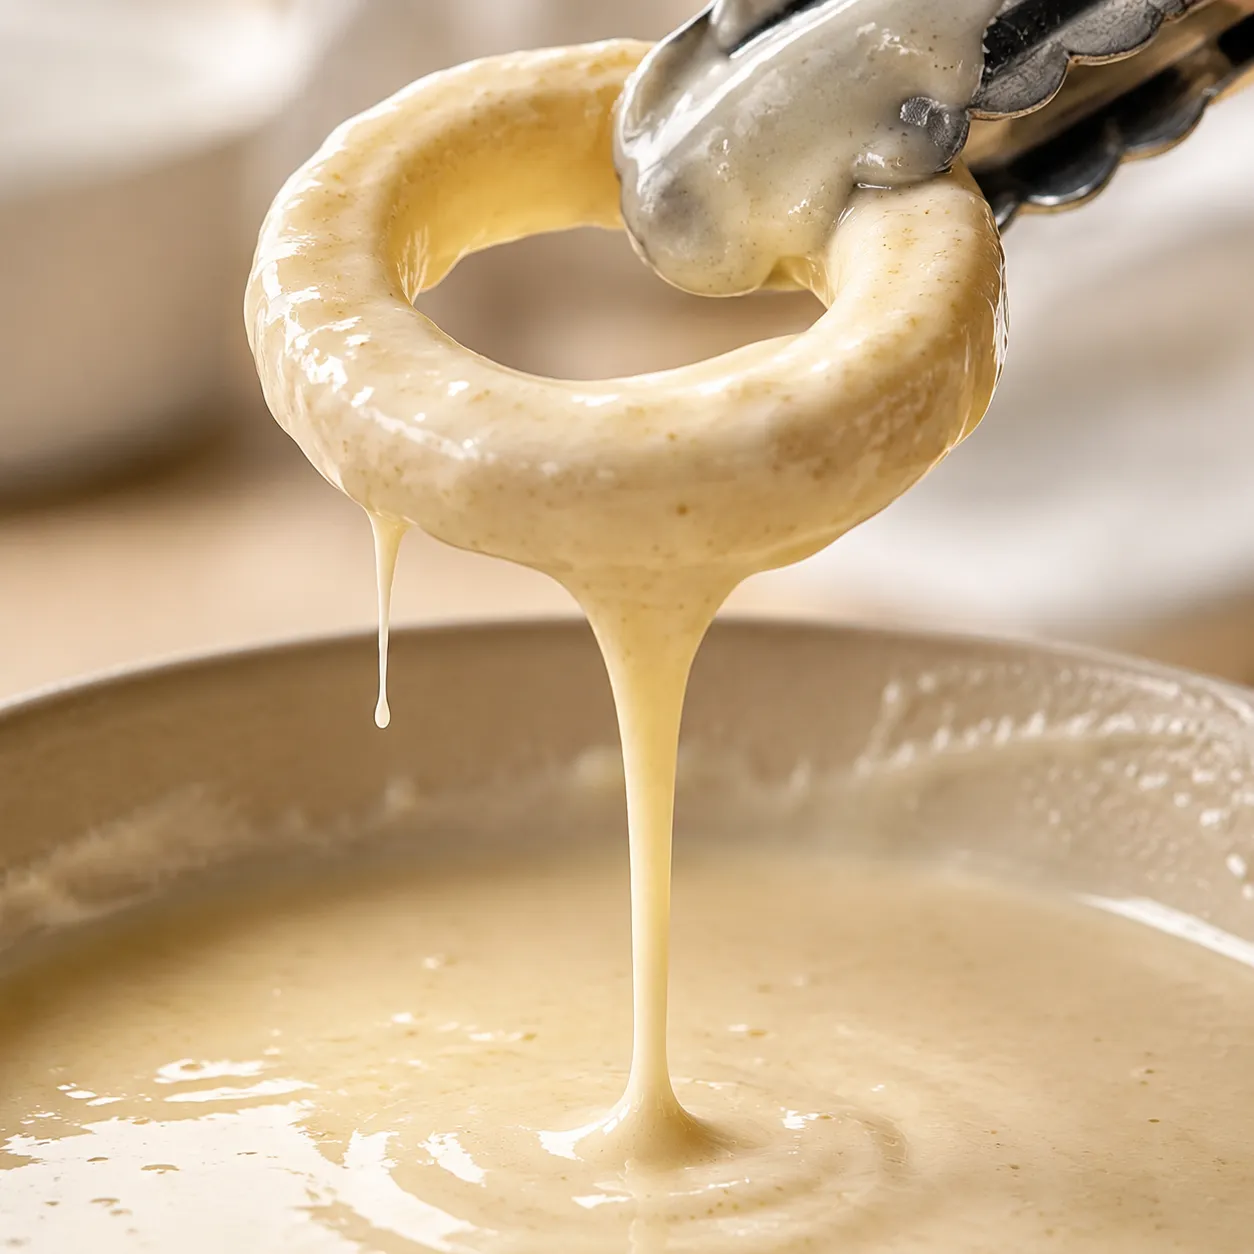
The dry dredge is more than a first layer. It absorbs surface moisture from the onion and creates a rough texture for the wet batter to grab. After the rings are dipped in batter, a final quick toss in the dry mixture creates craggy edges that fry into the crunchy ridges everyone reaches for first. This is the diner-style detail that makes the coating feel substantial without turning greasy.
Work with a few pieces at a time so the batter stays clean and the rings do not clump together. Use one hand for dry coating and one hand or a fork for wet dipping if you want to keep the process tidy. The batter will thicken a little as it sits; if it becomes too heavy, whisk in a splash of cold beer or club soda. If it thins out, add a spoonful of flour and cornstarch to bring it back.
To deep fry at home, choose a heavy Dutch oven, cast iron skillet, or deep sauté pan and add enough neutral oil to give the rings room to float. Heat the oil to 375°F and keep a thermometer clipped to the side if you have one. The temperature will drop when food goes in, so fry in small batches instead of crowding the pan. Crowding traps steam and slows the fry, which is the fastest route to a limp coating.
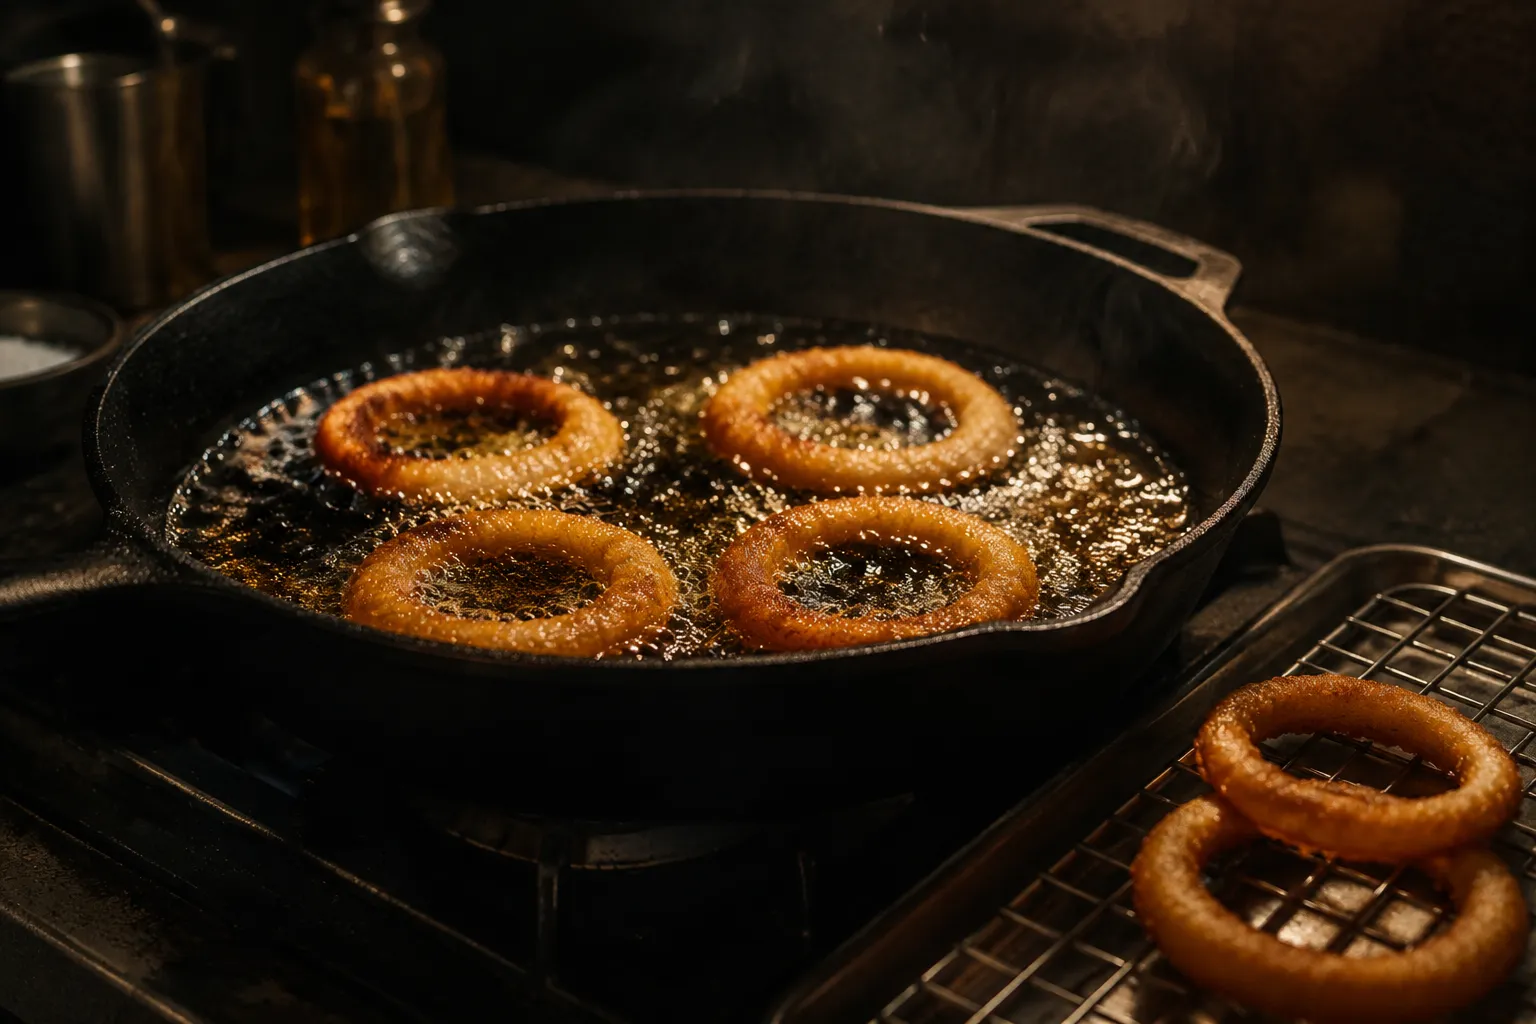
Lower each coated ring into the oil carefully, letting it fall away from you to avoid splashes. The oil should bubble steadily around the edges right away. Fry until the coating is deep golden, turning once so both sides color evenly. Most batches take just a couple of minutes, so stay close and use the color of the crust as your main guide.
As each batch finishes, transfer it to a wire rack set over a sheet pan. This keeps air circulating around the crust so steam does not soften the underside. Salt immediately while the surface is still hot and a little glossy. That final sprinkle is the difference between a good fried snack and one that tastes fully seasoned from the first bite.
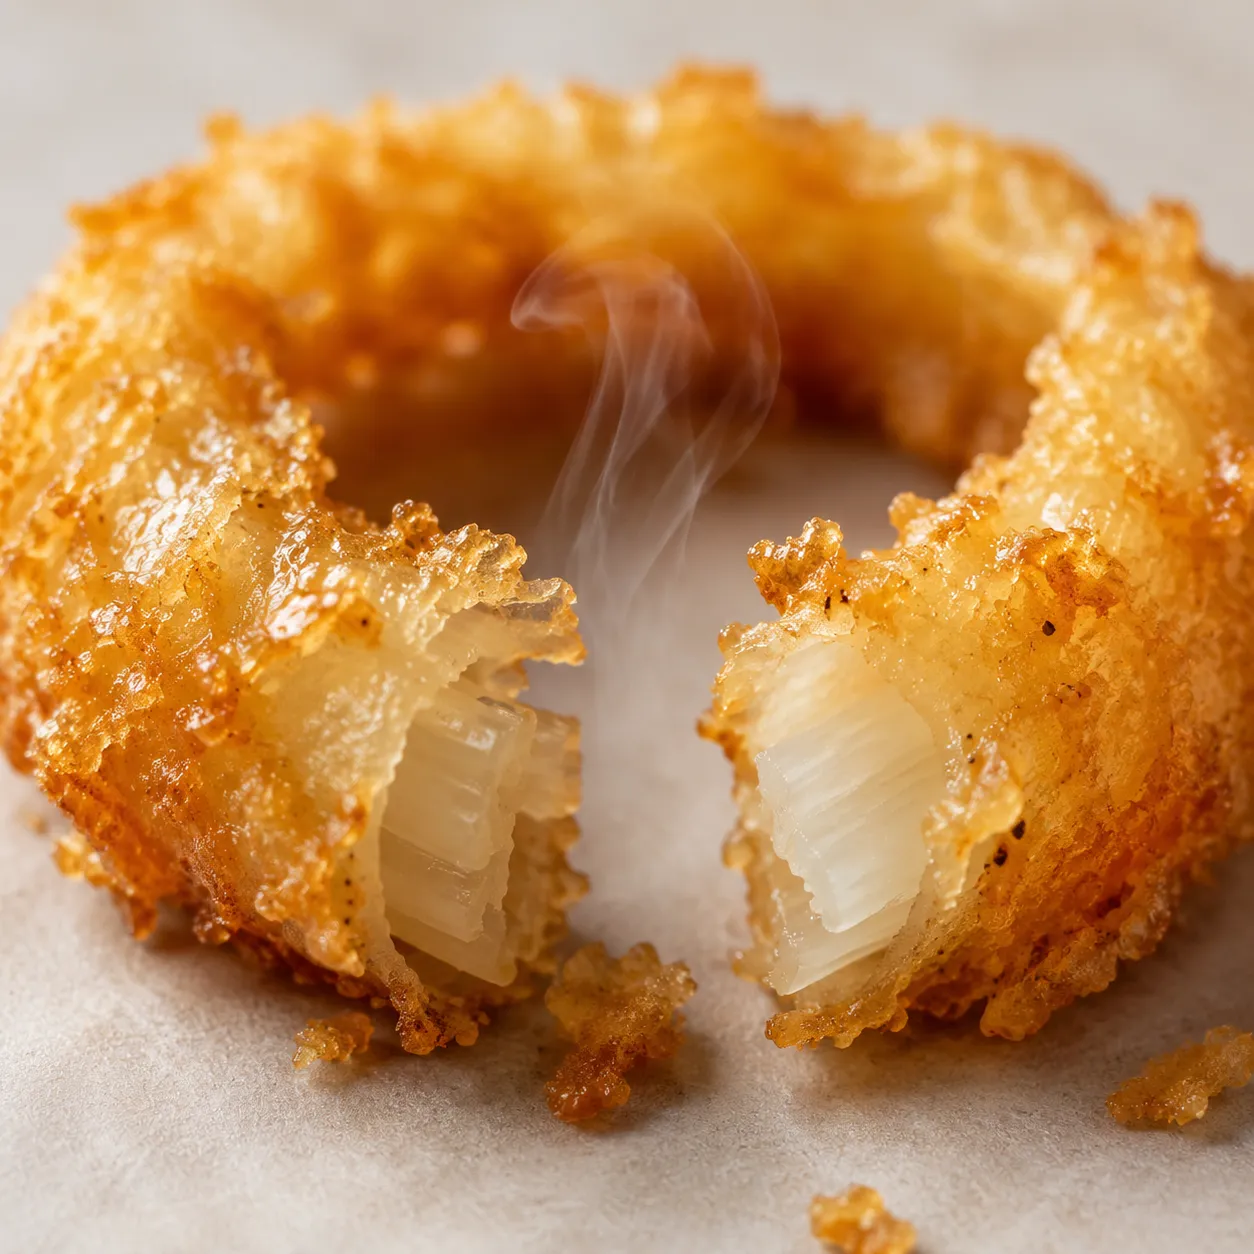
A well-fried ring should look deeply golden rather than pale blond. The edges will be slightly jagged, the surface will have tiny bubbles and ridges, and the coating should feel firm when you lift it with tongs. If the crust browns too quickly while the onion inside is still sharp, your oil may be too hot. If the coating turns dull and greasy before it colors, the oil is likely too cool.
The sound matters too. When you tap a finished ring lightly with tongs, you should hear a faint crackle. Break one open and you should see a tender, translucent onion wrapped in a thin, shattered shell. That balance of sweet onion and crisp coating is what makes beer battered onion rings so satisfying.
If you are making multiple batches for a crowd, keep finished rings on a rack in a 200°F oven while you fry the rest. Do not cover them with foil, which traps steam and softens the crust. A low oven preserves warmth without continuing to brown the coating too aggressively. Serve as soon as the final batch is done for the best texture.
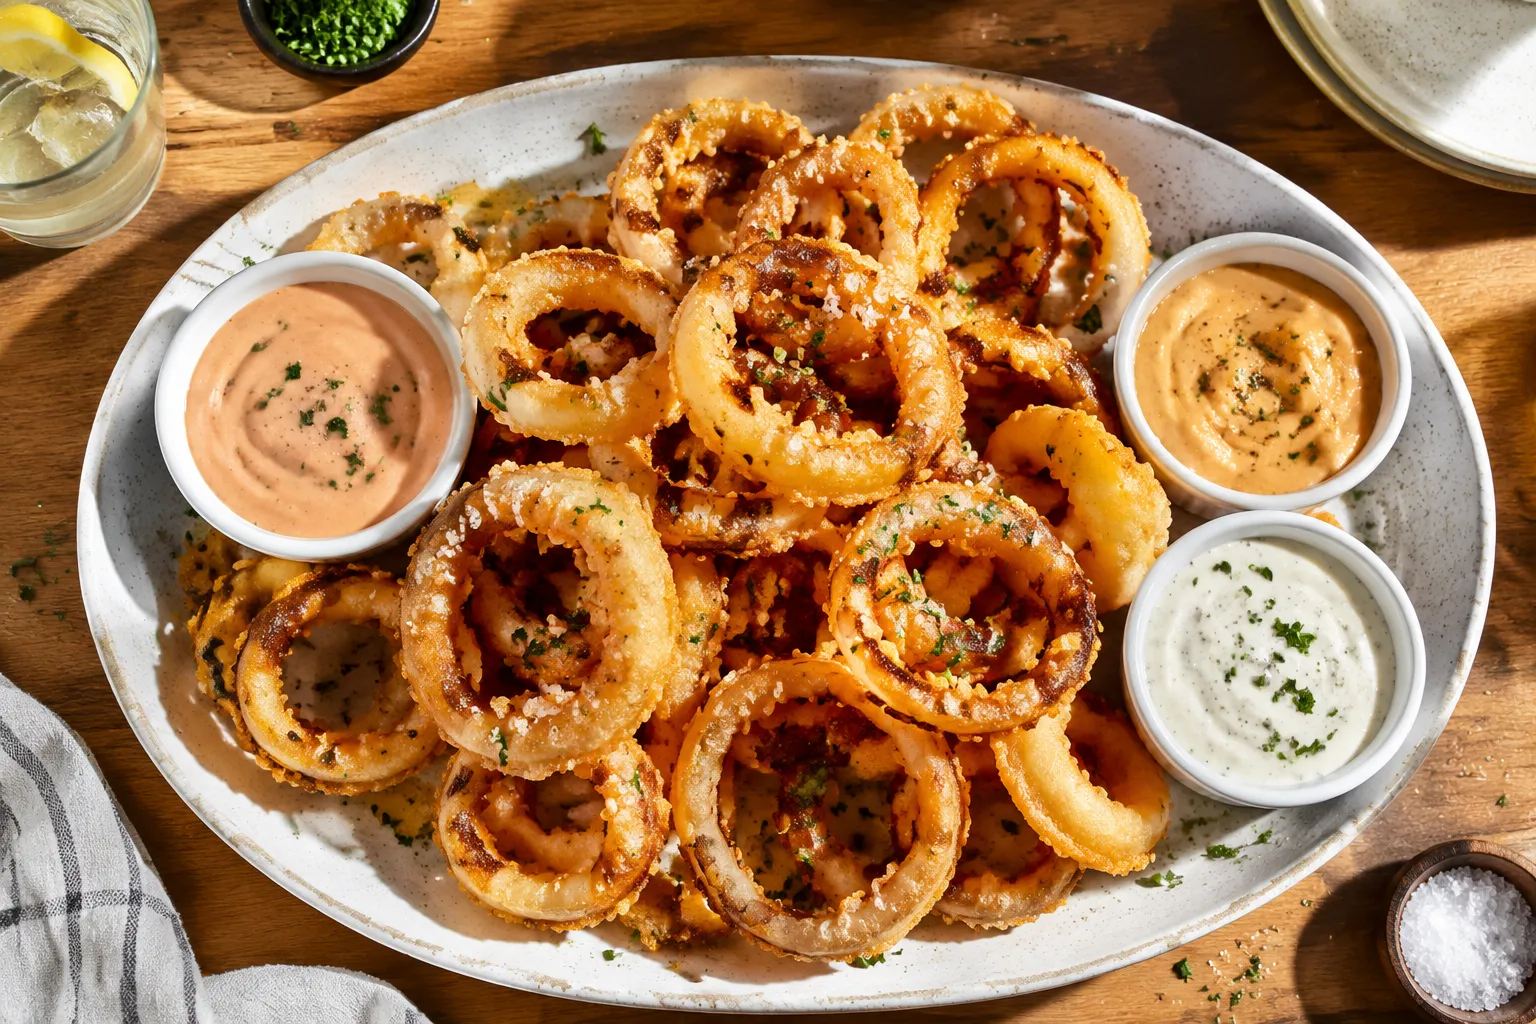
These are a natural match for burgers, patty melts, grilled chicken sandwiches, pulled pork, and steakhouse-style mains. I also love them as a party appetizer on a big platter with a few sauces so everyone can choose their own dip. For a simple spread, offer fry sauce, ranch, and a smoky chipotle mayo. Add pickles, lemon wedges, or a crisp slaw to cut through the richness.
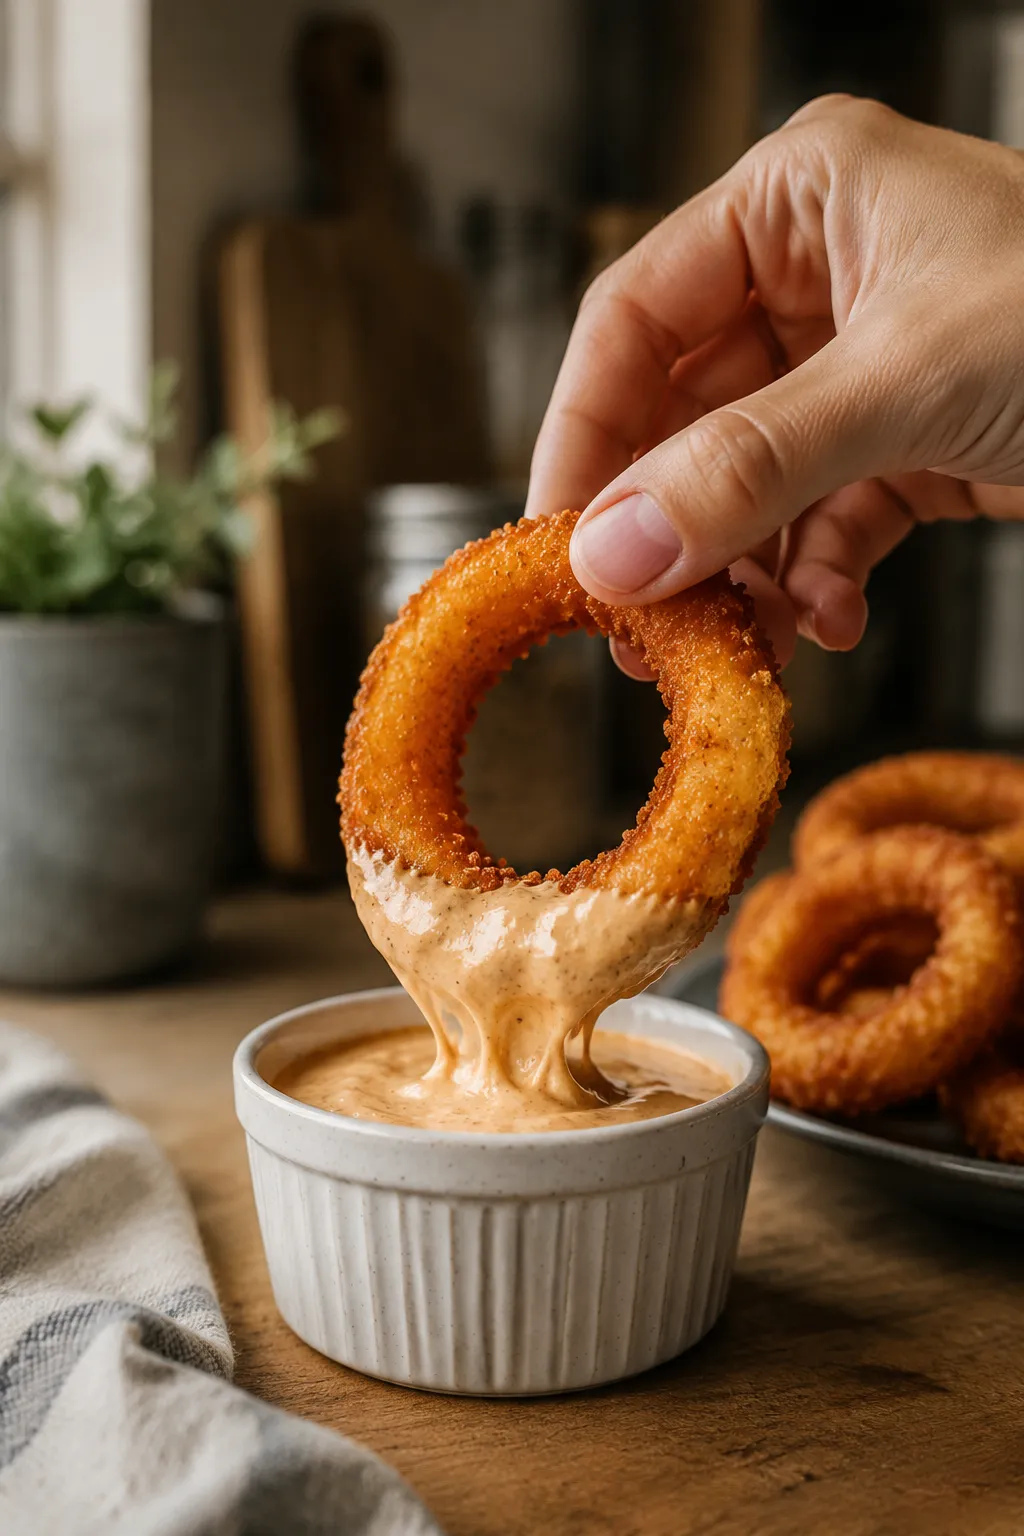
A quick dipping sauce for onion rings can be as easy as mayonnaise, ketchup, a splash of pickle juice, and a pinch of smoked paprika. For chipotle aioli, stir mayo with minced chipotles in adobo, lime juice, garlic, and salt. Ranch is always welcome, especially if you add extra black pepper and chopped dill. Honey mustard is another great option if you like a sweet-tangy contrast with the savory crust.
For a casual dinner, tuck the rings alongside cheeseburgers and a pile of cold crunchy vegetables. For game day, serve them with sliders, wings, and a pitcher of something cold. If you want to make the meal feel extra diner-inspired, stack the rings high on a board and let the sauce ramekins do the decorating. They are unfussy, nostalgic, and a little bit showy in the best possible way.
Once you understand the coating, you can use the same idea for other vegetables. Thick-cut zucchini, green tomatoes, mushrooms, and jalapeño slices all love the flour-cornstarch dredge plus bubbly batter treatment. The timing will vary depending on the vegetable, but the goal stays the same: hot oil, small batches, and a rack for draining. It is a great base technique when you want a crisp appetizer without making a complicated breading station.
This recipe also gives you a strong starting point if you are exploring homemade onion rings in different cooking styles. The classic fried version will always be the crunchiest, but the batter principles still help when adapting for a lighter approach. If you are curious about air fryer onion rings, use a thicker coating and a generous mist of oil to encourage browning. For baked versions, a hot sheet pan and a little patience help mimic that fresh-from-the-fryer texture.
However you serve them, the big takeaway is simple: cold batter, dry onions, hot oil, and a rack finish. Those four details do most of the work. Make them once, and you will understand why this is the kind of snack people hover around the kitchen for, stealing just one more while the next batch bubbles away.
This base recipe is built for classic frying, but you can adapt it depending on your kitchen setup or dietary needs. The texture will vary slightly, but the same ideas still apply: dry onions, a flavorful coating, and enough heat to crisp the outside before the onion overcooks.
These are best served fresh, but leftovers can still be revived. Let them cool completely, then store in an airtight container in the refrigerator for up to 3 days. If you are holding a fresh batch for a party, keep them on a wire rack in a 200°F oven for up to 2 hours rather than covering them.
To reheat, use a 400°F oven or air fryer for 4 to 5 minutes, or until hot and crisp again. Avoid the microwave, which steams the coating and turns it soft almost immediately.