7 Layer Dip: The Ultimate Crowd-Pleasing Party Recipe
Ingredients
Scale
Bold, creamy, and built for a crowd, this 7 layer dip stacks every Tex-Mex craving into one scoopable, scroll-stopping appetizer.
7 layer dip is the kind of party appetizer that disappears before the second quarter, the first toast, or the last guest has even arrived. It is cool and creamy, bright and crunchy, and built in colorful strata that make a clear glass dish look like a Tex-Mex centerpiece. Best of all, this 7 layer dip recipe takes about 15 minutes, no oven required, and it feeds a happy crowd with one big bag of sturdy tortilla chips.
Think of it as a fully loaded taco dip with the volume turned up: seasoned refried beans on the bottom, plush guacamole, tangy sour cream, juicy salsa, shredded cheese, briny olives, fresh green onions, cilantro, and jalapeños. Every scoop gets a little creamy, a little salty, a little fresh, and just enough spice. If you already love Mexican appetizers, this one deserves a permanent spot in your hosting rotation.
The magic of a Mexican layered dip is contrast. The refried beans bring weight and savory depth, the guacamole adds buttery richness, the sour cream layer cools everything down, and the salsa gives the whole dish a juicy, tomato-bright lift. Then comes shredded cheese for that classic Tex-Mex pull, olives for a little salt, and a fresh finish of herbs and scallions that keeps each bite from feeling heavy.
This is also one of those game day dips that feels festive without asking much of the cook. You are not sautéing, baking, frying, or watching a pot; you are simply seasoning, spreading, and stacking. A chilled rest helps the layers settle into place, but the flavor is ready almost immediately, which makes this seven layer dip especially handy for last-minute get-togethers.
The key is not just what goes into the dish, but how each layer is treated. A thick bean base anchors the dip, well-drained salsa prevents sogginess, and the toppings are scattered in a way that makes every scoop taste balanced. It is simple food, but with a few smart choices, it looks and tastes like the party was planned days in advance.
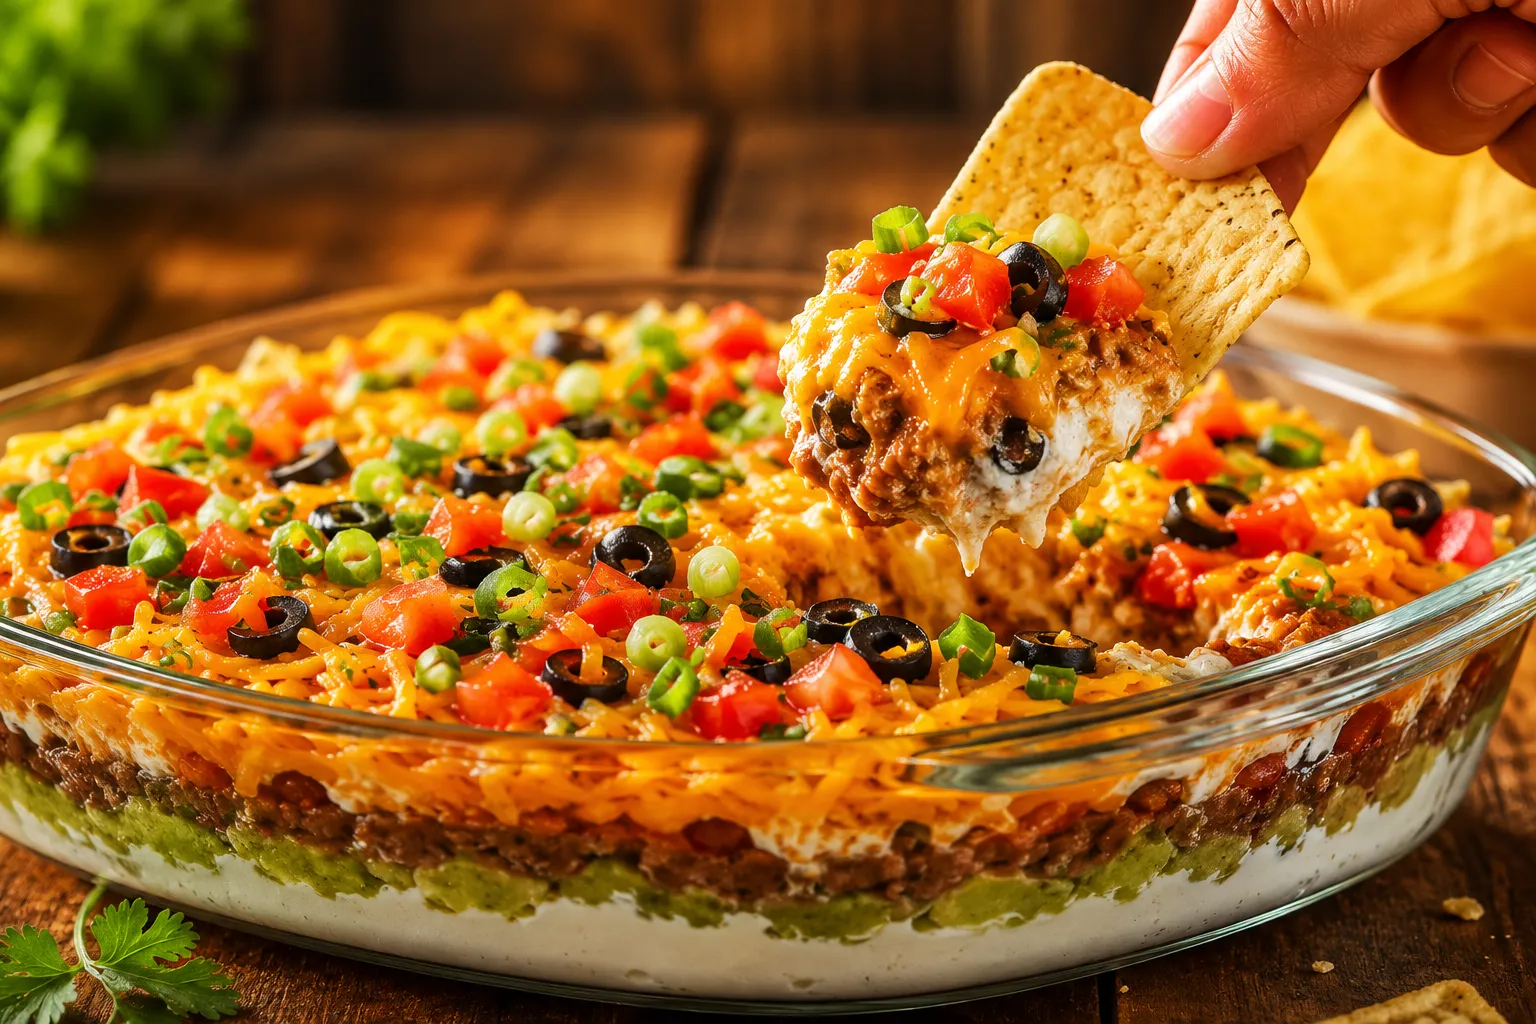
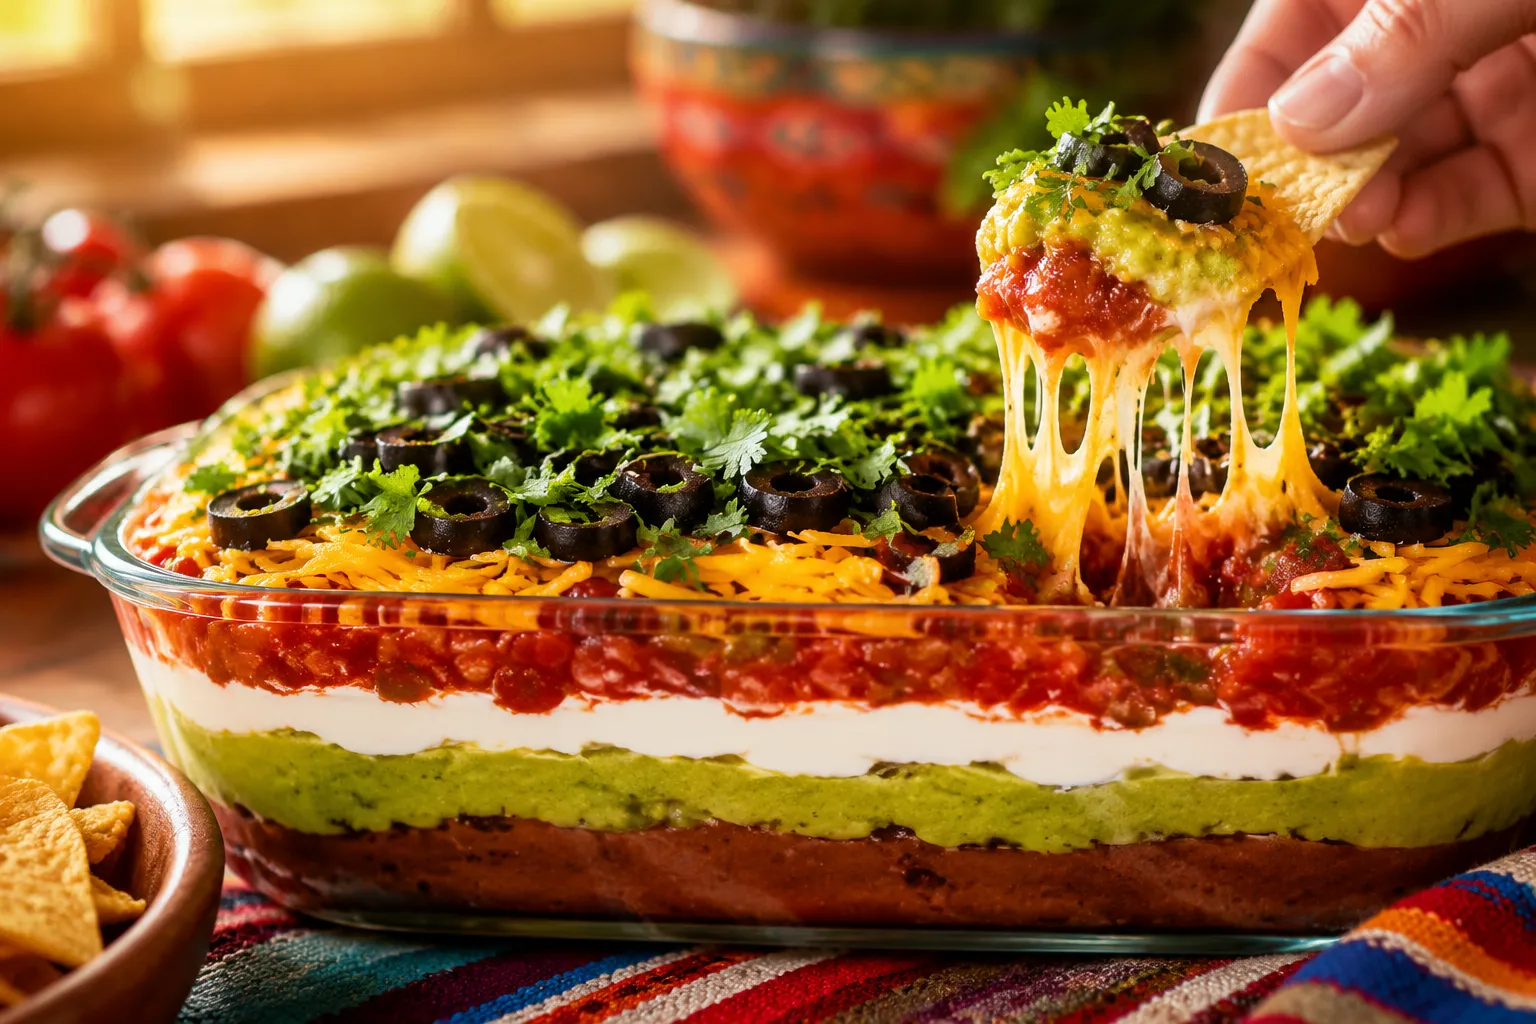
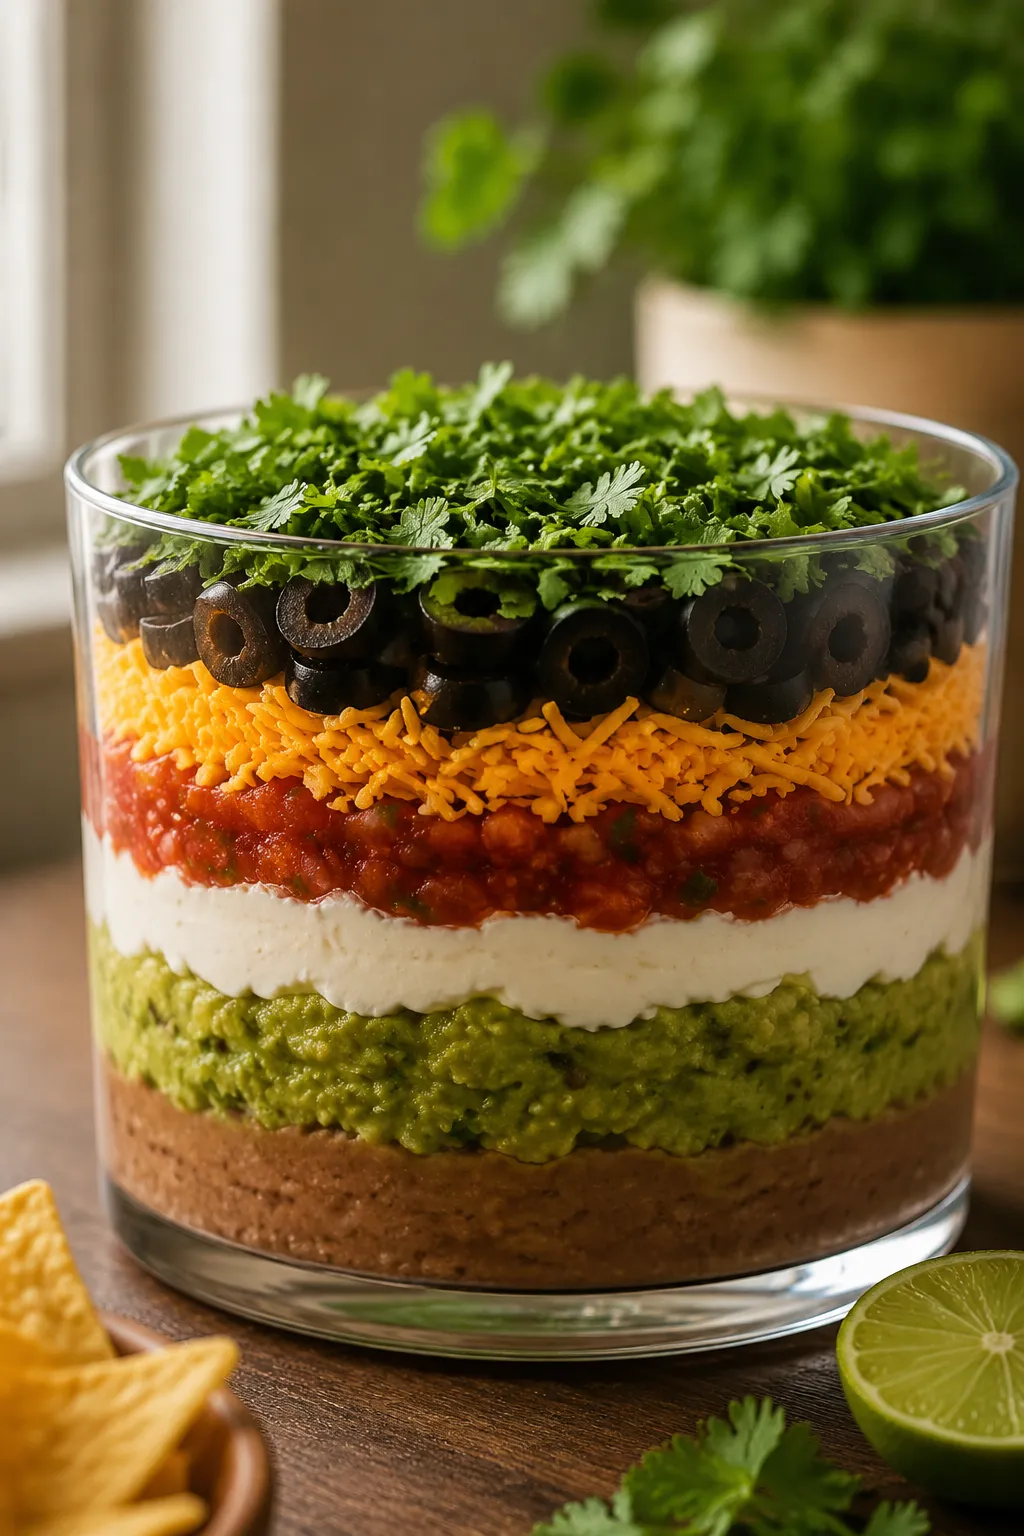
Layer 1: Seasoned refried beans. The beans are the foundation, so they should be smooth, savory, and easy to scoop. Stirring in easy taco seasoning gives them cumin, chili, garlic, and onion flavor without needing to cook anything. If your beans are extra thick, a spoonful of salsa or lime juice loosens them just enough to spread evenly.
Layer 2: Guacamole. A generous layer of guacamole adds freshness and richness right above the beans. You can use store-bought in a pinch, but homemade guacamole gives this dip the brightest flavor, especially if it is seasoned with lime, salt, cilantro, and a little jalapeño. Spread it gently so the green layer stays distinct and does not drag the beans up into the surface.
Layer 3: Seasoned sour cream. Sour cream brings the cooling, creamy layer that makes this dip so scoopable. You can stir a little taco seasoning into it for a bolder flavor, or keep it mostly plain if your salsa and beans are already well seasoned. Greek yogurt can work here too, though sour cream gives the most classic texture.
Layer 4: Salsa or pico de gallo. This is where the dip gets its fresh tomato bite. Restaurant-style salsa is smooth and saucy, while pico de gallo gives you a chunkier, fresher layer. Either way, drain it well before spreading so the dip stays thick and party-ready instead of watery at the edges.
Layer 5: Shredded cheese. Shredded cheese acts like a cheerful, salty blanket over the soft layers beneath it. A Mexican cheese blend is easy and reliable, but sharp cheddar, Monterey Jack, pepper Jack, or a mix of all three is excellent. For the prettiest top, sprinkle the cheese all the way to the corners instead of leaving a bare border.
Layer 6: Olives and green onions. Sliced black olives are classic here, adding briny little pops that cut through the richness. Green onions bring crunch and a mild onion bite without overpowering the dip. Together, they make the surface look generous and colorful.
Layer 7: Cilantro and jalapeños. The final layer is all about freshness and sparkle. Cilantro adds an herbal lift, while jalapeños bring heat and a little tang if you use pickled slices. Add lime wedges on the side for guests who like a brighter, punchier scoop.
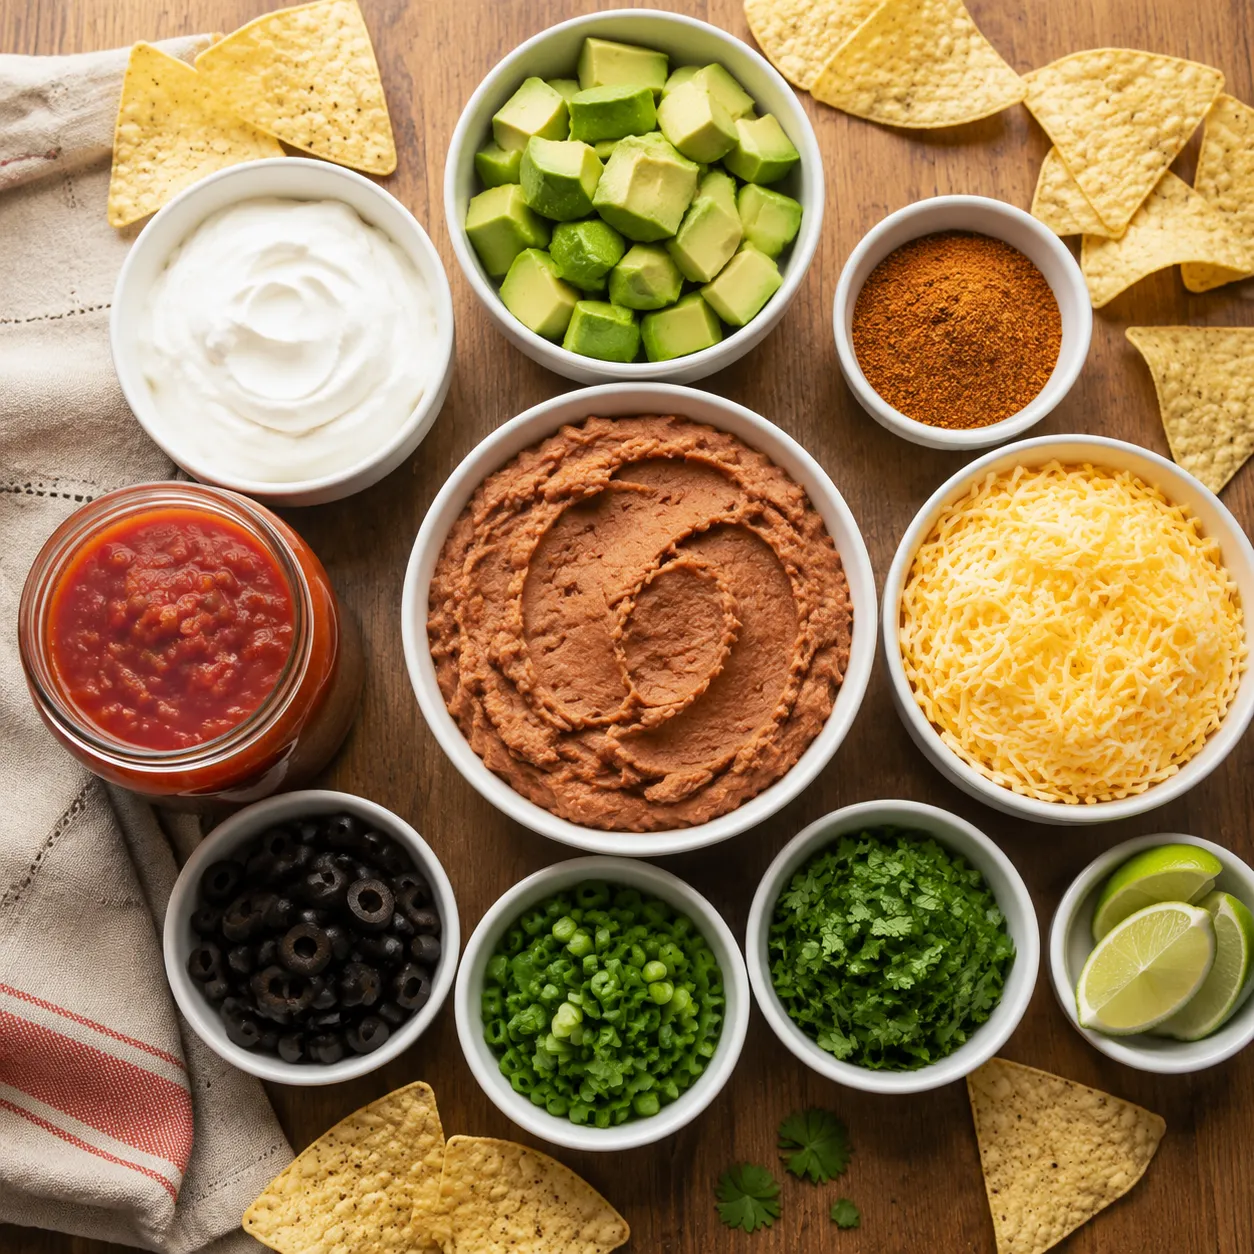
The ingredient list is short, familiar, and very forgiving. Start with a 16-ounce can of refried beans, one packet of taco seasoning, about 2 cups of guacamole, 1 cup sour cream, 1 cup salsa or pico de gallo, 2 cups shredded cheese, sliced black olives, chopped green onions, and fresh cilantro. If you have a favorite refried beans recipe, this is a perfect place to use it, because the bean layer sets the tone for the whole dish.
For pantry staples, keep the beans, taco seasoning, olives, and tortilla chips ready to go. If you are using canned beans, traditional, vegetarian, or fat-free versions all work, though classic refried beans tend to spread the most smoothly. A packet of seasoning is convenient, but you can also mix chili powder, cumin, garlic powder, onion powder, paprika, oregano, and salt for a more customized flavor.
Fresh produce is what keeps the dip from tasting flat. Avocados, lime, cilantro, green onions, tomatoes, and jalapeños all add brightness and texture. Even if you choose store-bought guacamole and salsa, a handful of fresh cilantro and sliced scallions on top makes the dish feel lively and homemade.
Smart substitutions are easy. Use plain Greek yogurt in place of sour cream for extra tang and protein, or use dairy-free sour cream and vegan cheese for a plant-based version. Swap black olives for pickled red onions, diced bell pepper, or roasted corn if olives are not your thing. The structure stays the same, but the personality can shift depending on what your crowd loves.
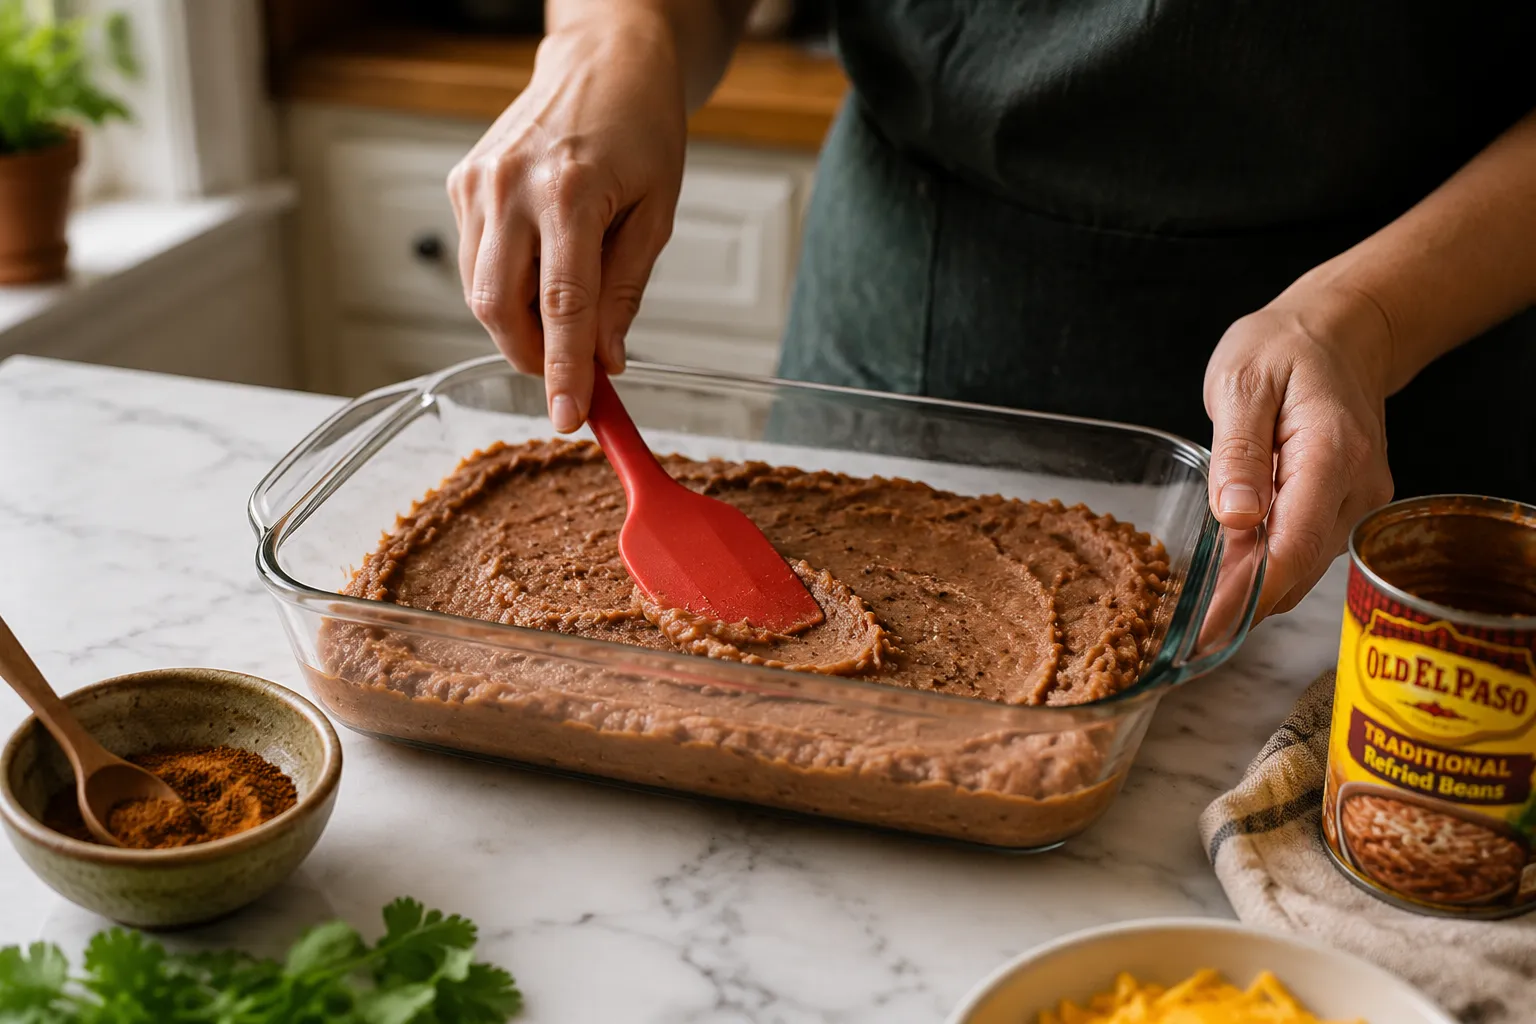
Start with the bean base because it is the heaviest layer and the best anchor. Stir the refried beans with taco seasoning until the mixture is evenly flavored, then spread it into the bottom of a clear 9-by-13-inch glass dish or a similarly sized serving dish. A small offset spatula or silicone spatula helps you push the beans into the corners and create a clean, even surface.
Next, add the guacamole in spoonfuls across the beans rather than dumping it all in one spot. This makes it easier to spread without pulling up the bean layer underneath. Work gently from the center outward, and do not worry if the layers are not perfectly smooth; a little texture makes each scoop more interesting.

The sour cream layer comes next, and it should be soft enough to glide over the guacamole. If it is very thick, stir it briefly in a bowl before spreading. This is also the moment to add extra seasoning if you want more taco dip flavor, but keep the layer creamy enough to balance the salsa and jalapeños.
Before adding salsa, take one extra minute to drain off excess liquid. You can spoon it into a fine-mesh strainer, blot pico de gallo lightly with a paper towel, or simply use a slotted spoon to transfer it. That one small step helps the finished dip hold its shape and keeps the bean and guacamole layers from turning loose and soupy.
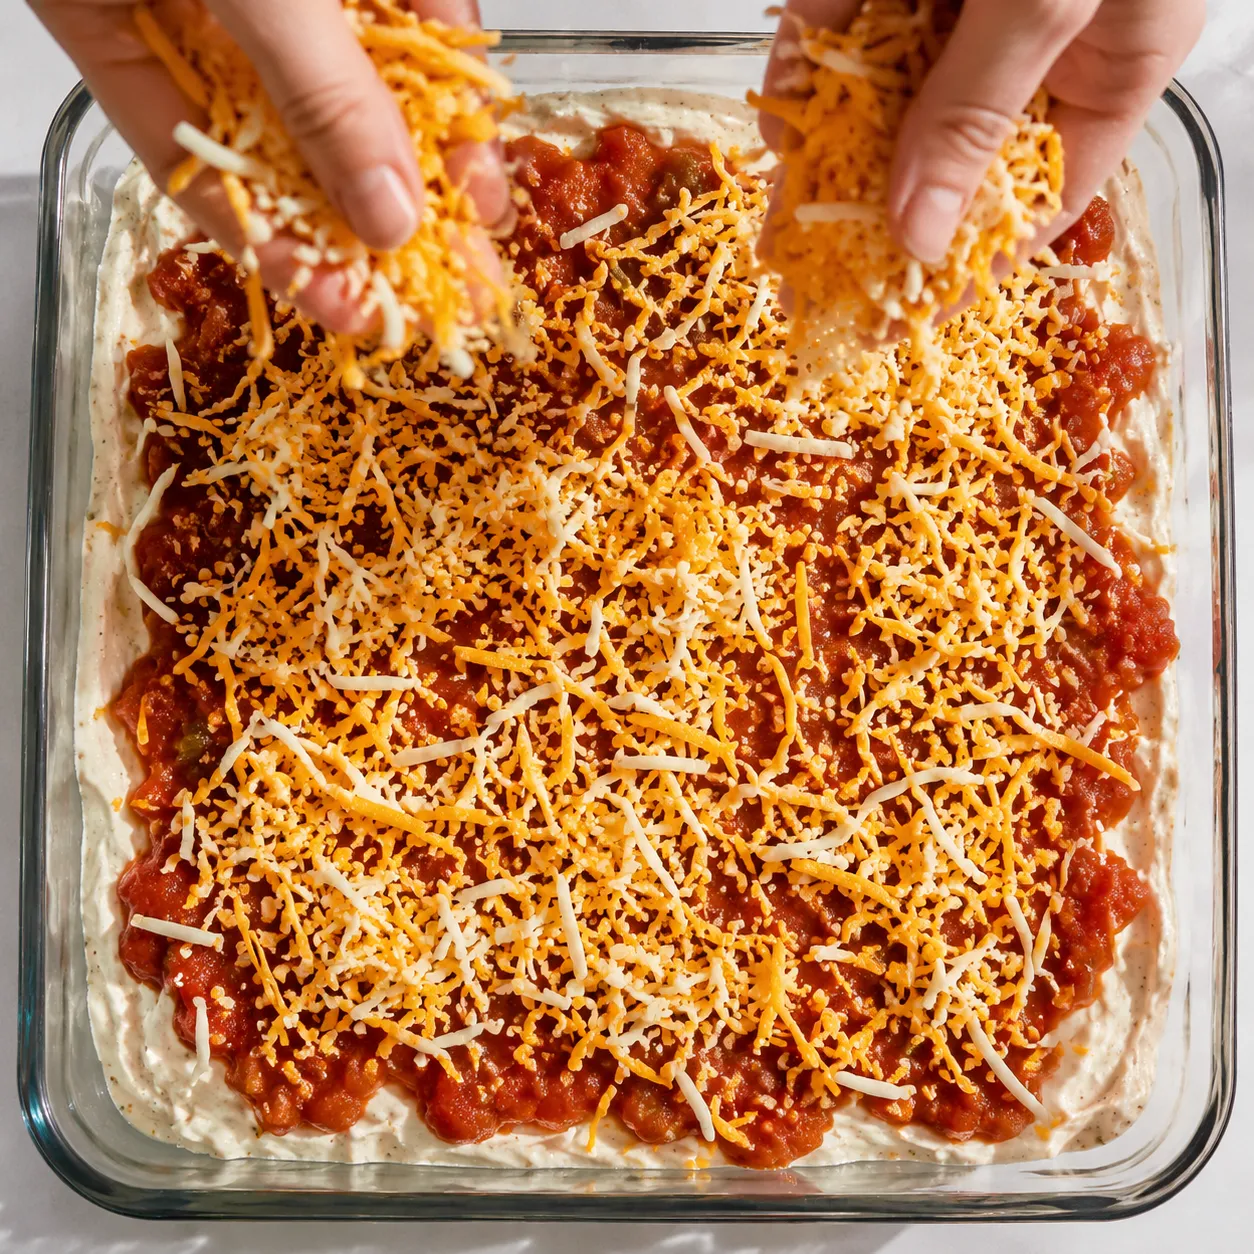
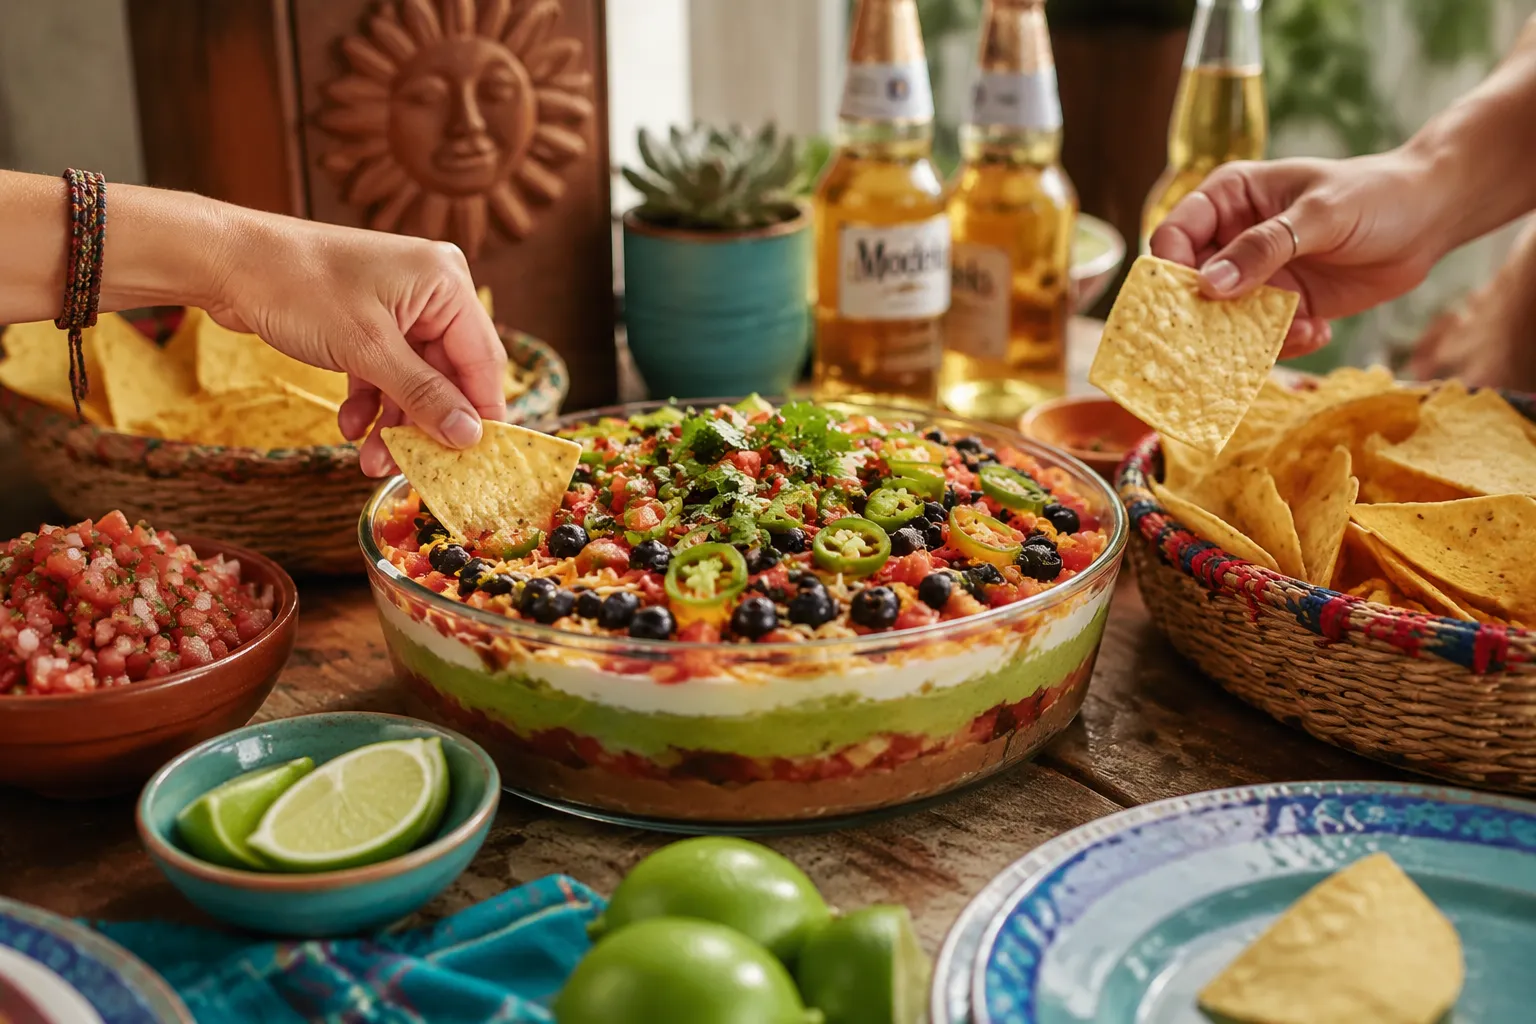
Once the salsa is spread, shower on the shredded cheese. The cheese should cover the top generously but not so thickly that guests cannot reach the layers underneath. Finish with olives, green onions, cilantro, and jalapeños, scattering them evenly so every corner gets a little of everything.
For the cleanest scoops, chill the assembled 7 layer dip for at least 30 minutes before serving. This brief rest firms the sour cream and guacamole slightly and lets the seasoned beans settle. If you are serving right away, it will still taste wonderful, but the layers will look sharpest after a short time in the refrigerator.
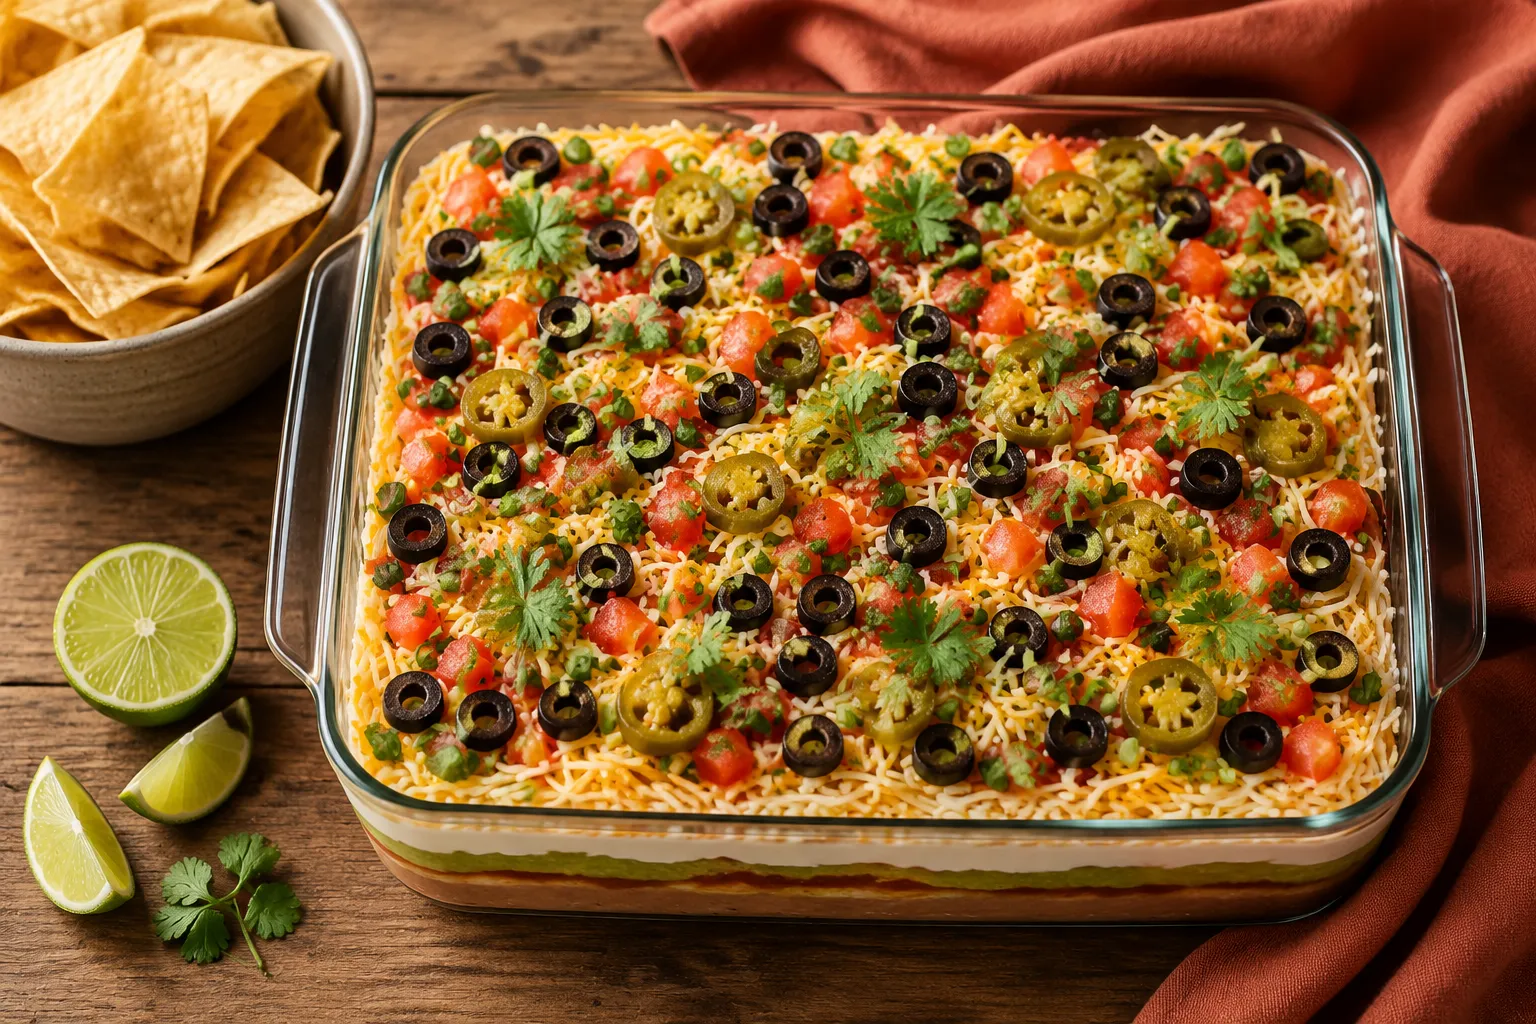
A clear glass baking dish is the classic choice because it shows off the dramatic side profile. When the red beans, green guacamole, white sour cream, ruby salsa, and golden cheese stack up against the glass, the whole thing becomes part appetizer, part table decoration. It is the easiest way to make a no-cook recipe look polished.
A shallow dish is better than a deep bowl because guests can scoop straight down and catch multiple layers at once. In a deep bowl, the top disappears first and the lower layers can get left behind. A 9-by-13-inch dish gives the dip enough surface area for toppings and makes it easy for a group to gather around without crowding.
If you are making this for a smaller group, use two smaller dishes instead of one big one. Serve one now and keep the second chilled for later in the party. It also keeps the dip looking fresh longer, which is helpful for open houses, tailgates, and casual buffet-style dinners.
Sturdy chips matter more than you might think. Thin tortilla chips can snap under the weight of beans, guacamole, sour cream, and salsa, especially once guests dig into the center. Restaurant-style tortilla chips, scoop-shaped chips, or thick corn chips are the best match for this hearty party appetizer.
For a bigger spread, surround the dish with lime wedges, extra salsa, hot sauce, and a bowl of sliced jalapeños. It pairs beautifully with tacos, grilled chicken, quesadillas, nachos, and other casual Mexican appetizers. You can also set it out with crunchy vegetables like bell pepper strips, cucumber rounds, and mini sweet peppers for a fresher dipping option.

This dip is especially good for game days because it can sit at the center of the table while everyone serves themselves. Add cold drinks, a stack of napkins, and a few extra bowls of chips so nobody has to wander away from the action. The colors are bold, the flavors are familiar, and the whole dish feels celebratory with almost no fuss.
Because this recipe is so visual, the finishing touches make a real difference. Scatter cilantro leaves instead of finely mincing every bit, angle a few jalapeño slices across the cheese, and leave some of the shredded cheese visible beneath the toppings. Those little choices make the top look abundant and intentional.
Right before serving, wipe the rim of the dish and tuck chips around one side for that just-set-down-on-the-party-table look. If you are bringing it to a potluck, keep the garnish separate and add the cilantro and green onions when you arrive. The dip will taste fresher, and the greens will stay bright.
This is the beauty of a good seven layer dip: it asks for everyday ingredients but delivers big flavor, color, and scoopable comfort. Whether you are hosting a backyard cookout, a birthday, a holiday snack board, or a football Sunday, 7 layer dip brings people to the table fast. Set it down, hand someone the chips, and watch the layers disappear.
This classic version is endlessly flexible, so use the same layer-building method and change the flavors to match your menu.
Cover leftover dip tightly with plastic wrap or transfer it to an airtight container and refrigerate for 2 to 3 days. It tastes best on the first day, since avocado naturally darkens and the sour cream and salsa layers soften over time.
For make-ahead serving, assemble the bean, guacamole, sour cream, salsa, and cheese layers up to 24 hours in advance. Add olives, green onions, cilantro, and jalapeños shortly before serving so the top stays fresh and colorful.