Instant Pot Black Beans (No Soak, Perfect Every Time)
Ingredients
Scale
Tender, creamy Instant Pot black beans cooked from dry in about 30 minutes, no soaking, no fuss, and seasoned just enough to taste better than canned.
Instant pot black beans are the weeknight kitchen magic trick I come back to again and again: pour in dry beans, add water and aromatics, press a button, and come back to a pot of tender, glossy beans with a deeply savory cooking liquid. No overnight soaking, no babysitting the stove, and no sad, chalky beans hiding in the back of the pantry. They are budget-friendly, freezer-friendly, and endlessly useful for tacos, soups, bowls, dips, and quick lunches.
What makes this method special is that the beans cook with onion, garlic, bay leaf, and cumin from the very beginning, so they taste seasoned all the way through. You are not just dumping drained beans into a sauce at the end; you are building flavor into the broth while the pressure cooker does the heavy lifting. The result is a batch of creamy, no soak black beans that tastes miles better than canned and can be used in just about any meal that needs a little protein and comfort.
If you already make instant pot kidney beans or instant pot white beans, this black bean version will feel familiar, but the timing and texture are their own thing. Black beans hold their shape beautifully while still turning creamy inside, which makes them especially good for meal prep. Keep them brothy for bowls and soups, or simmer them down until thick and spoonable for burritos, tostadas, and homemade refried beans.
The ingredient list is short, but each piece has a job. Start with 1 pound of dry black beans, which is usually the standard bag you see at the grocery store. Before cooking, give them a quick sort on a rimmed baking sheet or in a wide bowl, looking for any tiny stones, shriveled beans, or stray bits of debris. Then rinse them well under cool running water until the water runs mostly clear.
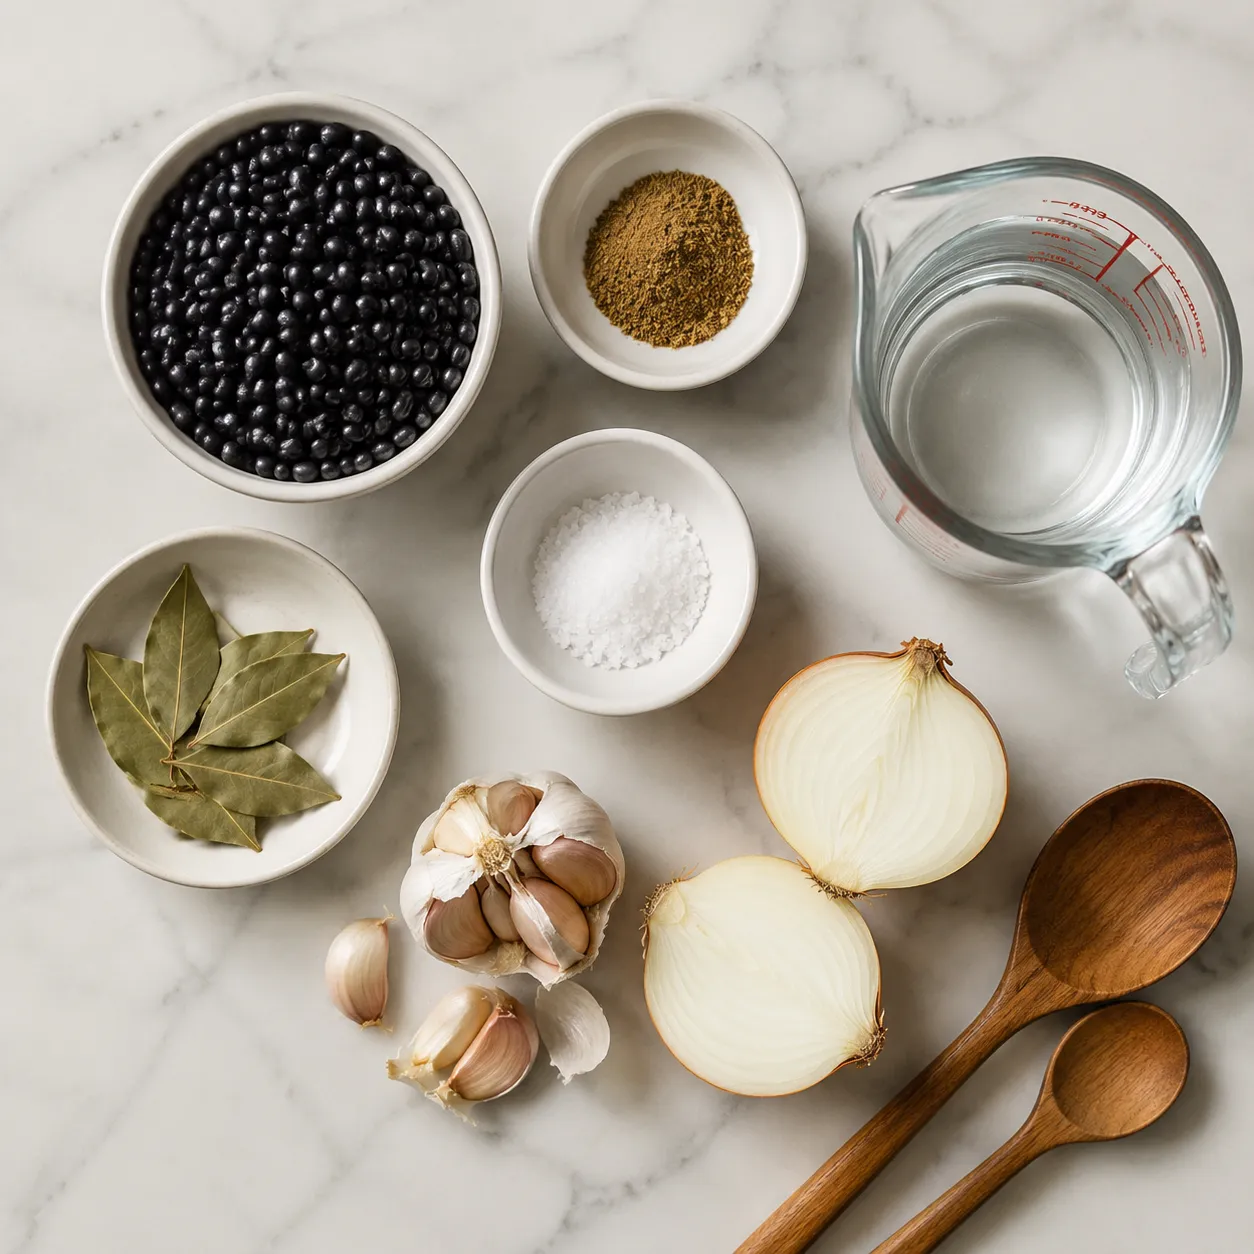
For liquid, use 6 cups of water or low-sodium broth. Water keeps the flavor clean and versatile, while broth makes the cooking liquid more savory and layered. The aromatics are simple: a halved yellow onion, smashed garlic cloves, and a bay leaf. A teaspoon of ground cumin adds warmth without pushing the beans in only one direction, so they still work for burrito bowls, chili, salads, and easy black bean soup.
The one ingredient to hold back is salt. Salted cooking liquid can sometimes make older beans take longer to soften, so this recipe adds fine sea salt after the beans are tender. That said, once the beans are cooked, salt generously enough to wake everything up. Beans can taste flat until they are properly seasoned, and then suddenly they become the cozy, spoonable staple you wanted all along.
Optional flavor boosters are welcome if you know how you plan to use the batch. Add a strip of orange zest for a subtle Cuban-inspired note, a dried chile for gentle heat, or a splash of olive oil for extra richness. If you want the beans to stay flexible for multiple meals, keep the base recipe simple and finish individual portions with lime, cilantro, salsa, hot sauce, or a spoonful of pickled onions.
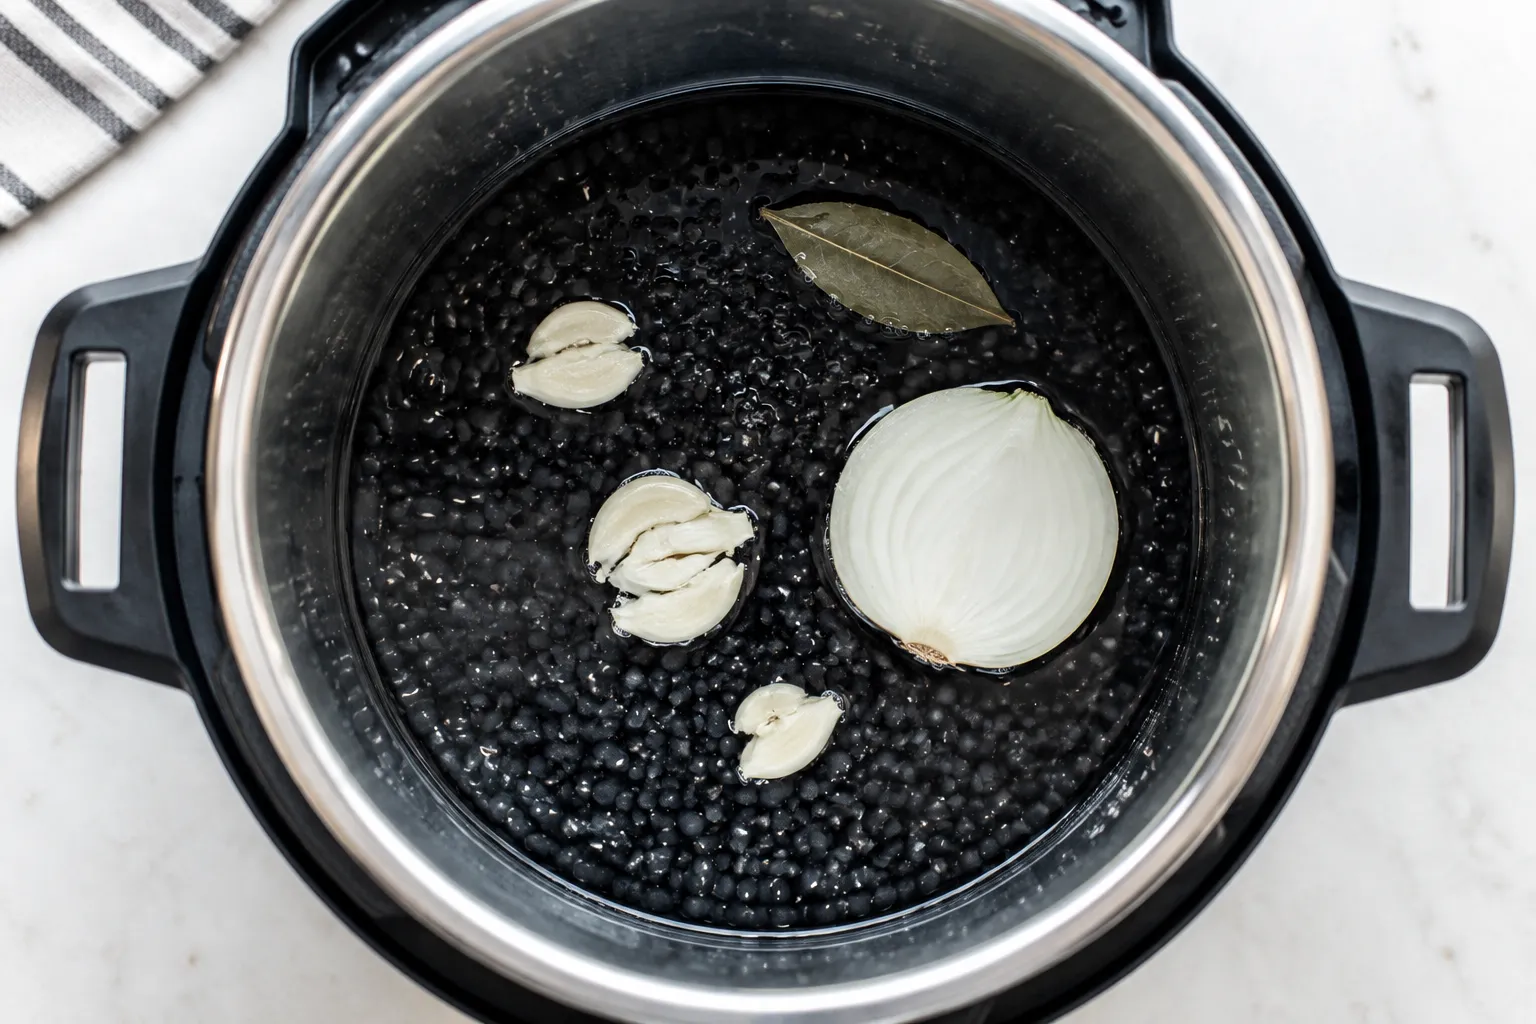
The process begins with a good rinse. Place the beans in a fine-mesh strainer and run them under cool water, rubbing them lightly with your hands. This removes dust from storage and gives you one more chance to spot anything that does not belong. It is a small step, but it makes the finished pot feel cleaner and more polished.

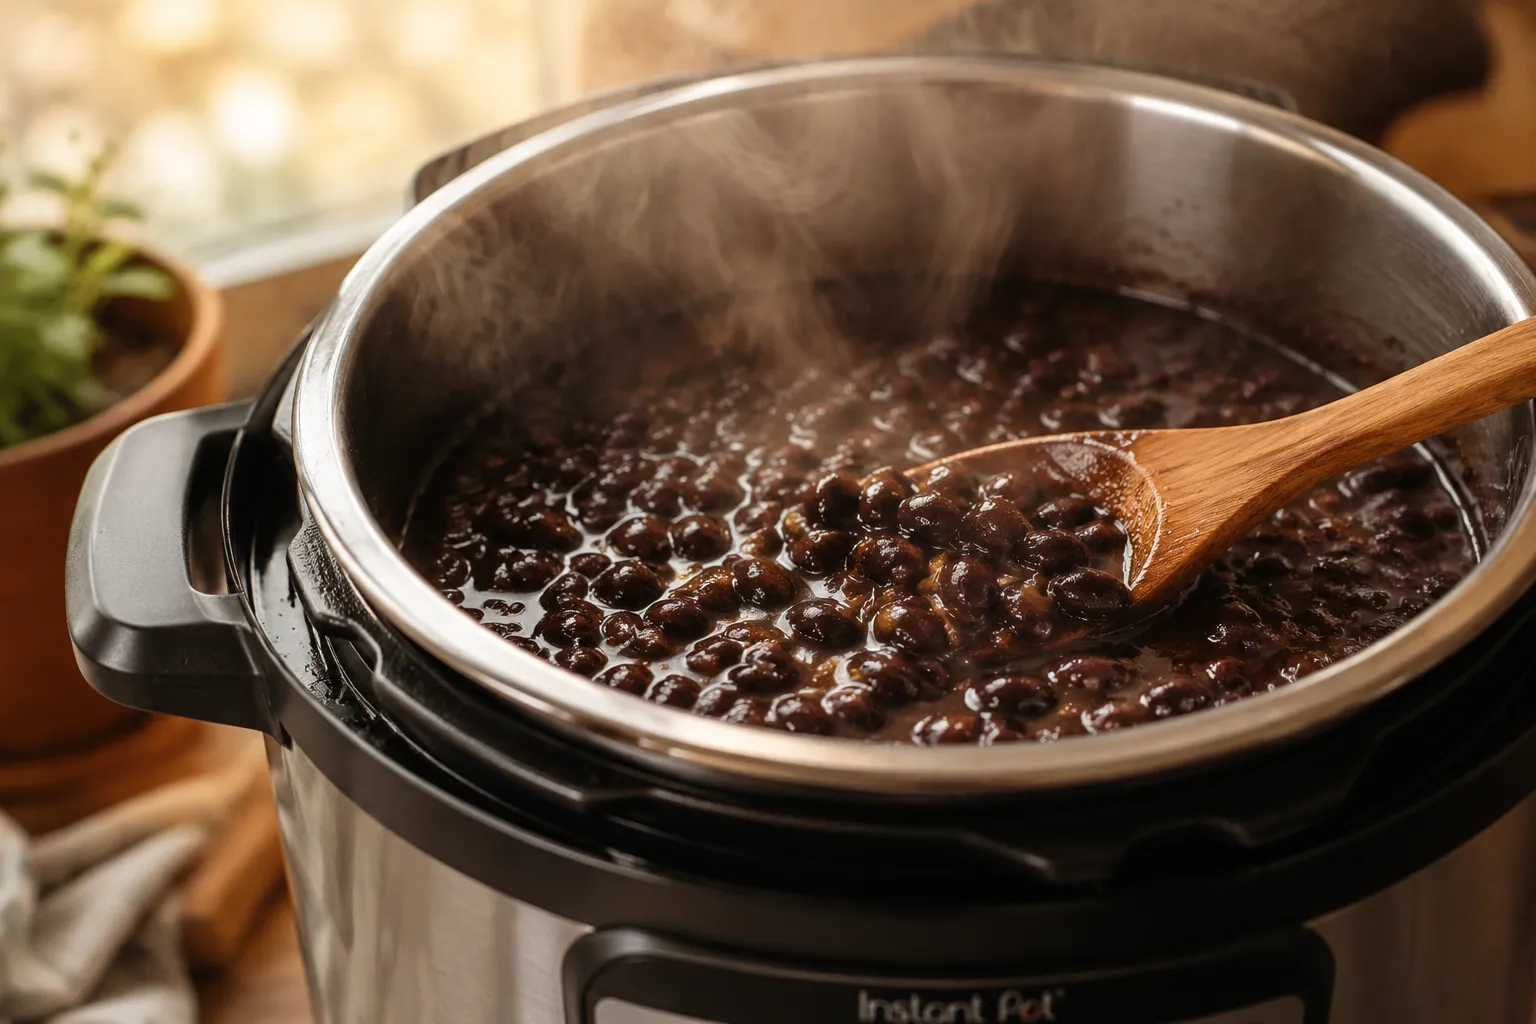
Next, add the rinsed beans to the Instant Pot insert with 6 cups of water or broth, the onion, garlic, bay leaf, and cumin. Make sure the beans and liquid sit comfortably below the max fill line; beans foam and expand as they cook, so they need room. If you are doubling the recipe, check your pressure cooker size first, and never fill it more than halfway for legumes. This is one of those practical details that keeps pressure cooking safe and predictable.
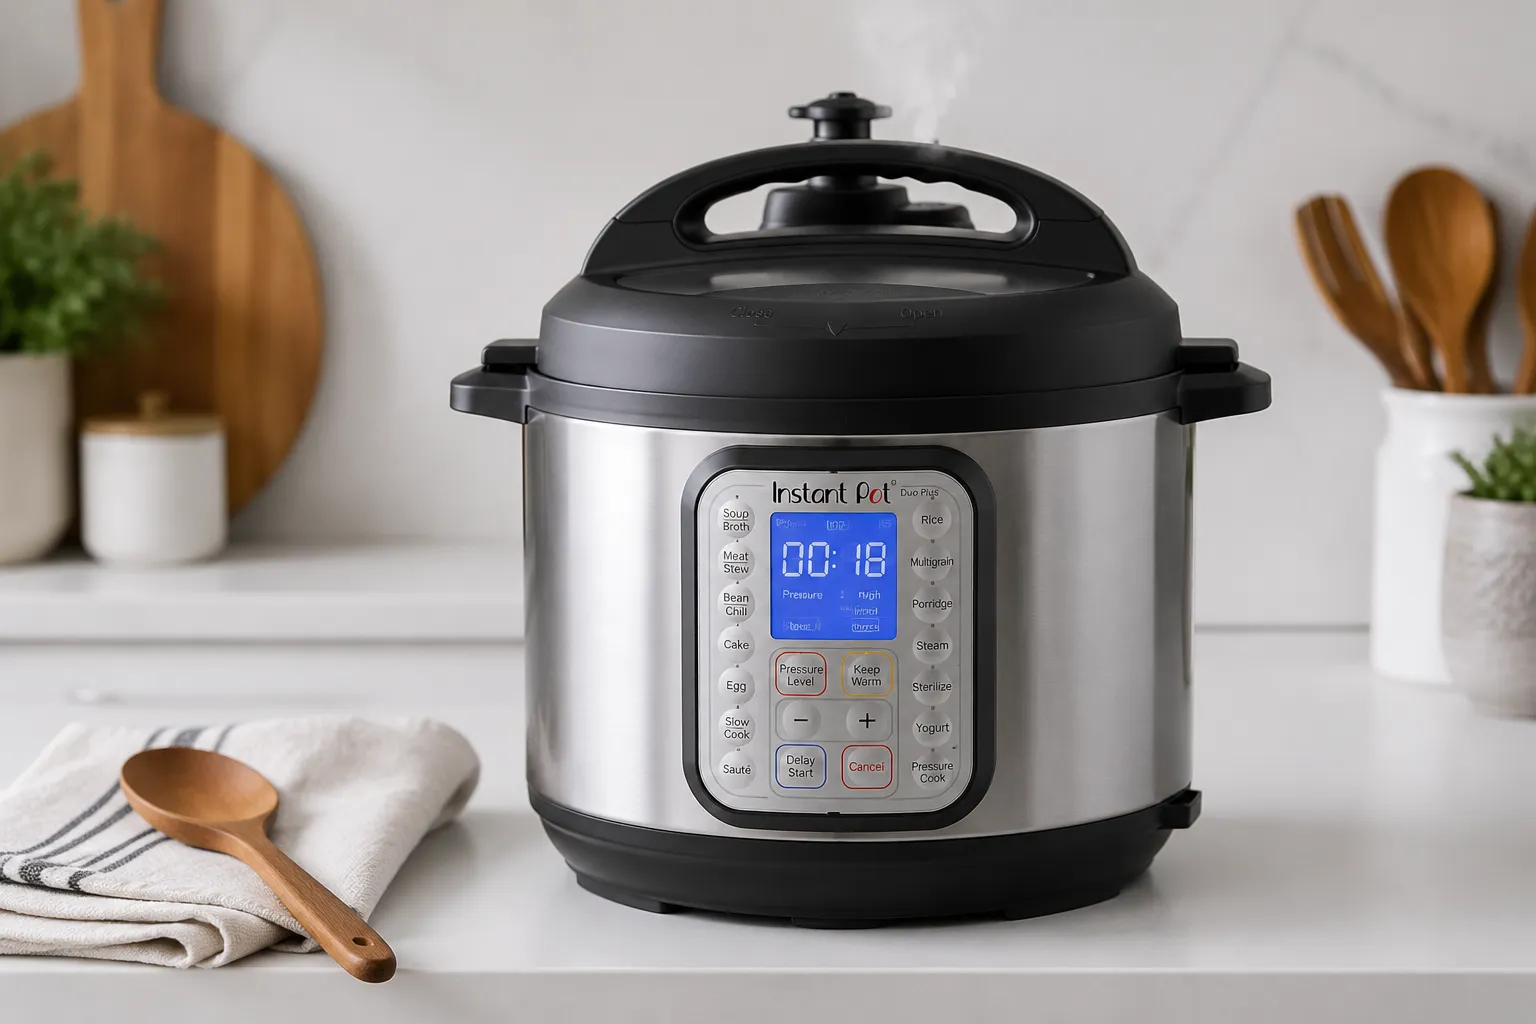
Seal the lid, set the valve to sealing, and cook on high pressure for 30 minutes. The pot will take time to come to pressure before the countdown begins, usually 10 to 15 minutes depending on the temperature of your liquid and your specific model. After the cook time ends, let the pot complete a full natural pressure release. This rest is part of the cooking process, allowing the beans to finish softening gently without bursting or turning ragged.
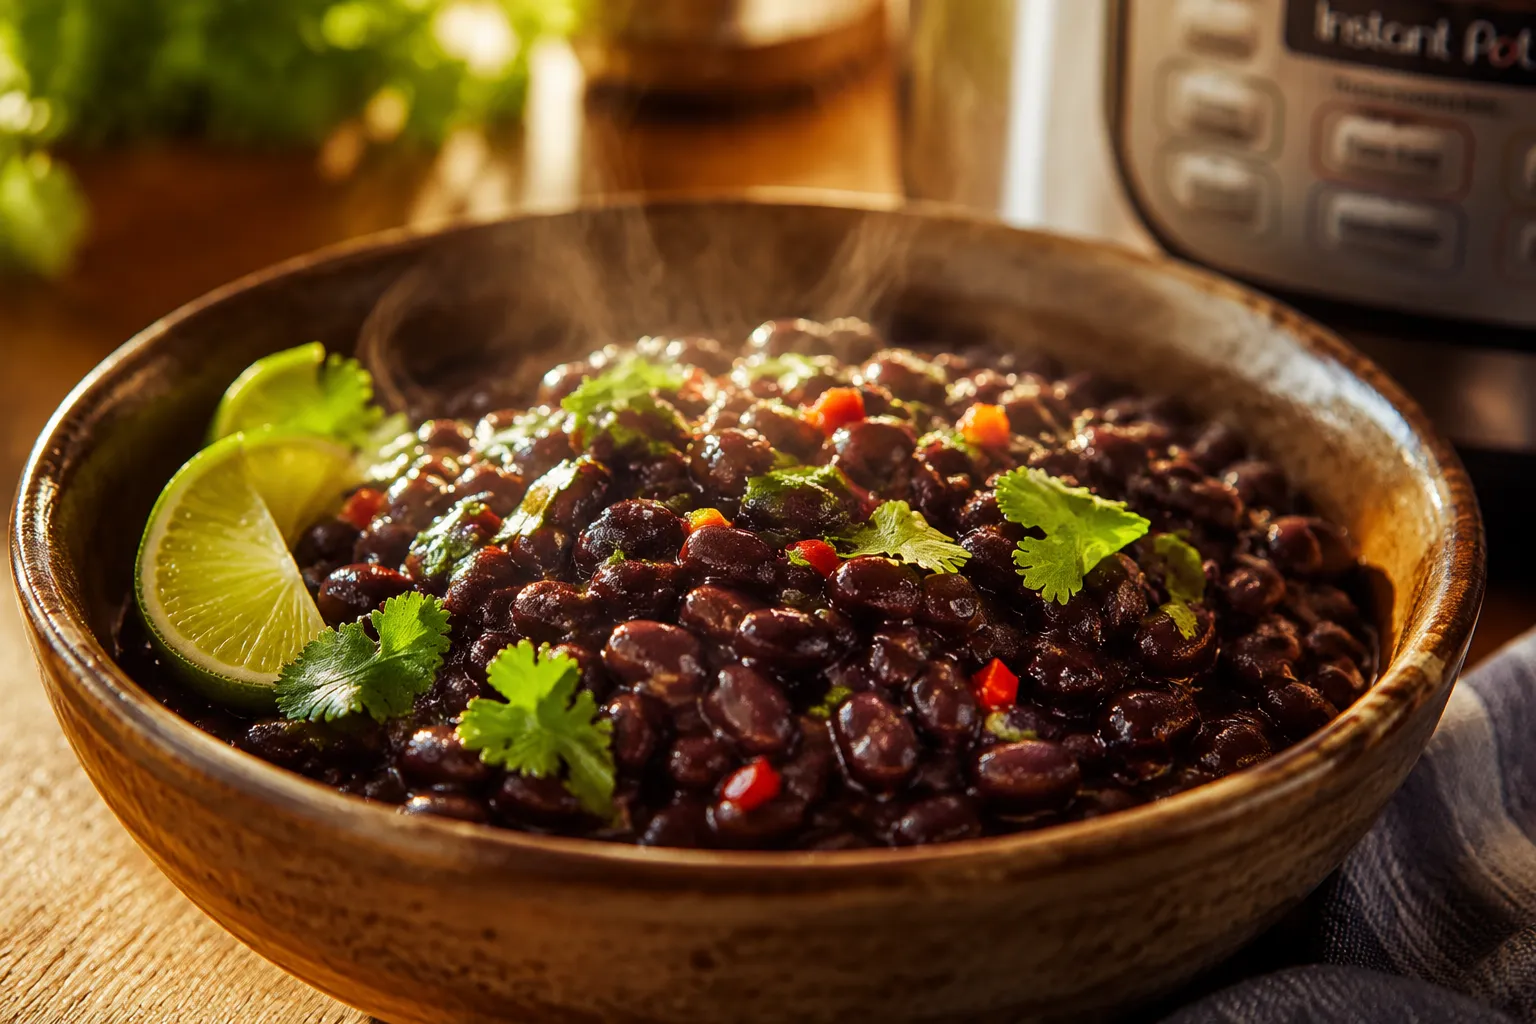
When the pin drops, open the lid and take a look. The beans should be tender, creamy inside, and surrounded by a dark, flavorful broth. Remove the onion, garlic, and bay leaf if you prefer a cleaner pot, or mash some of the softened garlic back into the cooking liquid for extra depth. Stir in the salt while the beans are still hot, then taste and adjust with more salt, lime juice, or a drizzle of olive oil.
This is the point where instant pot black beans become a meal-prep powerhouse. Ladle them into bowls with rice and avocado, tuck them into tortillas, or spoon them next to roasted sweet potatoes and a crunchy slaw. If you want them thicker, turn on the sauté function for a few minutes and simmer uncovered, stirring often. The broth will reduce into a glossy sauce that clings to every bean.
The beauty of this recipe is that unsoaked beans work beautifully. For dry black beans straight from the bag, cook for 30 minutes on high pressure, followed by a natural pressure release. This timing gives you tender beans that still hold their shape, which is exactly what you want for bowls, salads, tacos, and freezer portions. It is the method I use most because it does not require any planning.
If you quick-soak the beans first, reduce the pressure cook time to about 18 minutes. A quick soak means covering the beans with water, bringing them to a boil, turning off the heat, and letting them sit for about an hour before draining. This can be helpful if your beans are a little older or if you started dinner earlier in the afternoon and want to shorten the pressure-cooking window. Even with quick-soaked beans, use a full natural release for the best texture.
For overnight-soaked beans, cook for 8 to 10 minutes on high pressure. Soaked beans can go from perfectly tender to overly soft faster than unsoaked beans, so the shorter window matters. If you like very firm beans for salads, start at 8 minutes; if you want them creamier for burritos, try 10. Either way, the final seasoning still happens after cooking, when you can taste the beans and their broth together.
Bean age is the wild card in any black beans instant pot method. Very old beans may need an extra 5 to 10 minutes even if you follow every direction perfectly. If your beans are still firm after the natural release, simply reseal the pot and cook them a little longer with enough liquid still covering them. It is not a failure; it is just beans being beans.
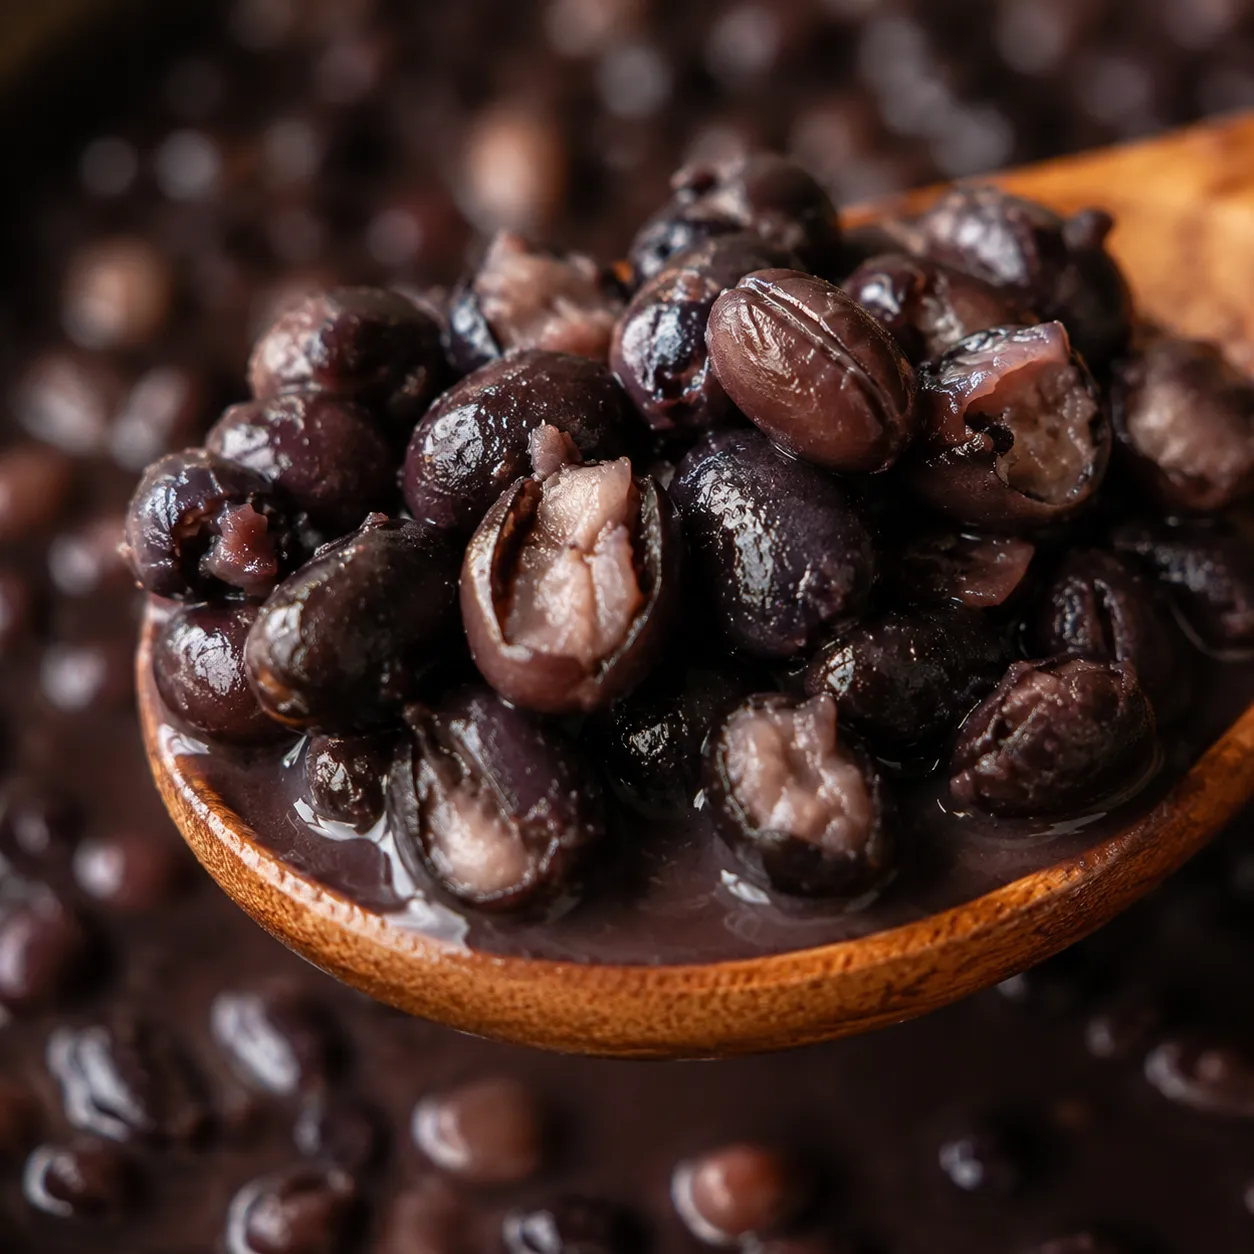
The best instant pot black beans are not just soft; they are creamy, glossy, and suspended in a broth you actually want to eat. The cooking liquid should look dark and slightly thickened, almost like a light bean gravy. If it tastes bland at first, do not panic. Beans need salt, acid, and sometimes a little fat to come fully alive.

Start with the salt amount in the recipe card, then taste again. A squeeze of lime brightens the earthy flavor, while olive oil or butter rounds the edges and gives the pot a richer finish. For a smoky note, stir in a pinch of smoked paprika or a spoonful of adobo sauce from canned chipotles. For a fresher bowl, add chopped cilantro, scallions, diced red onion, or a few spoonfuls of pico de gallo right before serving.
If you want thicker beans, mash about 1 cup of cooked beans against the side of the pot and stir them back in. This naturally thickens the broth without flour or cornstarch. For looser, soupier beans, add a splash of hot water or broth until they are as spoonable as you like. That flexibility is one reason pressure cooker black beans are so handy to keep in the fridge.
The same seasoning logic applies if you branch out to instant pot red beans, pintos, or other pantry staples. Cook them until tender, season after cooking, and let the broth be part of the dish instead of something you drain away. The liquid carries garlic, onion, and bean starch, which means it adds body and flavor wherever the beans go next. Think of it as a built-in sauce, not a byproduct.
A fresh pot of instant pot black beans can turn almost anything into dinner. Spoon them over cilantro-lime rice with salsa, avocado, and crushed tortilla chips for an easy bowl. Fold them into black bean tacos with cabbage, crema, and pickled onions. Or pile them into quesadillas with melty cheese and a little hot sauce for the kind of lunch that feels much more satisfying than the effort required.
They are also a natural fit for soups and stews. Use the beans and their broth as the base for easy black bean soup, then add more stock, tomatoes, spices, and a quick blend for creaminess. Stir them into chili with corn and peppers, or simmer them with sautéed onions and chipotle for a smoky side dish. Because the beans are already seasoned, you get a head start on flavor in every recipe.
For breakfast, warm a scoop in a small skillet and serve with eggs, tortillas, and a shower of cilantro. For snacks, mash a cup with lime juice, cumin, and salt for a quick dip. For dinner prep, portion them alongside rice, roasted vegetables, and grilled chicken or tofu. One pot can quietly carry you through several meals without tasting repetitive.
When you want a thicker, scoopable filling, simmer the beans uncovered until the broth reduces, then lightly mash them. This gives you a texture close to homemade refried beans without starting a separate recipe from scratch. Add a little oil to a skillet, cook the mashed beans until they sizzle and thicken, and you have a deeply comforting spread for tostadas, burritos, or nachos.
These beans are at their best when stored with their broth. The cooking liquid keeps them tender, protects them from drying out, and gives you more options when reheating. If you know you will use the beans in different ways, portion some brothy and some slightly drained. The brothy containers can become soup or bowls, while the less liquid portions are great for tacos and quesadillas.
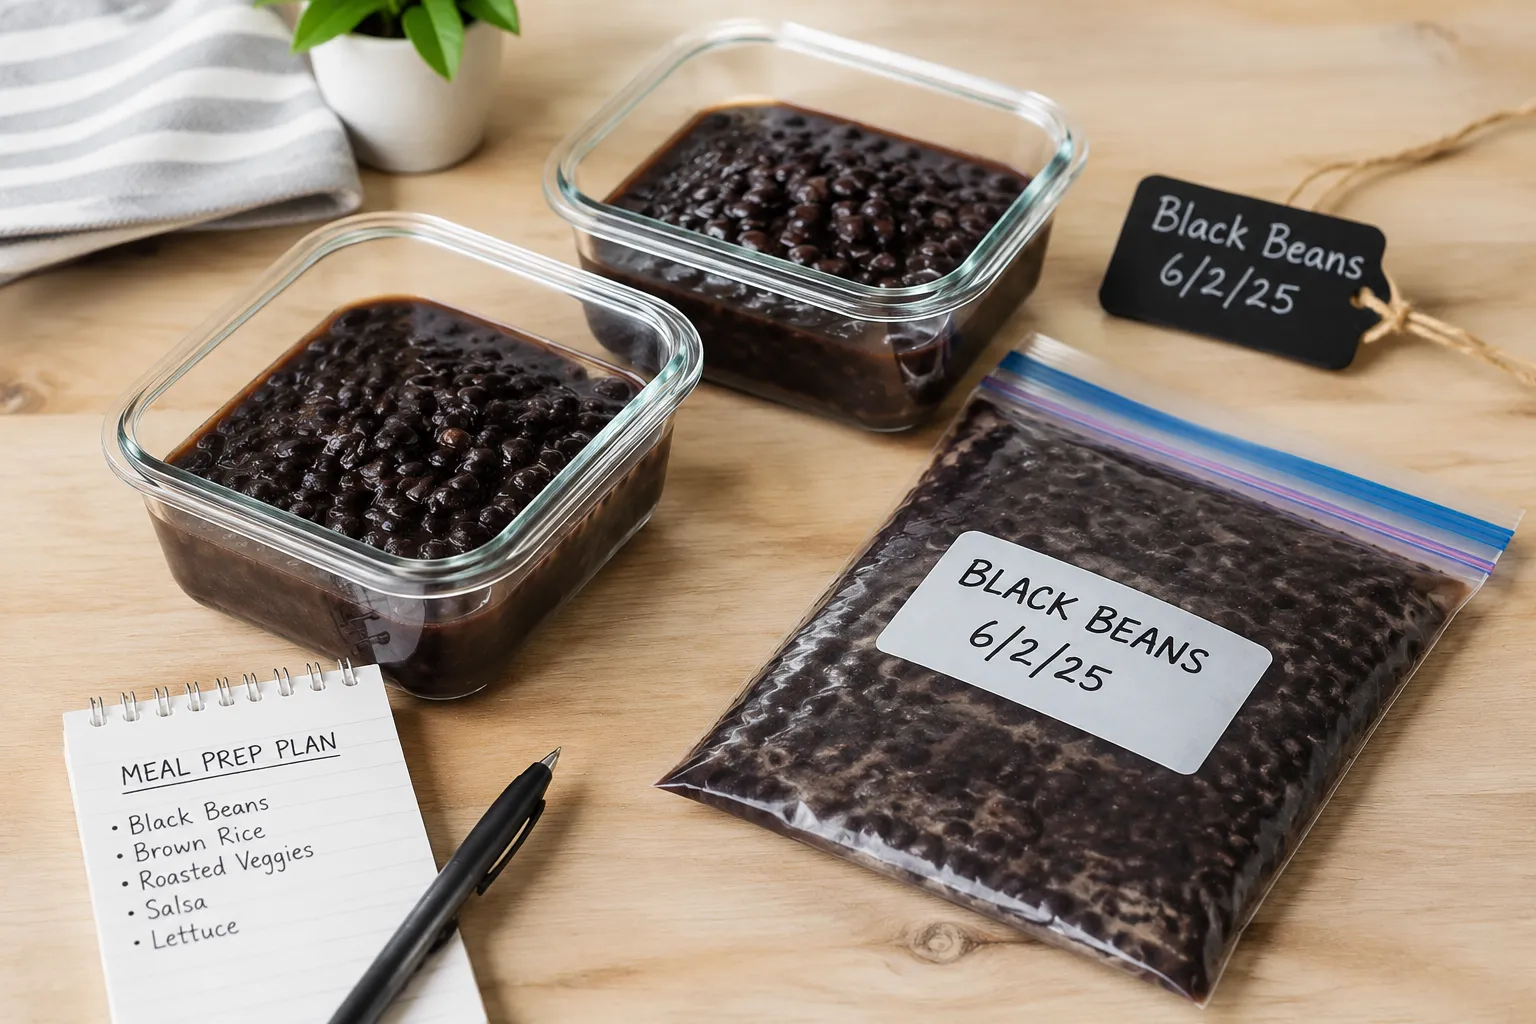
For freezer meals, let the beans cool until they are no longer steaming, then pack them into freezer-safe containers or zip-top bags with enough liquid to cover. Flatten bags for faster freezing and easier stacking. Label them with the date and portion size, because future you will absolutely appreciate that tiny act of organization. A 1 1/2-cup portion is roughly the amount in a standard can of beans, which makes it easy to swap into recipes.
To reheat, warm the beans gently on the stovetop or in the microwave, adding a splash of water or broth as needed. They will thicken as they sit, so a little extra liquid brings them right back. Finish reheated beans with fresh lime, herbs, or a pinch of salt to revive the flavor. This is how a simple pot of instant pot black beans becomes one of the most useful building blocks in the kitchen.
The big promise here is consistency. With 1 pound of dry black beans, 6 cups of liquid, 30 minutes on high pressure, and a full natural pressure release, you get a pot that is tender, flavorful, and ready for real-life meals. There is no soaking calendar to remember and no need to hover over the stove. Just a sturdy, dependable method that turns an inexpensive pantry ingredient into something you will be excited to eat.
Once you make a batch, you will start seeing possibilities everywhere: tucked into breakfast tacos, spooned over baked potatoes, blended into soup, or layered into freezer burritos. The beans are humble, but they make dinner feel grounded and generous. Keep a bag of dry beans in the pantry, and you are never very far from a meal.
This base recipe is intentionally simple so the beans can go in several directions after cooking. Choose a flavor profile before serving, or keep the whole pot mild and season each portion differently throughout the week.
Store cooked black beans in an airtight container in the refrigerator for up to 5 days, covered with their cooking liquid. The liquid keeps the beans plump and makes reheating easier, so avoid draining them before storing unless you have a very specific use in mind.
To freeze, cool completely, portion into freezer-safe containers or bags, and include enough broth to cover the beans. Freeze for up to 3 months. Thaw overnight in the refrigerator, then reheat gently with a splash of water or broth if the beans have thickened.